Alpine INA-W910 Owner's Manual (english) - Page 66
Switching the function of the remote sensor, Setting the Camera Input
 |
View all Alpine INA-W910 manuals
Add to My Manuals
Save this manual to your list of manuals |
Page 66 highlights
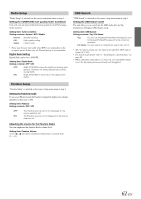
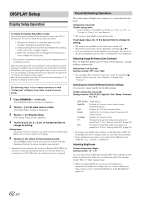
Switching the function of the remote sensor For remote control operation, the remote sensor of the external device (monitor, etc.) can be switched, as you prefer. Setting item: Remote Sensor Setting contents: Front / Rear Front: Rear: The remote sensor of this unit is effective. The remote sensor of the external monitor connected to AUX OUT of this unit becomes effective. The remote control operates the source connected to the AUX OUT terminals. • When an optional DVD changer or DVD player is connected, and the remote control sensor is set to Rear, some soft button operations ( [ ] STOP, etc.) cannot be performed. In this case, set the remote control sensor to Front. Setting the Camera Input With an optional camera connected, video of camera is output to the monitor. Depending on the connected camera, set this item to "Direct" or "RCA". For detailed information of the optional camera, refer to the table on page 66. Setting item: Camera IN Setting contents: OFF / Direct / RCA OFF: Direct: RCA: The Camera mode cannot be used. Use when the optional direct camera is connected. Used when connecting to an optional camera with RCA output connector. • By shifting to reverse (R), the rear pictures are output. This function is effective when the reverse wire is properly connected. After setting this item to Direct or RCA, touch [ ] of Camera IN, the following further setting items can be adjusted. Rear camera guide line display setting You can set whether the rear camera guide line is displayed or not. Further Setting item: Guide Line Setting contents: OFF / ON Adjusting the Rear Camera Guide line You can adjust the rear camera guide line position. Further Setting item: Guide Line Adjustment 1 Touch [ ] of Guide Line Adjustment. The guide line adjustment screen is displayed. 2 Touch the guide pylon you intend to adjust. 3 Touch or [ ] to adjust the position of the guide. After moving the guide, when you touch [ ], the guides in the horizontal row are aligned in a row. 4 After the adjustment is completed, touch [OK]. You can touch [Reset] during adjustment to return to the default adjustment. Selecting the camera Depending on the connected camera, set this item to "Topview", "Front" or "Rear". Setting item: Camera Select Setting contents: Topview*1 / Front / Rear About the setting information of the optional Alpine camera, refer to the table below. Direct Camera RCA Camera*2 Front HCE-C200F *3 - Rear HCE-C300R HCE-C117D HCE-C200R *3 HCE-C115 *1 This setting item is prepared for the Alpine Topview camera. This setting item is displayed only when Camera IN is set to RCA, refer to page 66. *2 Any front or rear camera which has the RCA video output can also be connected to this unit. *3 If both front camera HCE-C200F and rear camera HCE-C200R are connected, please set "Camera IN" to "RCA" and "Camera Select" to "Rear". Turning View Change Function ON/OFF Depending on the connected camera, the view angle of camera may be changed. When a camera with View Change Function is connected, set this item to ON. Setting item: View Change Func.* * Displayed only when Camera IN is set to Direct and the rear camera is selected, refer to page 66. 66-EN
-
 1
1 -
2
-
3
-
4
-
5
-
6
-
7
-
8
-
9
-
10
-
11
-
12
-
13
-
14
-
15
-
16
-
17
-
18
-
19
-
20
-
21
-
22
-
23
-
24
-
25
-
26
-
27
-
28
-
29
-
30
-
31
-
32
-
33
-
34
-
35
-
36
-
37
-
38
-
39
-
40
-
41
-
42
-
43
-
44
-
45
-
46
-
47
-
48
-
49
-
50
-
51
-
52
-
53
-
54
-
55
-
56
-
57
-
58
-
59
-
60
-
 61
61 -
 62
62 -
 63
63 -
 64
64 -
 65
65 -
 66
66 -
 67
67 -
 68
68 -
 69
69 -
 70
70 -
 71
71 -
72
-
73
-
74
-
75
-
76
-
77
-
78
-
79
-
80
-
81
-
82
-
83
-
84
-
85
-
86
-
87
-
88
-
89
-
90
-
91
-
92
-
93
-
94
-
95
-
96
-
97
-
98
-
99
-
100
-
101
-
102
-
103
-
104
-
105
-
106
-
107
-
108
-
109
-
110
-
111
-
112
-
113
-
114
-
115
-
116
-
117
-
118
-
119
-
120
-
121
-
122
-
123
-
124
-
125
-
126
-
127
-
128
-
129
-
130
-
131
 |
 |