Brother International MFC-9970CDW Users Manual - English - Page 66
Storing Speed Dial numbers, b
 |
UPC - 012502625131
View all Brother International MFC-9970CDW manuals
Add to My Manuals
Save this manual to your list of manuals |
Page 66 highlights
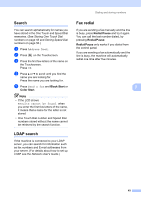
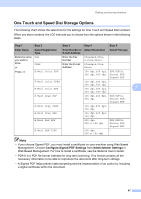
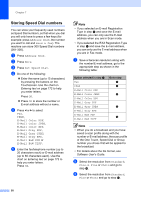
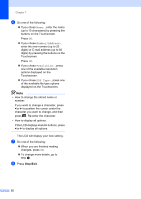
Chapter 7 Storing Speed Dial numbers 7 You can store your frequently used numbers as Speed Dial numbers, so that when you dial you will only have to press a few keys (for example: press Address Book, the number you want to call and Send a fax). The machine can store 300 Speed Dial numbers (001-300). a Press Address Book. b Press More. c Press Set Speed Dial. d Do one of the following: Enter the name (up to 15 characters) by pressing the buttons on the Touchscreen. Use the chart on Entering text on page 172 to help you enter letters. Press OK. Press OK to store the number or E-mail address without a name. e Press d or c to select Fax, IFAX, E-Mail Color PDF, E-Mail Color JPEG, E-Mail Color XPS, E-Mail Gray PDF, E-Mail Gray JPEG, E-Mail Gray XPS, E-Mail B&W PDF or E-Mail B&W TIFF. f Enter the fax/telephone number (up to 20 characters each) or E-mail address (up to 60 characters each). Use the chart on Entering text on page 172 to help you enter letters. Press OK. Note • If you selected an E-mail Registration Type in step e and save the E-mail address, you can only use the E-mail address when you are in Scan mode. • If you selected the IFAX Registration Type in step e and save the E-mail address, you can only use the E-mail address when you are in Fax mode. g Save a fax/scan resolution along with the number/E-mail address, go to the appropriate step as shown in the following table: Option selected in step e Fax IFAX E-Mail Color PDF E-Mail Color JPEG E-Mail Color XPS E-Mail Gray PDF E-Mail Gray JPEG E-Mail Gray XPS E-Mail B&W PDF E-Mail B&W TIFF Go to step h i j k l Note • When you do a broadcast and you have saved a scan profile along with the number or E-mail address, the scan profile of the One Touch, Speed Dial or Group number you chose first will be applied to the broadcast. • For details about the file format, see Software User's Guide. h Select the resolution from Standard, Fine, S.Fine or Photo and go to step n. i Select the resolution from Standard, Fine or Photo and go to step n. 50
-
 1
1 -
2
-
3
-
4
-
5
-
6
-
7
-
8
-
9
-
10
-
11
-
12
-
13
-
14
-
15
-
16
-
17
-
18
-
19
-
20
-
21
-
22
-
23
-
24
-
25
-
26
-
27
-
28
-
29
-
30
-
31
-
32
-
33
-
34
-
35
-
36
-
37
-
38
-
39
-
40
-
41
-
42
-
43
-
44
-
45
-
46
-
47
-
48
-
49
-
50
-
51
-
52
-
53
-
54
-
55
-
56
-
57
-
58
-
59
-
60
-
 61
61 -
 62
62 -
 63
63 -
 64
64 -
 65
65 -
 66
66 -
 67
67 -
 68
68 -
 69
69 -
 70
70 -
 71
71 -
72
-
73
-
74
-
75
-
76
-
77
-
78
-
79
-
80
-
81
-
82
-
83
-
84
-
85
-
86
-
87
-
88
-
89
-
90
-
91
-
92
-
93
-
94
-
95
-
96
-
97
-
98
-
99
-
100
-
101
-
102
-
103
-
104
-
105
-
106
-
107
-
108
-
109
-
110
-
111
-
112
-
113
-
114
-
115
-
116
-
117
-
118
-
119
-
120
-
121
-
122
-
123
-
124
-
125
-
126
-
127
-
128
-
129
-
130
-
131
-
132
-
133
-
134
-
135
-
136
-
137
-
138
-
139
-
140
-
141
-
142
-
143
-
144
-
145
-
146
-
147
-
148
-
149
-
150
-
151
-
152
-
153
-
154
-
155
-
156
-
157
-
158
-
159
-
160
-
161
-
162
-
163
-
164
-
165
-
166
-
167
-
168
-
169
-
170
-
171
-
172
-
173
-
174
-
175
-
176
-
177
-
178
-
179
-
180
-
181
-
182
-
183
-
184
-
185
-
186
-
187
-
188
-
189
-
190
-
191
-
192
-
193
-
194
-
195
-
196
-
197
-
198
-
199
-
200
-
201
-
202
-
203
-
204
-
205
-
206
-
207
-
208
-
209
-
210
 |
 |