Canon MultiPASS F80 MultiPASS F80 Basic Guide - Page 51
Faxing with your machine
 |
View all Canon MultiPASS F80 manuals
Add to My Manuals
Save this manual to your list of manuals |
Page 51 highlights
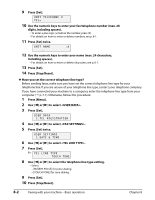
Chapter Fax Model 8 Faxing with your machine Basic operation Sending faxes from your machine Before sending faxes Before sending faxes from your machine, check the following: Does the document you want to send meet the requirements for loading on the platen glass or ADF? For details, see p. 2-1. Have you entered the sender information? Before sending faxes, you must register the date and time, your name and fax/telephone number so that they are printed at the top of faxes you send. For more details on what sender information is, see the Comprehensive Guide. If you have connected your machine to a computer, enter the sender information from your 8 Faxing with your machine-Basic operation computer ( p. 7-1). Otherwise, follow this procedure: 1 Press [Menu]. 2 Use [2] or [3] to select . 3 Press [Set]. Use the numeric keys to enter characters: Key Letters Number USER DATA 1.TEL REGISTRATION [1] 1 [2] ABCabc 2 4 Use [2] or [3] to select . 5 Press [Set] three times. [3] DEFdef 3 [4] GHIghi 4 [5] JKLjkl 5 DATE & TIME 12/03/2002 15:10 [6] MNOmno 6 [7] PQRSpqrs 7 6 Use the numeric keys to enter the date (month/day/year) and time (in 24-hour format). • Enter only the last two digits of the year. 7 Press [Set]. [8] TUVtuv 8 [9] WXYZwxyz 9 [0] 0 [#] -.A [T] Switches between letter and number mode. USER SETTINGS 2.DATE SETUP • To enter a space: Press [3]. • To delete a character: Press [2]. 8 Use [2] or [3] to select . • To delete an entire entry: Press and hold [2]. Chapter 8 Faxing with your machine-Basic operation 8-1
-
 1
1 -
2
-
3
-
4
-
5
-
6
-
7
-
8
-
9
-
10
-
11
-
12
-
13
-
14
-
15
-
16
-
17
-
18
-
19
-
20
-
21
-
22
-
23
-
24
-
25
-
26
-
27
-
28
-
29
-
30
-
31
-
32
-
33
-
34
-
35
-
36
-
37
-
38
-
39
-
40
-
41
-
42
-
43
-
44
-
45
-
 46
46 -
 47
47 -
 48
48 -
 49
49 -
 50
50 -
 51
51 -
 52
52 -
 53
53 -
 54
54 -
 55
55 -
 56
56 -
57
-
58
-
59
-
60
-
61
-
62
-
63
-
64
-
65
-
66
-
67
-
68
-
69
-
70
-
71
-
72
-
73
-
74
-
75
-
76
-
77
-
78
-
79
-
80
-
81
-
82
-
83
-
84
-
85
-
86
-
87
-
88
-
89
-
90
-
91
-
92
-
93
-
94
-
95
-
96
-
97
-
98
-
99
-
100
-
101
-
102
-
103
-
104
-
105
-
106
-
107
-
108
-
109
-
110
-
111
-
112
-
113
-
114
-
115
 |
 |