Canon MultiPASS F80 MultiPASS F80 Basic Guide - Page 60
Customizing Toolbar buttons
 |
View all Canon MultiPASS F80 manuals
Add to My Manuals
Save this manual to your list of manuals |
Page 60 highlights
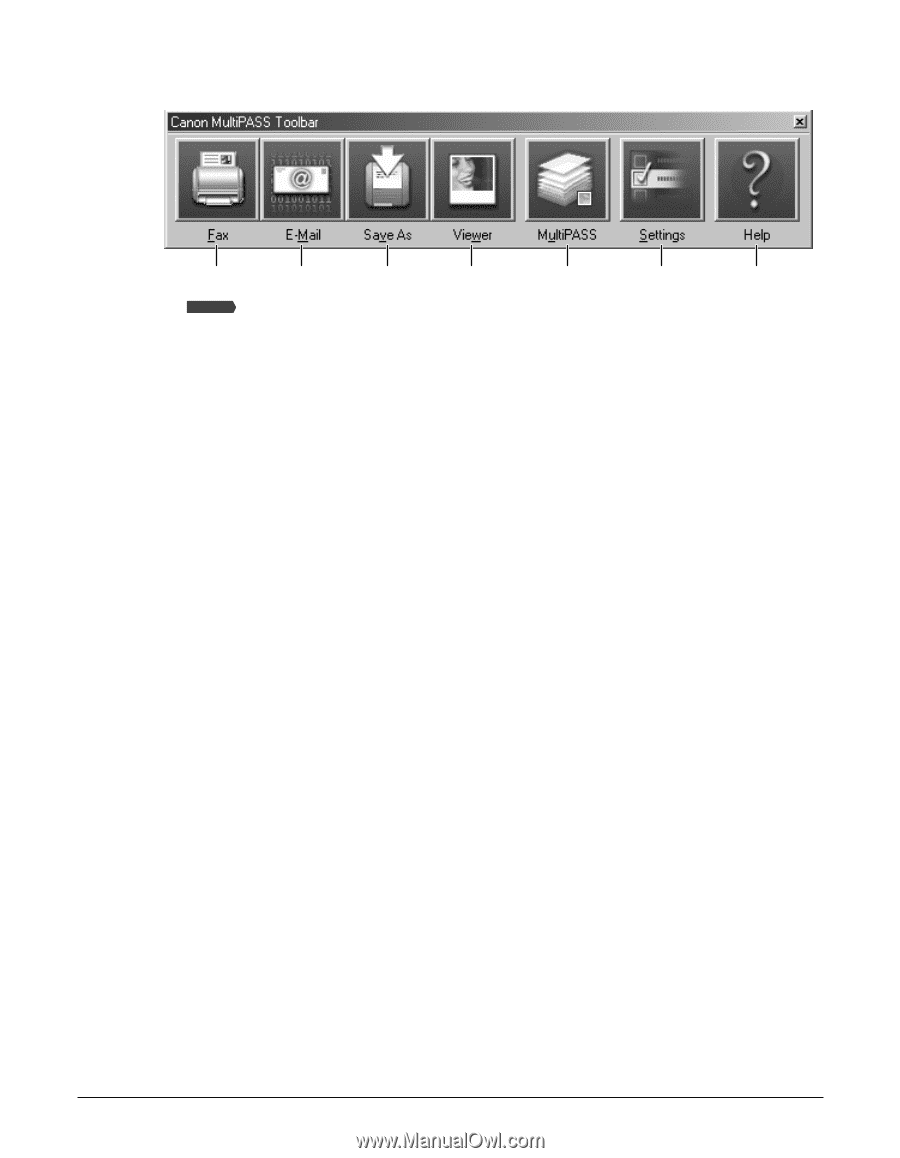
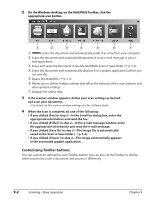
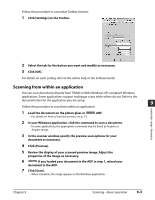
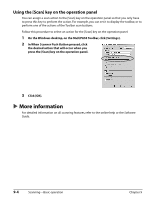
2 On the Windows desktop, on the MultiPASS Toolbar, click the appropriate scan button. q w e r t y u q Fax Model Scans the document and automatically sends it as a fax from your computer. w Scans the document and automatically attaches it to an e-mail message in your e- mail application. e Scans and saves the document in the My MultiPASS Scan to Save folder ( p. 3-3). r Scans the document and automatically displays it in a graphic application (which you can specify). t Opens My MultiPASS ( p. 3-3). y Allows you to define Toolbar settings that affect the behavior of the scan buttons and other general settings. u Displays the online help. 3 If the scanner window appears, define your scan settings as desired and scan your document. • For details on the scanner window settings, see the Software Guide. 4 When the scan is complete, do one of the following: • If you clicked [Fax] in step 2-In the Send Fax dialog box, enter the appropriate information and send the fax. • If you clicked [E-Mail] in step 2-In the e-mail message window, enter the appropriate information and send the e-mail message. • If you clicked [Save As] in step 2-The image file is automatically saved in the Scan to Save folder ( p. 3-3). • If you clicked [Viewer] in step 2-The image automatically appears in the associated graphic application. Customizing Toolbar buttons You can customize settings for each Toolbar button. You can also set the Toolbar to display other buttons that scan a document and process it differently. 9-2 Scanning-Basic operation Chapter 9
-
 1
1 -
2
-
3
-
4
-
5
-
6
-
7
-
8
-
9
-
10
-
11
-
12
-
13
-
14
-
15
-
16
-
17
-
18
-
19
-
20
-
21
-
22
-
23
-
24
-
25
-
26
-
27
-
28
-
29
-
30
-
31
-
32
-
33
-
34
-
35
-
36
-
37
-
38
-
39
-
40
-
41
-
42
-
43
-
44
-
45
-
46
-
47
-
48
-
49
-
50
-
51
-
52
-
53
-
54
-
 55
55 -
 56
56 -
 57
57 -
 58
58 -
 59
59 -
 60
60 -
 61
61 -
 62
62 -
 63
63 -
 64
64 -
 65
65 -
66
-
67
-
68
-
69
-
70
-
71
-
72
-
73
-
74
-
75
-
76
-
77
-
78
-
79
-
80
-
81
-
82
-
83
-
84
-
85
-
86
-
87
-
88
-
89
-
90
-
91
-
92
-
93
-
94
-
95
-
96
-
97
-
98
-
99
-
100
-
101
-
102
-
103
-
104
-
105
-
106
-
107
-
108
-
109
-
110
-
111
-
112
-
113
-
114
-
115
 |
 |