HP D5970A HP Netserver LXr 8000 to LXr 8500 Upgrade Guide - Page 25
Disassembling the LXr 8000
 |
View all HP D5970A manuals
Add to My Manuals
Save this manual to your list of manuals |
Page 25 highlights
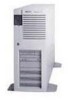
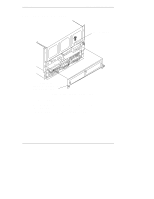
3 Disassembling the LXr 8000 This chapter describes how to complete the following steps to disassemble the LXr 8000. • Disconnect cables, remove power supplies, and extend rack. • Remove bezel, control panel, and covers. • Remove memory boards. • Remove fans and fan cage. • Remove processor tray. • Remove I/O tray. • Remove midplane board and center support. l Apply gaskets to chassis. CAUTION Do not proceed until you have followed the instructions in Chapter 2 to back up your data. Disconnect Cables, Remove Power Supplies, and Extend Rack CAUTION Put on the anti-static wrist strap and place an anti-static mat on a firm surface near the system. Connect the strap and mat to an unpainted metal surface on the system chassis. 1. If you have not already done so, close all applications, log off all users, and shut down the operating system. 2. Turn off the NetServer and monitor. 3. If necessary, label all external cables before you disconnect them. 4. Disconnect all telephone cables and power cables. 5. Disconnect all external cables such as the keyboard, mouse, monitor, LAN, SCSI, and so on. All cables will be reused in NetServer LXr 8500. 19
-
 1
1 -
2
-
3
-
4
-
5
-
6
-
7
-
8
-
9
-
10
-
11
-
12
-
13
-
14
-
15
-
16
-
17
-
18
-
19
-
 20
20 -
 21
21 -
 22
22 -
 23
23 -
 24
24 -
 25
25 -
 26
26 -
 27
27 -
 28
28 -
 29
29 -
 30
30 -
31
-
32
-
33
-
34
-
35
-
36
-
37
-
38
-
39
-
40
-
41
-
42
-
43
-
44
-
45
-
46
-
47
-
48
-
49
-
50
-
51
-
52
-
53
-
54
-
55
-
56
-
57
-
58
-
59
-
60
-
61
-
62
-
63
-
64
-
65
-
66
-
67
-
68
-
69
-
70
-
71
-
72
-
73
-
74
-
75
-
76
-
77
-
78
-
79
-
80
-
81
-
82
-
83
-
84
-
85
-
86
-
87
-
88
-
89
-
90
-
91
-
92
-
93
-
94
-
95
-
96
-
97
 |
 |
