HP D5970A HP Netserver LXr 8000 to LXr 8500 Upgrade Guide - Page 27
Remove Bezel, Control Panel, & Covers
 |
View all HP D5970A manuals
Add to My Manuals
Save this manual to your list of manuals |
Page 27 highlights
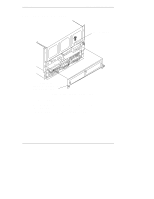
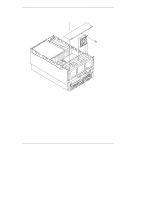
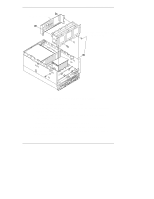
Chapter 3 Disassembling the LXr 8000 Remove Bezel, Control Panel, & Covers 10. Remove control panel. 9. Unscrew front bezel hinge. 8. Remove front bezel. Figure 3-2. Remove Bezel, Bezel Hinge, and Control Panel 8. Remove the front bezel from the NetServer. Pull it straight out off the chassis. (See Figure 3-2.) Place the front bezel on the table of items that will not be reused in the NetServer LXr 8500. 9. Detach the front bezel hinge from the chassis. Insert the Torx® driver through the hinge to remove all three screws. (See Figure 3-2.) Place the front bezel hinge on the table if items that will not be reused. You received a new front bezel hinge in the upgrade kit. 10. Remove the plastic control panel by depressing the two latches located on either end of the control panel. (See Figure 3-2.) This item will be reused in the NetServer LXr 8500. 21
-
 1
1 -
2
-
3
-
4
-
5
-
6
-
7
-
8
-
9
-
10
-
11
-
12
-
13
-
14
-
15
-
16
-
17
-
18
-
19
-
20
-
21
-
 22
22 -
 23
23 -
 24
24 -
 25
25 -
 26
26 -
 27
27 -
 28
28 -
 29
29 -
 30
30 -
 31
31 -
 32
32 -
33
-
34
-
35
-
36
-
37
-
38
-
39
-
40
-
41
-
42
-
43
-
44
-
45
-
46
-
47
-
48
-
49
-
50
-
51
-
52
-
53
-
54
-
55
-
56
-
57
-
58
-
59
-
60
-
61
-
62
-
63
-
64
-
65
-
66
-
67
-
68
-
69
-
70
-
71
-
72
-
73
-
74
-
75
-
76
-
77
-
78
-
79
-
80
-
81
-
82
-
83
-
84
-
85
-
86
-
87
-
88
-
89
-
90
-
91
-
92
-
93
-
94
-
95
-
96
-
97
 |
 |
