HP D5970A HP Netserver LXr 8000 to LXr 8500 Upgrade Guide - Page 43
LXr 8000 Processor Cage
 |
View all HP D5970A manuals
Add to My Manuals
Save this manual to your list of manuals |
Page 43 highlights
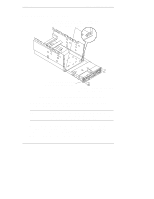
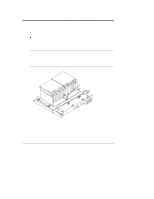
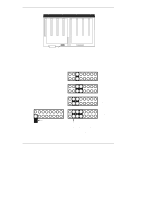
Chapter 4 Preparing to Assemble the LXr 8500 Remove just one processor from the LXr 8000, turn it 180 degrees, and insert it in the LXr 8500. (Later you will move the remaining processors.) LXr 8000 Processor Cage LXr 8500 Processor Cage Figure 4-2. Install One Processor in the LXr 8500 5. Replace each processor cage cover. Insert the tabs on the back of the cover into the matching slots on the rim of the cage. Lower the cover into place and fasten the captive screws. 37
-
 1
1 -
2
-
3
-
4
-
5
-
6
-
7
-
8
-
9
-
10
-
11
-
12
-
13
-
14
-
15
-
16
-
17
-
18
-
19
-
20
-
21
-
22
-
23
-
24
-
25
-
26
-
27
-
28
-
29
-
30
-
31
-
32
-
33
-
34
-
35
-
36
-
37
-
 38
38 -
 39
39 -
 40
40 -
 41
41 -
 42
42 -
 43
43 -
 44
44 -
 45
45 -
 46
46 -
 47
47 -
 48
48 -
49
-
50
-
51
-
52
-
53
-
54
-
55
-
56
-
57
-
58
-
59
-
60
-
61
-
62
-
63
-
64
-
65
-
66
-
67
-
68
-
69
-
70
-
71
-
72
-
73
-
74
-
75
-
76
-
77
-
78
-
79
-
80
-
81
-
82
-
83
-
84
-
85
-
86
-
87
-
88
-
89
-
90
-
91
-
92
-
93
-
94
-
95
-
96
-
97
 |
 |

Chapter 4
Preparing to Assemble the LXr 8500
37
LXr 8500 Processor Cage
Remove just
processor from the LXr 8000,
turn it 180 degrees, and insert it in the LXr 8500.
(Later you will move the remaining processors.)
one
LXr 8000 Processor Cage
Figure 4-2. Install One Processor in the LXr 8500
5.
Replace each processor cage cover. Insert the tabs on the back of the cover
into the matching slots on the rim of the cage. Lower the cover into place
and fasten the captive screws.