HP D5970A HP Netserver LXr 8000 to LXr 8500 Upgrade Guide - Page 68
Slide each power supply module into place, and press each lever into the upright position.
 |
View all HP D5970A manuals
Add to My Manuals
Save this manual to your list of manuals |
Page 68 highlights
Chapter 5 Assembling the LXr 8500 25. Slide each power supply module into place and press each lever into the upright position. Figure 5-21. Install All Three Power Supply Modules 26. Reconnect the power, monitor, keyboard, and mouse cables. Once power is connected, but not turned on, the LCD will be lit. In the next chapter, you will perform a preliminary hardware verification. Do not install all of your accessory boards into the I/O tray at the point. 62
-
 1
1 -
2
-
3
-
4
-
5
-
6
-
7
-
8
-
9
-
10
-
11
-
12
-
13
-
14
-
15
-
16
-
17
-
18
-
19
-
20
-
21
-
22
-
23
-
24
-
25
-
26
-
27
-
28
-
29
-
30
-
31
-
32
-
33
-
34
-
35
-
36
-
37
-
38
-
39
-
40
-
41
-
42
-
43
-
44
-
45
-
46
-
47
-
48
-
49
-
50
-
51
-
52
-
53
-
54
-
55
-
56
-
57
-
58
-
59
-
60
-
61
-
62
-
 63
63 -
 64
64 -
 65
65 -
 66
66 -
 67
67 -
 68
68 -
 69
69 -
 70
70 -
 71
71 -
 72
72 -
 73
73 -
74
-
75
-
76
-
77
-
78
-
79
-
80
-
81
-
82
-
83
-
84
-
85
-
86
-
87
-
88
-
89
-
90
-
91
-
92
-
93
-
94
-
95
-
96
-
97
 |
 |

Chapter 5
Assembling the LXr 8500
62
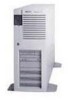
25. Slide each power supply module into place
and press each lever into the upright position.
Figure 5-21. Install All Three Power Supply Modules
26.
Reconnect the power, monitor, keyboard, and mouse cables.
Once power is connected, but not turned on, the LCD will be lit.
In the next chapter, you will perform a preliminary hardware verification. Do
not
install all of your accessory boards into the I/O tray at the point.