Canon imageCLASS MF5770 imageCLASS MF5750/MF5770 Facsimile Guide - Page 46
After you have specified all of the destinations, press [Start]., To use directory dialing
 |
View all Canon imageCLASS MF5770 manuals
Add to My Manuals
Save this manual to your list of manuals |
Page 46 highlights
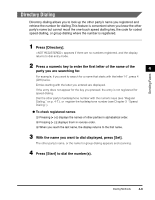
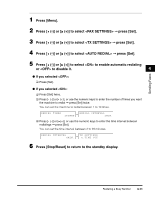
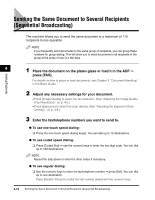
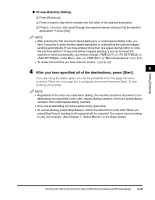
● To use directory dialing: ❑ Press [Directory]. ❑ Press a numeric key which contains the first letter of the desired destination. ❑ Press [ (-)] or [ (+)] to scroll through the required names until you find the desired destination ➞ press [Set]. NOTE • After entering the first one-touch speed dialing key or coded speed dialing code, you have 5 seconds to enter another speed dialing key or code before the machine begins sending automatically. If you have entered more than one speed dialing button or code, the machine waits for 10 seconds before it begins sending. If you do not want the machine to send automatically, you need to change in in of the Menu. (See of "Menu Descriptions," on p. 8-4.) • To review the numbers you have entered, press [ (-)] or [ (+)]. 4 After you have specified all of the destinations, press [Start]. 4 If you are using the platen glass, you will be prompted when the page has been scanned. Place the next page (for a multipage document) ➞ press [Start]. To start sending, press [Set]. NOTE • Regardless of the order you used when dialing, the machine sends the document to the destinations you specified in this order: regular dialing numbers, one-touch speed dialing numbers, then coded speed dialing numbers. • Only one broadcasting job will be active at any given time. • To cancel sending, press [Stop/Reset] ➞ follow the instructions in the LCD. When you press [Stop/Reset], sending to all recipients will be canceled. You cannot cancel sending to only one recipient. (See Chapter 7, "Status Monitor," in the Basic Guide.) Sending Faxes Sending the Same Document to Several Recipients (Sequential Broadcasting) 4-13
-
 1
1 -
2
-
3
-
4
-
5
-
6
-
7
-
8
-
9
-
10
-
11
-
12
-
13
-
14
-
15
-
16
-
17
-
18
-
19
-
20
-
21
-
22
-
23
-
24
-
25
-
26
-
27
-
28
-
29
-
30
-
31
-
32
-
33
-
34
-
35
-
36
-
37
-
38
-
39
-
40
-
 41
41 -
 42
42 -
 43
43 -
 44
44 -
 45
45 -
 46
46 -
 47
47 -
 48
48 -
 49
49 -
 50
50 -
 51
51 -
52
-
53
-
54
-
55
-
56
-
57
-
58
-
59
-
60
-
61
-
62
-
63
-
64
-
65
-
66
-
67
-
68
-
69
-
70
-
71
-
72
-
73
-
74
-
75
-
76
-
77
-
78
-
79
-
80
-
81
-
82
-
83
-
84
-
85
-
86
-
87
-
88
-
89
-
90
-
91
-
92
-
93
-
94
-
95
 |
 |