Dell C3760DN Color Laser User Manual - Page 248
Printing from USB Memory
 |
View all Dell C3760DN Color Laser manuals
Add to My Manuals
Save this manual to your list of manuals |
Page 248 highlights
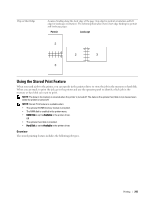
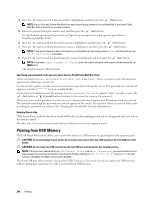
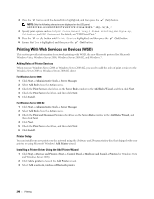
4 Press the button until the desired user ID is highlighted, and then press the (Set) button. NOTE: Secure Print and Private Mail Box Print require specifying a password for confidentiality. If you select Public Mail Box Print or Proof Print, proceed to step 6. 5 Enter the password using the number pad, and then press the (Set) button. For details about specifying the password, see "Specifying your password on the operator panel (Secure Print/Private Mail Box Print)." 6 Press the button until the desired document is highlighted, and then press the (Set) button. 7 Press the button until the desired print menu is highlighted, and then press the (Set) button. NOTE: If you want to keep the data in the memory or hard disk for the time being, select Print. For Secure Print, only Print and Delete is available. 8 Press the button until the desired quantity menu is highlighted, and then press the (Set) button. NOTE: If you select Input Number of Copies, enter the number using the number pad, and then press the (Set) button. The stored document will be printed. Specifying your password on the operator panel (Secure Print/Private Mail Box Print) When you select Secure Print or Private Mail Box from Print Menu, a screen to enter the password appears after selecting your user ID. Use the number pad to enter the numeric password you specified in the printer driver. The password you entered will appear as asterisks (*******) to ensure confidentiality. If you enter an invalid password, the message Wrong Password Re-enter appears. Wait 3 seconds, or press the (Set) button or (Cancel) button to return to the screen for entering the password. When you enter a valid password, you have access to all print jobs matching the user ID and password you entered. The print jobs matching the password you entered appear on the screen. You can then choose to print or delete jobs matching the password you entered. (See "Printing the Stored Jobs" for more information.) Deleting Stored Jobs With Secure Print, a job that has been stored will be deleted after printing or deleted at a designated time entered on the operator panel. For other jobs, these jobs remain stored until you delete them from the operator panel. Printing from USB Memory The USB Direct Print feature allows you to print files stored in a USB memory by operating from the operator panel. CAUTION: To prevent damage to your printer, do not connect any device other than USB memory to the front USB port of the printer. CAUTION: Do not remove the USB memory from the front USB port until the printer has finished printing. NOTE: If the Function Enabled setting for USB Direct Print is set to On (Password), you need to enter the four digit password to use the print function. If the Function Enabled setting for USB Direct Print is set to Off, the print function is disabled. For details, see "Function Enabled." The front USB port of the printer is designed for USB 2.0 devices. You must use only an authorized USB memory with an A plug type connector. Use only a metal shielded USB memory. 246 Printing
-
 1
1 -
2
-
3
-
4
-
5
-
6
-
7
-
8
-
9
-
10
-
11
-
12
-
13
-
14
-
15
-
16
-
17
-
18
-
19
-
20
-
21
-
22
-
23
-
24
-
25
-
26
-
27
-
28
-
29
-
30
-
31
-
32
-
33
-
34
-
35
-
36
-
37
-
38
-
39
-
40
-
41
-
42
-
43
-
44
-
45
-
46
-
47
-
48
-
49
-
50
-
51
-
52
-
53
-
54
-
55
-
56
-
57
-
58
-
59
-
60
-
61
-
62
-
63
-
64
-
65
-
66
-
67
-
68
-
69
-
70
-
71
-
72
-
73
-
74
-
75
-
76
-
77
-
78
-
79
-
80
-
81
-
82
-
83
-
84
-
85
-
86
-
87
-
88
-
89
-
90
-
91
-
92
-
93
-
94
-
95
-
96
-
97
-
98
-
99
-
100
-
101
-
102
-
103
-
104
-
105
-
106
-
107
-
108
-
109
-
110
-
111
-
112
-
113
-
114
-
115
-
116
-
117
-
118
-
119
-
120
-
121
-
122
-
123
-
124
-
125
-
126
-
127
-
128
-
129
-
130
-
131
-
132
-
133
-
134
-
135
-
136
-
137
-
138
-
139
-
140
-
141
-
142
-
143
-
144
-
145
-
146
-
147
-
148
-
149
-
150
-
151
-
152
-
153
-
154
-
155
-
156
-
157
-
158
-
159
-
160
-
161
-
162
-
163
-
164
-
165
-
166
-
167
-
168
-
169
-
170
-
171
-
172
-
173
-
174
-
175
-
176
-
177
-
178
-
179
-
180
-
181
-
182
-
183
-
184
-
185
-
186
-
187
-
188
-
189
-
190
-
191
-
192
-
193
-
194
-
195
-
196
-
197
-
198
-
199
-
200
-
201
-
202
-
203
-
204
-
205
-
206
-
207
-
208
-
209
-
210
-
211
-
212
-
213
-
214
-
215
-
216
-
217
-
218
-
219
-
220
-
221
-
222
-
223
-
224
-
225
-
226
-
227
-
228
-
229
-
230
-
231
-
232
-
233
-
234
-
235
-
236
-
237
-
238
-
239
-
240
-
241
-
242
-
 243
243 -
 244
244 -
 245
245 -
 246
246 -
 247
247 -
 248
248 -
 249
249 -
 250
250 -
 251
251 -
 252
252 -
 253
253 -
254
-
255
-
256
-
257
-
258
-
259
-
260
-
261
-
262
-
263
-
264
-
265
-
266
-
267
-
268
-
269
-
270
-
271
-
272
-
273
-
274
-
275
-
276
-
277
-
278
-
279
-
280
-
281
-
282
-
283
-
284
-
285
-
286
-
287
-
288
-
289
-
290
-
291
-
292
-
293
-
294
-
295
-
296
-
297
-
298
-
299
-
300
-
301
-
302
-
303
-
304
-
305
-
306
-
307
-
308
-
309
-
310
-
311
-
312
-
313
-
314
-
315
-
316
-
317
-
318
-
319
-
320
-
321
-
322
-
323
-
324
-
325
-
326
-
327
-
328
-
329
-
330
-
331
-
332
-
333
-
334
-
335
-
336
-
337
-
338
-
339
-
340
-
341
-
342
-
343
-
344
-
345
-
346
-
347
-
348
-
349
-
350
-
351
-
352
-
353
-
354
-
355
-
356
-
357
-
358
-
359
-
360
-
361
-
362
-
363
-
364
-
365
-
366
-
367
-
368
-
369
-
370
-
371
-
372
-
373
-
374
-
375
-
376
-
377
-
378
-
379
-
380
-
381
-
382
-
383
-
384
-
385
-
386
-
387
-
388
-
389
-
390
-
391
-
392
-
393
-
394
-
395
-
396
-
397
-
398
-
399
-
400
 |
 |