| Section |
Page |
| Dell™ C3760n/C3760dn Color Laser Printer |
1 |
| Contents |
3 |
| Before Beginning |
17 |
| Notes, Cautions, and Warnings |
19 |
| Dell™ C3760n/C3760dn Color Laser Printer User's Guide |
21 |
| Conventions |
21 |
| Finding Information |
23 |
| Product Features |
27 |
| About the Printer |
29 |
| Front and Rear View |
29 |
| Front View |
29 |
| Rear View |
30 |
| Space Requirements |
31 |
| Operator Panel |
31 |
| Additional Components |
32 |
| Optional Accessories |
32 |
| Non-bundled Items |
32 |
| Securing the Printer |
32 |
| Ordering Supplies |
33 |
| Setting up the Printer (Printer Setup) |
35 |
| Preparing Printer Hardware |
37 |
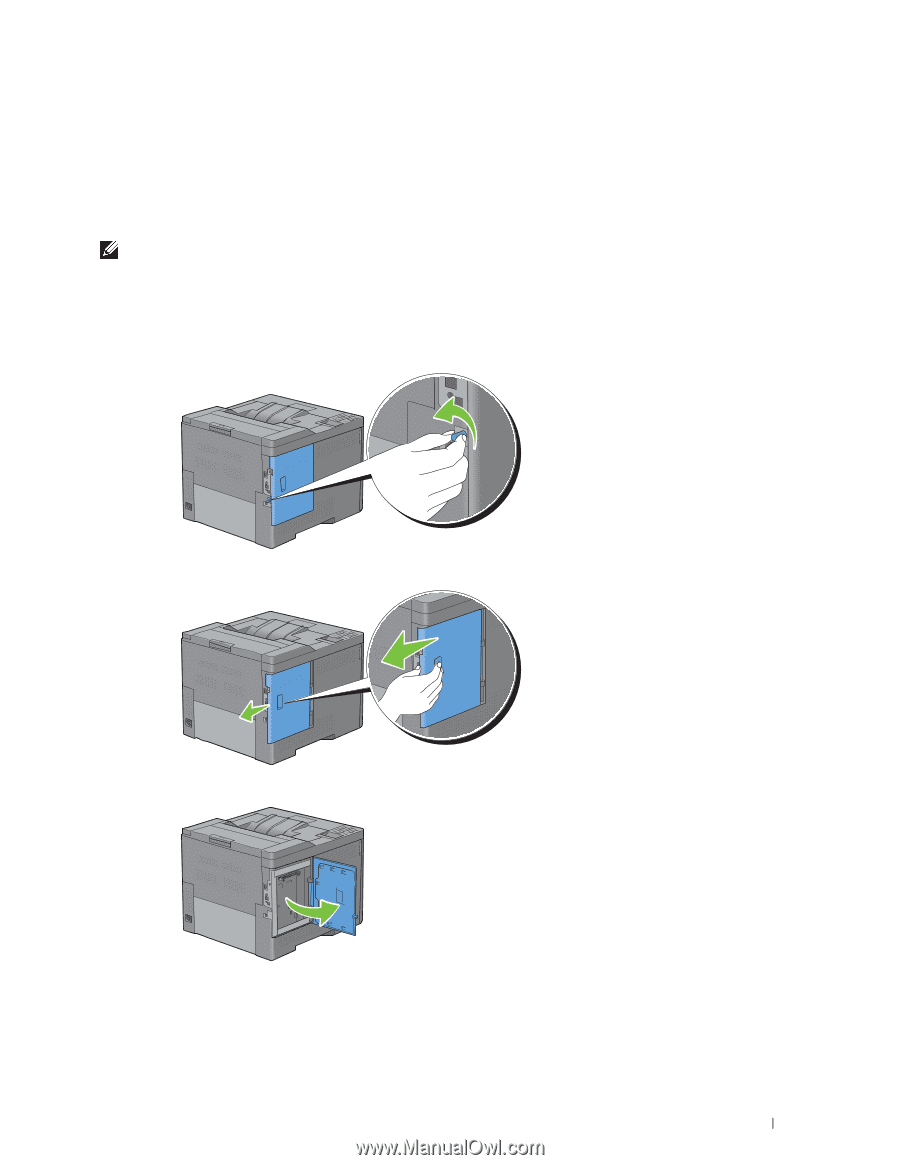
| Removing Tape |
37 |
| Installing Optional Accessories |
39 |
| Installing the Optional Memory Module |
39 |
| Updating Your Driver to Detect Memory Module |
41 |
| Installing the Optional 550-Sheet Feeder |
44 |
| Updating Your Driver to Detect 550-Sheet Feeder |
46 |
| Installing the Optional Wireless Adapter |
48 |
| Verifying the Contents of the Box |
49 |
| Installing the Wireless Adapter Using Video Instructions (Recommended) |
49 |
| Installing the Optional Wireless Adapter |
50 |
| Determining the Wireless Network Settings |
51 |
| Configuring the Optional Wireless Adapter |
52 |
| Using Wizard Setup to Configure a Wireless Adapter |
52 |
| Using Advanced Setup to Configure a Wireless Adapter |
54 |
| Reconfiguring the Wireless Setting |
58 |
| Installing the Optional Hard Disk |
59 |
| Updating Your Driver to Detect Hard Disk |
61 |
| Connecting Your Printer |
65 |
| Connecting Printer to Computer or Network |
66 |
| Direct Connection |
66 |
| Network Connection |
67 |
| Turning on the Printer |
68 |
| Setting Initial Settings on the Operator Panel |
68 |
| Setting the IP Address |
71 |
| Assigning an IP Address |
71 |
| When Using the Easy Setup Navigator |
71 |
| When Using the Operator Panel |
71 |
| When Using the Tool Box |
72 |
| Verifying the IP Settings |
73 |
| Verifying the Settings Using Operator Panel |
73 |
| Verifying the Settings Using Printer Settings Report |
73 |
| Verifying the Settings Using Ping Command |
73 |
| Loading Paper |
75 |
| Installing Printer Drivers on Windows® Computers |
79 |
| Identifying Printer Driver Pre-install Status |
79 |
| Inserting the Software and Documentation Disc |
79 |
| Direct Connection Setup |
79 |
| Network Connection Setup |
82 |
| Network Printer Setup on a Local Network |
82 |
| Network Printer Setup on a Remote Network |
86 |
| Setting Up for Shared Printing |
91 |
| Specifying the Shared Settings of the Printer |
91 |
| Point and Print |
92 |
| Peer-to-Peer |
95 |
| Installing Printer Drivers on Macintosh Computers |
99 |
| Installing the Drivers and Software |
99 |
| Adding a Printer on Mac OS X 10.5, 10.6, or 10.7 |
99 |
| Adding a Printer on Mac OS X 10.4.11 |
100 |
| Adding a Printer on Mac OS X 10.3.9 |
101 |
| Configuring Settings |
103 |
| Installing Printer Drivers on Linux Computers (CUPS) |
105 |
| Operation on Red Hat Enterprise Linux 5/6 Desktop |
105 |
| Setup Overview |
105 |
| Installing the Printer Driver |
105 |
| Setting Up the Queue |
105 |
| Setting the Default Queue |
106 |
| Specifying the Printing Options |
107 |
| Uninstalling the Printer Driver |
107 |
| Operation on SUSE Linux Enterprise Desktop 10 |
108 |
| Setup Overview |
108 |
| Installing the Printer Driver |
108 |
| Setting Up the Queue |
108 |
| Setting the Default Queue |
109 |
| Specifying the Printing Options |
109 |
| Setting the Password for Authority as the Printer Administrator |
110 |
| Uninstalling the Printer Driver |
110 |
| Operation on SUSE Linux Enterprise Desktop 11 |
110 |
| Setup Overview |
110 |
| Installing the Printer Driver |
111 |
| Setting Up the Queue |
111 |
| Setting the Default Queue |
112 |
| Specifying the Printing Options |
112 |
| Setting the Password for Authority as the Printer Administrator |
113 |
| Uninstalling the Printer Driver |
113 |
| Using Your Printer |
115 |
| Operator Panel |
117 |
| About the Operator Panel |
117 |
| Using the Number Pad |
118 |
| Number Pad Letters and Numbers |
118 |
| Changing Numbers or Names |
118 |
| Printing a Panel Settings Report |
119 |
| Changing the Language |
119 |
| When Using the Operator Panel |
119 |
| When Using the Tool Box |
119 |
| Setting the Power Saver Timer Option |
119 |
| Dell™ Printer Configuration Web Tool |
121 |
| Overview |
121 |
| Setting Up the Dell Printer Configuration Web Tool |
122 |
| Setting Up From Web Browser |
122 |
| Setting Up From Operator Panel |
123 |
| Starting the Dell Printer Configuration Web Tool |
124 |
| Overview of the Menu Items |
124 |
| Printer Status |
124 |
| Printer Jobs |
124 |
| Printer Settings |
124 |
| Print Server Settings |
124 |
| Copy Printer Settings |
125 |
| Print Volume |
125 |
| Printer Information |
125 |
| Tray Settings |
125 |
| E-Mail Alert |
125 |
| Set Password |
125 |
| Online Help |
125 |
| Order Supplies at: |
125 |
| Contact Dell Support at: |
125 |
| Page Display Format |
126 |
| Top Frame |
126 |
| Left Frame |
127 |
| Right Frame |
128 |
| Changing the Settings of the Menu Items |
128 |
| Details of the Menu Items |
128 |
| Printer Status |
130 |
| Printer Jobs |
131 |
| Printer Settings |
132 |
| Print Server Settings |
146 |
| Copy Printer Settings |
165 |
| Print Volume |
165 |
| Tray Settings |
167 |
| Understanding the Tool Box Menus |
169 |
| Starting the Tool Box |
169 |
| Printer Setting Reports |
169 |
| Printer Information |
169 |
| Menu Settings |
170 |
| Reports |
171 |
| TCP/IP Settings |
172 |
| Tray Settings |
172 |
| Panel Language |
173 |
| USB Direct Print Defaults |
173 |
| Printer Maintenance |
174 |
| System Settings |
174 |
| Maintenance |
177 |
| Tray Settings |
178 |
| Panel Language |
181 |
| TCP/IP Settings |
181 |
| Network Settings |
182 |
| USB Direct Print Defaults |
182 |
| Diagnosis |
183 |
| Chart Print |
183 |
| Environment Sensor Info |
183 |
| Resetting Defaults |
183 |
| When Using the Tool Box |
184 |
| Understanding the Printer Menus |
185 |
| Report / List |
185 |
| Printer Settings |
185 |
| Panel Settings |
185 |
| PCL Fonts List |
185 |
| PCL Macros List |
185 |
| PS Fonts List |
185 |
| PDF Fonts List |
185 |
| Job History |
185 |
| Error History |
186 |
| Print Meter |
186 |
| Color Test Page |
186 |
| Stored Documents |
186 |
| Printing a Report/List Using the Operator Panel |
186 |
| Printing a Report/List Using the Tool Box |
186 |
| Admin Settings |
186 |
| PCL |
186 |
| PDF |
192 |
| PostScript |
194 |
| Network |
195 |
| USB Settings |
199 |
| System Settings |
200 |
| Maintenance |
208 |
| Secure Settings |
213 |
| Defaults Settings |
214 |
| USB Direct Print Defaults |
214 |
| Tray Settings |
214 |
| MPF |
214 |
| Tray 1 |
216 |
| Tray 2 |
217 |
| Tray Priority |
218 |
| Panel Language |
218 |
| Print Menu |
219 |
| Secure Print |
219 |
| Private Mail Box |
219 |
| Public Mail Box |
220 |
| Proof Print |
221 |
| USB Direct Print |
221 |
| Panel Lock |
224 |
| Enabling the Panel Lock |
224 |
| Disabling the Panel Lock |
224 |
| Resetting Defaults |
225 |
| When Using the Operator Panel |
225 |
| Print Media Guidelines |
227 |
| Paper |
227 |
| Paper Characteristics |
227 |
| Recommended Paper |
228 |
| Unacceptable Paper |
228 |
| Selecting Paper |
228 |
| Selecting Pre-Printed Media and Letterheads |
229 |
| Selecting Pre-Punched Paper |
229 |
| Envelopes |
229 |
| Labels |
230 |
| Storing Print Media |
231 |
| Identifying Print Media and Specifications |
231 |
| Supported Paper Sizes |
231 |
| Supported Paper Types |
232 |
| Paper Type Specifications |
232 |
| Loading Print Media |
233 |
| Capacity |
233 |
| Print Media Dimensions |
233 |
| Loading Print Media in Tray1 and the Optional 550-Sheet Feeder |
233 |
| Loading Letterhead (Pre-Printed and Pre-Punched Paper) |
233 |
| Loading Print Media in the MPF |
235 |
| Loading an Envelope in the MPF |
237 |
| Envelope #10, Monarch, or DL |
237 |
| C5 |
238 |
| Using the MPF |
238 |
| Linking Trays |
238 |
| Printing |
239 |
| Printing |
241 |
| Tips for Successful Printing |
241 |
| Tips on Storing Print Media |
241 |
| Avoiding Paper Jams |
241 |
| Sending a Job to Print |
241 |
| Canceling a Print Job |
242 |
| Canceling a Job From the Operator Panel |
242 |
| Canceling a Job From a Computer Running Windows |
242 |
| Duplex Printing |
243 |
| Duplex Printing With Duplex Unit (Dell C3760dn Color Laser Printer Only) |
243 |
| Duplex Printing Without Duplex Unit (Dell C3760n Color Laser Printer Only) |
243 |
| Using Booklet Print (Dell C3760n and Dell C3760dn Models) |
244 |
| Using the Stored Print Feature |
245 |
| Overview |
245 |
| Procedures for Printing Stored Print |
247 |
| Printing from USB Memory |
248 |
| Supported File Formats |
249 |
| Inserting and Removing a USB Memory |
249 |
| Printing a File in a USB Memory |
249 |
| Printing With Web Services on Devices (WSD) |
250 |
| Adding Roles of Printer Services |
250 |
| Printer Setup |
250 |
| Installing a Printer Driver Using the Add Printer Wizard |
250 |
| Printing a Report Page |
251 |
| Printer Settings |
251 |
| Using the Operator Panel to Change the Printer Settings |
252 |
| Using the Dell Printer Configuration Web Tool to Change the Printer Settings |
252 |
| Know Your Printer |
253 |
| Understanding Your Printer Software |
255 |
| Printer Utility Software |
256 |
| Status Window |
256 |
| Tool Box |
256 |
| Updater |
257 |
| Troubleshooting |
257 |
| Status Monitor Widget for Macintosh |
257 |
| Status Monitor Widget Feature |
257 |
| Before Installing the Status Monitor Widget |
257 |
| Installing the Status Monitor Widget |
257 |
| Opening and Closing the Status Monitor Widget |
258 |
| Printer Status Window |
258 |
| Order Window |
259 |
| Preferences |
260 |
| Status Monitor Console for Linux |
261 |
| Status Monitor Console Feature |
261 |
| Before Installing the Status Monitor Console |
261 |
| Installing the Status Monitor Console |
261 |
| Starting the Status Monitor Console |
262 |
| Printer Selection Window |
262 |
| Printer Status Window |
263 |
| Dell Supplies Management System Window |
264 |
| Service Tag Window |
265 |
| Settings Window |
265 |
| Printing Using ColorTrack (External Authentication) |
267 |
| ColorTrack Settings |
267 |
| Dell ColorTrack |
267 |
| Authentication System |
269 |
| Kerberos Server |
269 |
| LDAP Server |
270 |
| LDAP Authentication |
272 |
| Setting the Printer Driver |
272 |
| Dell ColorTrack Mode |
273 |
| Specify Group Name |
273 |
| Specify Job Owner |
273 |
| Job Owner Name |
273 |
| Password |
273 |
| Using Digital Certificates |
275 |
| Managing Certificates |
275 |
| Preparing to Manage Certificates |
275 |
| Importing a Digital Certificate |
277 |
| Setting a Digital Certificate |
278 |
| Confirming the Settings of a Digital Certificate |
278 |
| Deleting a Digital Certificate |
279 |
| Exporting a Digital Certificate |
279 |
| Setting the Features |
280 |
| Setting the Certificate in the IPsec Digital Signature Mode |
280 |
| Setting the SSL-use Server Certificate (HTTP/IPP) |
281 |
| Setting LDAP-SSL/TLS Communication |
281 |
| Setting Server Certificate Verification for LDAP-SSL/TLS Communication |
281 |
| Setting Client Certificate for LDAP-SSL/TLS Communication |
282 |
| Setting for Wireless LAN WPA-Enterprise (EAP-TLS) |
282 |
| Setting for Wireless LAN WPA-Enterprise (PEAPV0-MS-CHAPV2, EAP-TTLS PAP, EAP-TTLS CHAP) |
283 |
| Understanding Fonts |
285 |
| Typefaces and Fonts |
285 |
| Weight and Style |
285 |
| Pitch and Point Size |
285 |
| Bitmapped and Scalable Fonts |
286 |
| Resident Fonts |
287 |
| Symbol Sets |
291 |
| Symbol Sets for PCL 5/PCL 6 |
291 |
| Understanding Printer Messages |
293 |
| Error Codes |
293 |
| Specifications |
299 |
| Operating System Compatibility |
299 |
| Power Supply |
299 |
| Dimensions |
299 |
| Memory |
299 |
| Page Description Language (PDL)/Emulation, Operating System, and Interface |
299 |
| MIB Compatibility |
300 |
| Environment |
300 |
| Operation |
300 |
| Print Quality Guarantee |
300 |
| Storage |
300 |
| Altitude |
300 |
| Cables |
301 |
| Optional Wireless Adapter |
301 |
| Maintaining Your Printer |
303 |
| Maintaining Your Printer |
305 |
| Determining the Status of Supplies |
305 |
| Conserving Supplies |
305 |
| Ordering Supplies |
305 |
| Storing Print Media |
306 |
| Storing Consumables |
306 |
| Replacing the Toner Cartridges |
307 |
| Removing the Toner Cartridge |
307 |
| Installing a Toner Cartridge |
308 |
| Replacing the Drum Cartridges |
309 |
| Removing the Drum Cartridge |
309 |
| Installing a Drum Cartridge |
311 |
| Replacing the Fusing Unit |
314 |
| Removing the Fusing Unit |
314 |
| Installing a Fusing Unit |
315 |
| Replacing the Transfer Belt Unit, the 2nd Belt Transfer Roller (2nd BTR), and the Retard Roller |
316 |
| Removing the Transfer Belt Unit |
316 |
| Installing a Transfer Belt Unit |
319 |
| Removing the 2nd BTR |
321 |
| Installing a 2nd BTR |
321 |
| Removing the Retard Roller in Tray1 |
322 |
| Installing a Retard Roller in Tray1 |
323 |
| Replacing the Waste Toner Box |
324 |
| Removing the Waste Toner Box |
324 |
| Installing a Waste Toner Box |
325 |
| Cleaning Inside the Printer |
326 |
| Cleaning the CTD Sensor |
326 |
| Cleaning the Raster Optical Scanner (ROS) Window |
330 |
| Adjusting Color Registration |
334 |
| Printing the Color Registration Chart |
334 |
| Determining Values |
334 |
| Entering Values |
336 |
| Removing Options |
337 |
| Removing the Optional Memory Module |
337 |
| Removing the Optional 550-Sheet Feeder |
339 |
| Removing the Optional Wireless Adapter |
341 |
| Removing the Optional Hard Disk |
343 |
| Clearing Jams |
345 |
| Avoiding Jams |
345 |
| Identifying the Location of Paper Jams |
346 |
| Clearing Paper Jams From the MPF |
346 |
| If error code: 050-112 appears: |
346 |
| If error code: 050-129 appears: |
348 |
| Clearing Paper Jams From Tray1 |
349 |
| Clearing Paper Jams From the Fusing Unit |
350 |
| If error code: 050-111 appears: |
350 |
| If error code: 050-129 appears: |
352 |
| Clearing Paper Jams From the Optional 550-Sheet Feeder |
356 |
| Troubleshooting |
359 |
| Troubleshooting Guide |
361 |
| Basic Printer Problems |
361 |
| Display Problems |
361 |
| Printing Problems |
361 |
| Print Quality Problems |
362 |
| The output is too light |
363 |
| Toner smears or print comes off |
364 |
| Random spots/Blurred images |
365 |
| The entire output is blank |
366 |
| Streaks appear on the output |
367 |
| Part or the entire output is black |
368 |
| Pitched color dots |
368 |
| Vertical blanks |
369 |
| Ghosting |
370 |
| Light-induced fatigue |
371 |
| Fog |
372 |
| Bead-Carry-Out (BCO) |
372 |
| Jagged characters |
373 |
| Banding |
373 |
| Auger mark |
374 |
| Wrinkled/Stained paper |
375 |
| Damage on the leading edge of paper |
375 |
| Jam/Alignment Problems |
376 |
| The top and side margins are incorrect |
376 |
| Color registration is out of alignment |
376 |
| Images are skewed |
377 |
| Tray1/Optional 550-Sheet Feeder Misfeed Jam |
378 |
| MPF Misfeed Jam |
379 |
| Regi Jam (Exit Sensor On JAM) |
380 |
| Exit Jam (Exit Sensor Off JAM) |
380 |
| Tray1/Optional 550-Sheet Feeder Multi-feed Jam |
381 |
| MPF Multi-feed Jam |
381 |
| Noise |
381 |
| Digital Certificate Problem |
383 |
| Problems With Installed Optional Accessories |
385 |
| Other Problems |
385 |
| Contacting Service |
385 |
| Appendix |
387 |
| Appendix |
389 |
| Dell™ Technical Support Policy |
389 |
| Online Services |
389 |
| Warranty and Return Policy |
390 |
| Recycling Information |
390 |
| Contacting Dell |
390 |
| Index |
391 |
| Symbols |
391 |
| Numerics |
391 |
| A |
391 |
| B |
391 |
| C |
392 |
| D |
392 |
| E |
393 |
| F |
393 |
| G |
393 |
| H |
393 |
| I |
394 |
| J |
394 |
| K |
394 |
| L |
394 |
| M |
394 |
| N |
395 |
| O |
395 |
| P |
395 |
| Q |
397 |
| R |
397 |
| S |
397 |
| T |
398 |
| U |
398 |
| V |
399 |
| W |
399 |
 1
1 34
34 35
35 36
36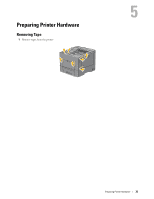 37
37 38
38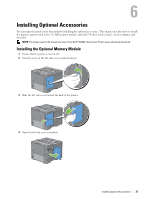 39
39 40
40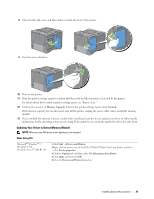 41
41 42
42 43
43 44
44