Dell Latitude D610 User Guide - Page 73
Memory - memory upgrade
 |
View all Dell Latitude D610 manuals
Add to My Manuals
Save this manual to your list of manuals |
Page 73 highlights
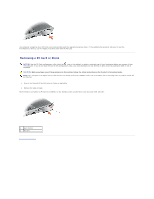
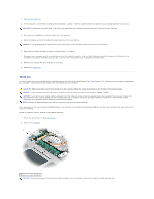
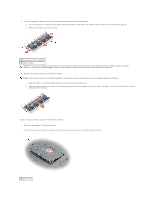
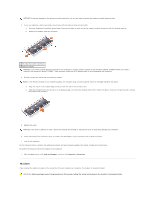
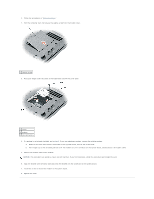
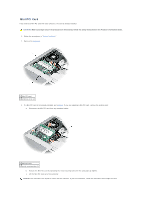
2. Turn off your computer. 3. If the computer is connected to a docking device (docked), undock it. See the documentation that came with your docking device for instructions. NOTICE: To disconnect a network cable, first unplug the cable from your computer and then unplug it from the network wall jack. 4. Disconnect any telephone or network cables from the computer. 5. Close the display and turn the computer upside down on a flat work surface. NOTICE: To avoid damaging the system board, you must remove the main battery before you service the computer. 6. Remove any installed modules, including a second battery, if installed. 7. Disconnect your computer and all attached devices from their electrical outlets, slide and hold the battery-bay latch release on the bottom of the computer and remove the battery from the bay, and then press the power button to ground the system board. 8. Remove any installed PC Cards from the PC Card slot. 9. Remove the hard drive. Memory You can increase your computer memory by installing memory modules on the system board. See "Specifications" for information on the memory supported by your computer. Install only memory modules that are intended for your computer. CAUTION: Before you begin any of the procedures in this section, follow the safety instructions in the Product Information Guide. NOTICE: If your computer has only one memory module, install the memory module in the connector labeled "DIMMA." NOTICE: If you remove your original memory modules from the computer during a memory upgrade, keep them separate from any new modules that you may have, even if you purchased the new modules from Dell. If possible, do not pair an original memory module with a new memory module. Otherwise, your computer may not function at optimal performance. NOTE: Memory modules purchased from Dell are covered under your computer warranty. Your computer has two user-accessible SODIMM sockets, one accessed from beneath the keyboard (DIMM A), and the other accessed from the bottom of the computer (DIMM B). To add or replace a memory module in the DIMM A connector: 1. Follow the procedures in "Before You Begin." 2. Remove the keyboard. 1 memory module (DIMM A) NOTICE: To prevent damage to the memory module connector, do not use tools to spread the memory-module securing clips.
-
 1
1 -
2
-
3
-
4
-
5
-
6
-
7
-
8
-
9
-
10
-
11
-
12
-
13
-
14
-
15
-
16
-
17
-
18
-
19
-
20
-
21
-
22
-
23
-
24
-
25
-
26
-
27
-
28
-
29
-
30
-
31
-
32
-
33
-
34
-
35
-
36
-
37
-
38
-
39
-
40
-
41
-
42
-
43
-
44
-
45
-
46
-
47
-
48
-
49
-
50
-
51
-
52
-
53
-
54
-
55
-
56
-
57
-
58
-
59
-
60
-
61
-
62
-
63
-
64
-
65
-
66
-
67
-
 68
68 -
 69
69 -
 70
70 -
 71
71 -
 72
72 -
 73
73 -
 74
74 -
 75
75 -
 76
76 -
 77
77 -
 78
78 -
79
-
80
-
81
-
82
-
83
-
84
-
85
-
86
-
87
-
88
-
89
-
90
-
91
-
92
-
93
-
94
-
95
-
96
-
97
-
98
-
99
-
100
-
101
-
102
-
103
-
104
-
105
-
106
-
107
-
108
-
109
-
110
-
111
-
112
-
113
-
114
-
115
 |
 |
