Dell Latitude D610 User Guide - Page 74
Before You Begin
 |
View all Dell Latitude D610 manuals
Add to My Manuals
Save this manual to your list of manuals |
Page 74 highlights
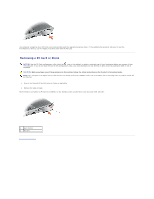
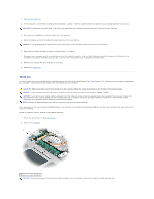
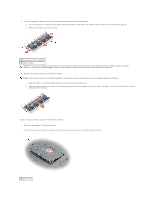
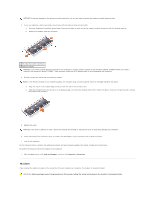
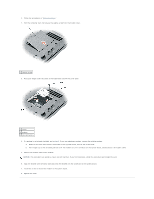
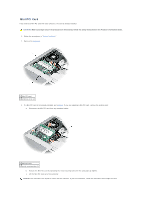
3. If you are replacing a memory module, ground yourself and remove the existing module: a. Use your fingertips to carefully spread apart the securing clips on each end of the memory module connector until the module pops up. b. Remove the module from the connector. 1 securing clips (2 per connector) 2 memory module NOTICE: If you need to install memory modules in two connectors, install a memory module in the connector labeled "DIMMA" before you install a module in the connector labeled "DIMMB." Insert memory modules at a 45-degree angle to avoid damaging the connector. 4. Ground yourself and install the new memory module: NOTE: If the memory module is not installed properly, the computer may not boot properly. No error message indicates this failure. a. Align the notch in the module edge connector with the tab in the connector slot. b. Slide the module firmly into the slot at a 45-degree angle, and rotate the module down until it clicks into place. If you do not feel the click, remove the module and reinstall it. To add or replace a memory module in the DIMM B connector: 1. Follow the procedures in "Before You Begin." 2. Turn the computer over, loosen the captive screw in the memory module cover, and then remove the cover. 1 captive screw
-
 1
1 -
2
-
3
-
4
-
5
-
6
-
7
-
8
-
9
-
10
-
11
-
12
-
13
-
14
-
15
-
16
-
17
-
18
-
19
-
20
-
21
-
22
-
23
-
24
-
25
-
26
-
27
-
28
-
29
-
30
-
31
-
32
-
33
-
34
-
35
-
36
-
37
-
38
-
39
-
40
-
41
-
42
-
43
-
44
-
45
-
46
-
47
-
48
-
49
-
50
-
51
-
52
-
53
-
54
-
55
-
56
-
57
-
58
-
59
-
60
-
61
-
62
-
63
-
64
-
65
-
66
-
67
-
68
-
 69
69 -
 70
70 -
 71
71 -
 72
72 -
 73
73 -
 74
74 -
 75
75 -
 76
76 -
 77
77 -
 78
78 -
 79
79 -
80
-
81
-
82
-
83
-
84
-
85
-
86
-
87
-
88
-
89
-
90
-
91
-
92
-
93
-
94
-
95
-
96
-
97
-
98
-
99
-
100
-
101
-
102
-
103
-
104
-
105
-
106
-
107
-
108
-
109
-
110
-
111
-
112
-
113
-
114
-
115
 |
 |
