Dell V525W User Manual - Page 63
Sending e-mail, Tips for e-mailing, Tips for e, mailing - wireless printer
 |
View all Dell V525W manuals
Add to My Manuals
Save this manual to your list of manuals |
Page 63 highlights
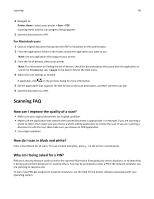
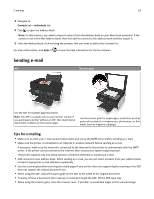
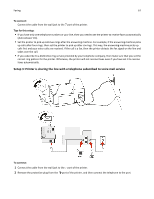
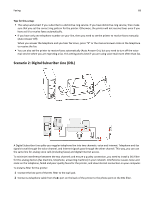
E-mailing 63 3 Navigate to: Contacts tab > Individuals tab 4 Click to open the Address Book. Note: To add contacts, you need to import contacts from the Address Book on your Macintosh computer. If the contact is not in the Mac Address Book, then first add the contact to the address book and then import it. 5 From the Address Book, click and drag the contacts that you want to add to the Contacts list. For more information, click Help or to view the help information for the fax software. Sending e-mail ADF Scanner glass Use the ADF for multiple‑page documents. Note: The ADF is available only in select printer models. If you purchased a printer without an ADF, then load original documents or photos on the scanner glass. Use the scanner glass for single pages, small items (such as postcards or photos), transparencies, photo paper, or thin media (such as magazine clippings). Tips for e‑mailing • Make sure to enter your e‑mail account information and set up the SMTP server before sending an e‑mail. • Make sure the printer is connected to an Ethernet or wireless network before sending an e‑mail. If necessary, make sure the network is connected to the Internet for the printer to communicate with the SMTP server. If the printer cannot connect to the Internet, then contact your system support person. The printer supports only one active network connection (Ethernet or wireless) at a time. • Add contacts to your address book. When sending an e‑mail, you can just select contacts from your address book instead of typing their e‑mail addresses repeatedly. • Use the scanner glass when scanning two‑sided pages if your printer does not support duplex scanning or the ADF does not support the original document size. • When using the ADF, adjust the paper guide on the ADF to the width of the original document. • To easily retrieve a document after copying or scanning through the ADF, lift the ADF input tray. • When using the scanner glass, close the scanner cover, if possible, to avoid dark edges on the scanned image.
-
 1
1 -
2
-
3
-
4
-
5
-
6
-
7
-
8
-
9
-
10
-
11
-
12
-
13
-
14
-
15
-
16
-
17
-
18
-
19
-
20
-
21
-
22
-
23
-
24
-
25
-
26
-
27
-
28
-
29
-
30
-
31
-
32
-
33
-
34
-
35
-
36
-
37
-
38
-
39
-
40
-
41
-
42
-
43
-
44
-
45
-
46
-
47
-
48
-
49
-
50
-
51
-
52
-
53
-
54
-
55
-
56
-
57
-
 58
58 -
 59
59 -
 60
60 -
 61
61 -
 62
62 -
 63
63 -
 64
64 -
 65
65 -
 66
66 -
 67
67 -
 68
68 -
69
-
70
-
71
-
72
-
73
-
74
-
75
-
76
-
77
-
78
-
79
-
80
-
81
-
82
-
83
-
84
-
85
-
86
-
87
-
88
-
89
-
90
-
91
-
92
-
93
-
94
-
95
-
96
-
97
-
98
-
99
-
100
-
101
-
102
-
103
-
104
-
105
-
106
-
107
-
108
-
109
-
110
-
111
-
112
-
113
-
114
-
115
-
116
-
117
-
118
-
119
-
120
-
121
-
122
-
123
-
124
-
125
-
126
-
127
-
128
-
129
-
130
-
131
-
132
-
133
-
134
-
135
-
136
-
137
-
138
-
139
-
140
-
141
-
142
-
143
-
144
-
145
-
146
-
147
-
148
-
149
-
150
-
151
-
152
-
153
-
154
-
155
-
156
-
157
-
158
-
159
-
160
-
161
-
162
-
163
-
164
-
165
-
166
-
167
-
168
-
169
-
170
-
171
-
172
-
173
-
174
-
175
-
176
-
177
 |
 |