Dell V715W User's Guide - Page 33
Printing specialty documents, Printing envelopes - all in one wireless printer
 |
UPC - 884116016564
View all Dell V715W manuals
Add to My Manuals
Save this manual to your list of manuals |
Page 33 highlights
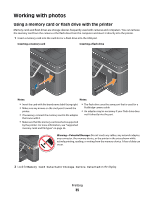
1 Insert a memory card or flash drive. When the printer detects the memory device, Memory Card Detected or Storage Device Detected appears on the display. 2 If only document files are stored on the memory device, then the printer automatically switches to File Print mode. If document files and image files are stored on the memory device, then press the up or down arrow button to scroll to Documents, and then press . 3 Select and print the document: If the printer is using a USB connection a Press the up or down arrow button to select the file name of the document that you want to print. b Press to start printing the document. If the printer is using a Wireless connection (selected models only) a Press the up or down arrow button to select the file name of the document that you want to print. b Press , and then wait for the printer to connect to the network computer or to finish searching the network for available computers. c When prompted, press the up or down arrow button to select the name of the network computer, and then press to start printing the document. Notes: • You may be prompted to enter a PIN if the computer requires it. Enter the PIN using the keypad. • To assign a computer name and a PIN to the computer, see the Help for the printer software associated with your operating system. Printing specialty documents Printing envelopes 1 Load the envelopes in the printer. 2 Send the print job: a With a document open, click File Print. b Click Properties, Preferences, Options, or Setup. c From the Paper Type list of the Print Setup tab, select Plain Paper. d From the Paper Size list, select the envelope size. Note: To print on a custom-size envelope, select Custom Size, and then specify the height and width of the envelope. e Select an orientation. f Click OK to close any printer software dialogs. g Click OK or Print. Printing 33
-
 1
1 -
2
-
3
-
4
-
5
-
6
-
7
-
8
-
9
-
10
-
11
-
12
-
13
-
14
-
15
-
16
-
17
-
18
-
19
-
20
-
21
-
22
-
23
-
24
-
25
-
26
-
27
-
 28
28 -
 29
29 -
 30
30 -
 31
31 -
 32
32 -
 33
33 -
 34
34 -
 35
35 -
 36
36 -
 37
37 -
 38
38 -
39
-
40
-
41
-
42
-
43
-
44
-
45
-
46
-
47
-
48
-
49
-
50
-
51
-
52
-
53
-
54
-
55
-
56
-
57
-
58
-
59
-
60
-
61
-
62
-
63
-
64
-
65
-
66
-
67
-
68
-
69
-
70
-
71
-
72
-
73
-
74
-
75
-
76
-
77
-
78
-
79
-
80
-
81
-
82
-
83
-
84
-
85
-
86
-
87
-
88
-
89
-
90
-
91
-
92
-
93
-
94
-
95
-
96
-
97
-
98
-
99
-
100
-
101
-
102
-
103
-
104
-
105
-
106
-
107
-
108
-
109
-
110
-
111
-
112
-
113
-
114
-
115
-
116
-
117
-
118
-
119
-
120
-
121
-
122
-
123
-
124
-
125
-
126
-
127
-
128
-
129
-
130
-
131
-
132
-
133
-
134
-
135
-
136
-
137
-
138
-
139
-
140
-
141
-
142
-
143
-
144
-
145
-
146
-
147
-
148
-
149
-
150
 |
 |