Epson Expression 10000XL User Manual - Page 12
Using EPSON Scan
 |
View all Epson Expression 10000XL manuals
Add to My Manuals
Save this manual to your list of manuals |
Page 12 highlights
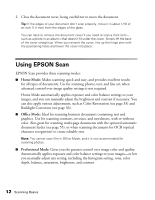
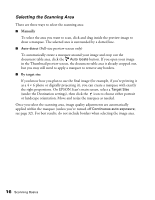
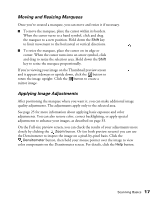
2. Close the document cover, being careful not to move the document. Tip: If the edges of your document don't scan properly, move it in about 1/16 of an inch (1.5 mm) from the edges of the glass. You can raise or remove the document cover if you need to scan a thick item- such as a photo in an album-that doesn't fit under the cover. Simply lift the back of the cover straight up. When you reinsert the cover, line up the hinge pins with the positioning holes and lower the cover into place. Using EPSON Scan EPSON Scan provides three scanning modes: ■ Home Mode: Makes scanning quick and easy, and provides excellent results for all types of documents. Use for scanning photos, text, and line art, when advanced control over image quality settings is not required. Home Mode automatically applies exposure and color balance settings to your images, and you can manually adjust the brightness and contrast if necessary. You can also apply various adjustments, such as Color Restoration (see page 33) and Backlight Correction (see page 36). ■ Office Mode: Ideal for scanning business documents containing text and graphics. Use for scanning contracts, invoices, and newsletters, with or without color. Also great for scanning multi-page documents with the optional automatic document feeder (see page 55), or when scanning documents for OCR (optical character recognition) to create editable text. Note: You cannot scan film in Office Mode, and it is not recommended for scanning photos. ■ Professional Mode: Gives you the greatest control over image color and quality. Automatically applies exposure and color balance settings to your images-or lets you manually adjust any setting, including the histogram setting, tone, color depth, balance, saturation, brightness, and contrast. 12 Scanning Basics
-
 1
1 -
2
-
3
-
4
-
5
-
6
-
 7
7 -
 8
8 -
 9
9 -
 10
10 -
 11
11 -
 12
12 -
 13
13 -
 14
14 -
 15
15 -
 16
16 -
 17
17 -
18
-
19
-
20
-
21
-
22
-
23
-
24
-
25
-
26
-
27
-
28
-
29
-
30
-
31
-
32
-
33
-
34
-
35
-
36
-
37
-
38
-
39
-
40
-
41
-
42
-
43
-
44
-
45
-
46
-
47
-
48
-
49
-
50
-
51
-
52
-
53
-
54
-
55
-
56
-
57
-
58
-
59
-
60
-
61
-
62
-
63
-
64
-
65
-
66
-
67
-
68
-
69
-
70
-
71
-
72
-
73
-
74
-
75
-
76
-
77
-
78
-
79
-
80
-
81
-
82
-
83
-
84
-
85
-
86
-
87
-
88
-
89
-
90
-
91
-
92
-
93
-
94
-
95
-
96
 |
 |
