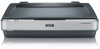
Epson Expression 10000XL User Manual - Page 50
Placing Nonstandard Film Sizes on the Scanner, Set your film directly on the document
 |
View all Epson Expression 10000XL manuals
Add to My Manuals
Save this manual to your list of manuals |
Page 50 highlights
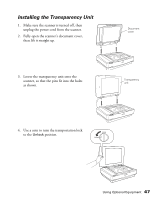
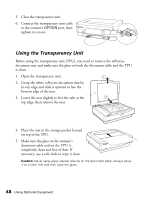
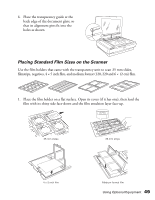
2. Make sure the transparency guide is in place at the back edge of the document glass (see page 49). Then place the film holder on the document glass, aligning the arrow marks as shown. When scanning large numbers of images, you can place a second film holder on the scanner next to the first one. The holders can be for different sizes of film (unless you plan to scan 35 mm slides using the Thumbnail preview screen; see page 52). 3. Close the transparency unit and scan as described on page 51. Note: If the transparency unit is not closed, you will get an error message and be unable to scan. Placing Nonstandard Film Sizes on the Scanner You can scan film in nonstandard sizes up to 12.2 × 16.5 inches (309 × 420 mm). Follow these guidelines: 1. Make sure the transparency guide is in place at the back edge of the document glass (see page 49). 2. Set your film directly on the document glass, with the shiny side face-down and the film emulsion layer face-up. Align the film with the edge of the transparency guide, as shown. 3. Close the transparency unit and scan as described in the next section. Note: When setting film directly on the glass or using film holders other than those that came with the scanner, be sure to adjust the focus (see page 52). 50 Using Optional Equipment
-
 1
1 -
2
-
3
-
4
-
5
-
6
-
7
-
8
-
9
-
10
-
11
-
12
-
13
-
14
-
15
-
16
-
17
-
18
-
19
-
20
-
21
-
22
-
23
-
24
-
25
-
26
-
27
-
28
-
29
-
30
-
31
-
32
-
33
-
34
-
35
-
36
-
37
-
38
-
39
-
40
-
41
-
42
-
43
-
44
-
 45
45 -
 46
46 -
 47
47 -
 48
48 -
 49
49 -
 50
50 -
 51
51 -
 52
52 -
 53
53 -
 54
54 -
 55
55 -
56
-
57
-
58
-
59
-
60
-
61
-
62
-
63
-
64
-
65
-
66
-
67
-
68
-
69
-
70
-
71
-
72
-
73
-
74
-
75
-
76
-
77
-
78
-
79
-
80
-
81
-
82
-
83
-
84
-
85
-
86
-
87
-
88
-
89
-
90
-
91
-
92
-
93
-
94
-
95
-
96
 |
 |
