Epson Expression 10000XL User Manual - Page 41
EPSON Scan., want to scan, then click
 |
View all Epson Expression 10000XL manuals
Add to My Manuals
Save this manual to your list of manuals |
Page 41 highlights
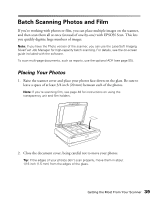
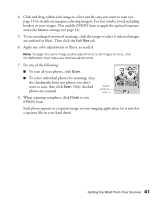
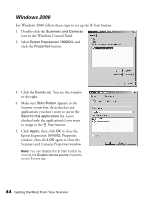
4. Click and drag within each image to select just the area you want to scan (see page 15 for details on marquee-selecting images). For best results, avoid including borders in your images. This enables EPSON Scan to apply the optimal exposure and color balance settings (see page 31). 5. To see an enlarged version of an image, click the image to select it (selected images are outlined in blue). Then click the Full Size tab. 6. Apply any color adjustments or filters, as needed. Note: To apply the same image quality adjustments to all images at once, click the All button, then make any desired adjustments. 7. Do one of the following: ■ To scan all your photos, click Scan. ■ To select individual photos for scanning, clear the checkmarks from any photos you don't want to scan, then click Scan. Only checked photos are scanned. 8. When scanning completes, click Close to exit EPSON Scan. Check photo to scan it Each photo appears as a separate image in your imaging application (or is saved as a separate file on your hard drive). Getting the Most From Your Scanner 41
-
 1
1 -
2
-
3
-
4
-
5
-
6
-
7
-
8
-
9
-
10
-
11
-
12
-
13
-
14
-
15
-
16
-
17
-
18
-
19
-
20
-
21
-
22
-
23
-
24
-
25
-
26
-
27
-
28
-
29
-
30
-
31
-
32
-
33
-
34
-
35
-
 36
36 -
 37
37 -
 38
38 -
 39
39 -
 40
40 -
 41
41 -
 42
42 -
 43
43 -
 44
44 -
 45
45 -
 46
46 -
47
-
48
-
49
-
50
-
51
-
52
-
53
-
54
-
55
-
56
-
57
-
58
-
59
-
60
-
61
-
62
-
63
-
64
-
65
-
66
-
67
-
68
-
69
-
70
-
71
-
72
-
73
-
74
-
75
-
76
-
77
-
78
-
79
-
80
-
81
-
82
-
83
-
84
-
85
-
86
-
87
-
88
-
89
-
90
-
91
-
92
-
93
-
94
-
95
-
96
 |
 |
