Epson Expression 10000XL User Manual - Page 20
Brightness and Contrast, Descreening see
 |
View all Epson Expression 10000XL manuals
Add to My Manuals
Save this manual to your list of manuals |
Page 20 highlights
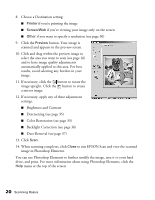
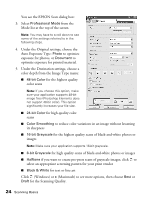
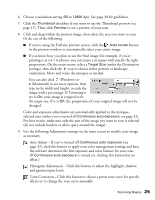
8. Choose a Destination setting: ■ Printer if you're printing the image ■ Screen/Web if you're viewing your image only on the screen ■ Other if you want to specify a resolution (see page 30) 9. Click the Preview button. Your image is scanned and appears in the preview screen. 10. Click and drag within the preview image to select the area you want to scan (see page 16) and to have image quality adjustments automatically applied to this area. For best results, avoid selecting any borders in your image. 11. If necessary, click the button to rotate the image upright. Click the button to create a mirror image. 12. If necessary, apply any of these adjustment settings: ■ Brightness and Contrast ■ Descreening (see page 35) ■ Color Restoration (see page 33) ■ Backlight Correction (see page 36) ■ Dust Removal (see page 37) 13. Click Scan. 14. When scanning completes, click Close to exit EPSON Scan and view the scanned image in Photoshop Elements. You can use Photoshop Elements to further modify the image, save it to your hard drive, and print. For more information about using Photoshop Elements, click the Help menu at the top of the screen. 20 Scanning Basics
-
 1
1 -
2
-
3
-
4
-
5
-
6
-
7
-
8
-
9
-
10
-
11
-
12
-
13
-
14
-
 15
15 -
 16
16 -
 17
17 -
 18
18 -
 19
19 -
 20
20 -
 21
21 -
 22
22 -
 23
23 -
 24
24 -
 25
25 -
26
-
27
-
28
-
29
-
30
-
31
-
32
-
33
-
34
-
35
-
36
-
37
-
38
-
39
-
40
-
41
-
42
-
43
-
44
-
45
-
46
-
47
-
48
-
49
-
50
-
51
-
52
-
53
-
54
-
55
-
56
-
57
-
58
-
59
-
60
-
61
-
62
-
63
-
64
-
65
-
66
-
67
-
68
-
69
-
70
-
71
-
72
-
73
-
74
-
75
-
76
-
77
-
78
-
79
-
80
-
81
-
82
-
83
-
84
-
85
-
86
-
87
-
88
-
89
-
90
-
91
-
92
-
93
-
94
-
95
-
96
 |
 |
