Epson Expression 10000XL User Manual - Page 32
Adobe RGB, Display preview using, monitor compensation, Full Color Management, Auto Adjust
 |
View all Epson Expression 10000XL manuals
Add to My Manuals
Save this manual to your list of manuals |
Page 32 highlights
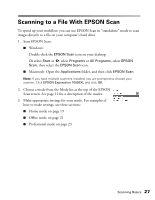
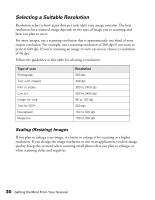
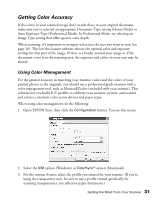
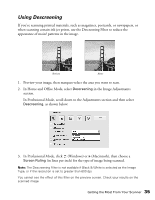
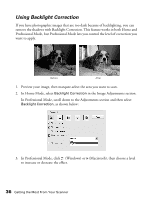
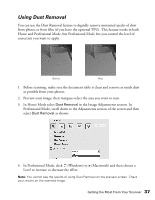
4. Unless you're using a specialized color space for your work, it is recommended that you select Adobe RGB as the Target. This provides a wide color gamut that works well for monitors, ink jet printers, and the majority of output devices. 5. If you are using Adobe Photoshop 5.0 or above, select Display preview using monitor compensation to match colors between images viewed in EPSON Scan and Photoshop. (Do not select this setting if you are using Photoshop Elements.) If you are using Adobe Photoshop Elements, select Full Color Management under Color Settings on the Edit menu. When you preview your image in EPSON Scan, click the Auto Adjust button to apply the color profiles you have selected. Before printing your image, be sure to turn off any color management settings in your printer driver software. See the manual for the application you're printing from for more information on using color management. If you are not using ICC color profiles as described above, do the following instead: 1. Open EPSON Scan, then click the Configuration button. 2. Select the Color Control option to use EPSON Scan's built-in exposure and color adjustments. 3. Select Continuous auto exposure to automatically adjust the exposure and color settings when you preview an image in EPSON Scan. The settings are recalculated whenever you create, move, or resize a marquee in the preview screen (see page 17). 4. Choose a Gamma setting from 1.0 to 3.0 that matches your monitor. If you are not sure which setting to use, choose the default setting of 1.8. 32 Getting the Most From Your Scanner
-
 1
1 -
2
-
3
-
4
-
5
-
6
-
7
-
8
-
9
-
10
-
11
-
12
-
13
-
14
-
15
-
16
-
17
-
18
-
19
-
20
-
21
-
22
-
23
-
24
-
25
-
26
-
 27
27 -
 28
28 -
 29
29 -
 30
30 -
 31
31 -
 32
32 -
 33
33 -
 34
34 -
 35
35 -
 36
36 -
 37
37 -
38
-
39
-
40
-
41
-
42
-
43
-
44
-
45
-
46
-
47
-
48
-
49
-
50
-
51
-
52
-
53
-
54
-
55
-
56
-
57
-
58
-
59
-
60
-
61
-
62
-
63
-
64
-
65
-
66
-
67
-
68
-
69
-
70
-
71
-
72
-
73
-
74
-
75
-
76
-
77
-
78
-
79
-
80
-
81
-
82
-
83
-
84
-
85
-
86
-
87
-
88
-
89
-
90
-
91
-
92
-
93
-
94
-
95
-
96
 |
 |
