Epson Expression 10000XL User Manual - Page 16
Selecting the Scanning Area, Manually, Auto-detect, By target size
 |
View all Epson Expression 10000XL manuals
Add to My Manuals
Save this manual to your list of manuals |
Page 16 highlights
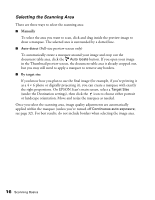
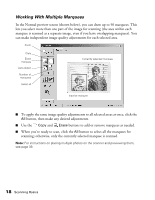
Selecting the Scanning Area There are three ways to select the scanning area: ■ Manually To select the area you want to scan, click and drag inside the preview image to draw a marquee. The selected area is surrounded by a dotted line. ■ Auto-detect (Full-size preview screen only) To automatically create a marquee around your image and crop out the document table area, click the Auto locate button. If you open your image in the Thumbnail preview screen, the document table area is already cropped out, but you may still need to apply a marquee to remove any borders. ■ By target size If you know how you plan to use the final image (for example, if you're printing it as a 4 × 6 photo or digitally projecting it), you can create a marquee with exactly the right proportions. On EPSON Scan's main screen, select a Target Size (under the Destination settings), then click the icon to choose either portrait or landscape orientation. Move and resize the marquee as needed. Once you select the scanning area, image quality adjustments are automatically applied within the marquee (unless you've turned off Continuous auto exposure; see page 32). For best results, do not include borders when selecting the image area. 16 Scanning Basics
-
 1
1 -
2
-
3
-
4
-
5
-
6
-
7
-
8
-
9
-
10
-
 11
11 -
 12
12 -
 13
13 -
 14
14 -
 15
15 -
 16
16 -
 17
17 -
 18
18 -
 19
19 -
 20
20 -
 21
21 -
22
-
23
-
24
-
25
-
26
-
27
-
28
-
29
-
30
-
31
-
32
-
33
-
34
-
35
-
36
-
37
-
38
-
39
-
40
-
41
-
42
-
43
-
44
-
45
-
46
-
47
-
48
-
49
-
50
-
51
-
52
-
53
-
54
-
55
-
56
-
57
-
58
-
59
-
60
-
61
-
62
-
63
-
64
-
65
-
66
-
67
-
68
-
69
-
70
-
71
-
72
-
73
-
74
-
75
-
76
-
77
-
78
-
79
-
80
-
81
-
82
-
83
-
84
-
85
-
86
-
87
-
88
-
89
-
90
-
91
-
92
-
93
-
94
-
95
-
96
 |
 |
