Epson Stylus Pro 7800 Professional Edition Printer Guide - Page 19
Setting Up the Printer, Assemble the left leg and base in the same way.
 |
View all Epson Stylus Pro 7800 Professional Edition manuals
Add to My Manuals
Save this manual to your list of manuals |
Page 19 highlights
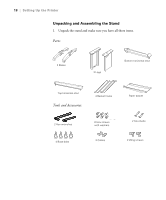
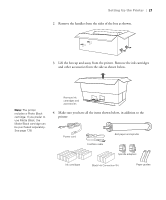
Setting Up the Printer | 19 Note: Make sure you tighten all bolts before moving to the next section. 2. Insert the right leg into the right base as shown. (Note that the bases are labeled L and R.) Use the included hex wrench to fasten the leg with the two base bolts. Bolt holes Underside view of base showing location of bolt holes 3. Assemble the left leg and base in the same way. 4. Attach the bottom horizontal strut as shown, then fasten it with one collar and one strut bolt at each end. Make sure the bolts are tight. 1-19 Collar Strut bolt
-
 1
1 -
2
-
3
-
4
-
5
-
6
-
7
-
8
-
9
-
10
-
11
-
12
-
13
-
 14
14 -
 15
15 -
 16
16 -
 17
17 -
 18
18 -
 19
19 -
 20
20 -
 21
21 -
 22
22 -
 23
23 -
 24
24 -
25
-
26
-
27
-
28
-
29
-
30
-
31
-
32
-
33
-
34
-
35
-
36
-
37
-
38
-
39
-
40
-
41
-
42
-
43
-
44
-
45
-
46
-
47
-
48
-
49
-
50
-
51
-
52
-
53
-
54
-
55
-
56
-
57
-
58
-
59
-
60
-
61
-
62
-
63
-
64
-
65
-
66
-
67
-
68
-
69
-
70
-
71
-
72
-
73
-
74
-
75
-
76
-
77
-
78
-
79
-
80
-
81
-
82
-
83
-
84
-
85
-
86
-
87
-
88
-
89
-
90
-
91
-
92
-
93
-
94
-
95
-
96
-
97
-
98
-
99
-
100
-
101
-
102
-
103
-
104
-
105
-
106
-
107
-
108
-
109
-
110
-
111
-
112
-
113
-
114
-
115
-
116
-
117
-
118
-
119
-
120
-
121
-
122
-
123
-
124
-
125
-
126
-
127
-
128
-
129
-
130
-
131
-
132
-
133
-
134
-
135
-
136
-
137
-
138
-
139
-
140
-
141
-
142
-
143
-
144
-
145
-
146
-
147
-
148
-
149
-
150
-
151
-
152
-
153
-
154
-
155
-
156
-
157
-
158
-
159
-
160
-
161
-
162
-
163
-
164
-
165
-
166
-
167
-
168
-
169
-
170
-
171
-
172
-
173
-
174
-
175
-
176
 |
 |

1-19
Setting Up the Printer
|
19
2.
Insert the right leg into the right base as shown. (Note that the bases are
labeled
L
and
R.
) Use the included hex wrench to fasten the leg with the
two base bolts.
3.
Assemble the left leg and base in the same way.
4.
Attach the bottom horizontal strut as shown, then fasten it with one
collar and one strut bolt at each end. Make sure the bolts are tight.
Note:
Make sure you
tighten all bolts before
moving to the next
section.
Bolt holes
Underside view of base
showing location of bolt holes
Collar
Strut bolt