Epson Stylus Pro 7800 Professional Edition Printer Guide - Page 53
Configuring the Printer for Your Network, Highlight the printer that you want to con and click
 |
View all Epson Stylus Pro 7800 Professional Edition manuals
Add to My Manuals
Save this manual to your list of manuals |
Page 53 highlights
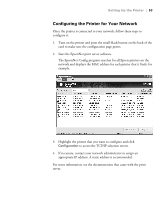
Setting Up the Printer | 53 Configuring the Printer for Your Network Once the printer is connected to your network, follow these steps to configure it: 1. Turn on the printer and press the small black button on the back of the card to make sure the configuration page prints. 2. Start the EpsonNet print server software. The EpsonNet Config program searches for all Epson printers on the network and displays the MAC address for each printer that it finds, for example: 3. Highlight the printer that you want to configure and click Configuration to access the TCP/IP selection screen. 4. If necessary, contact your network administrator to assign an appropriate IP address. A static address is recommended. For more information, see the documentation that came with the print server. 1-53
-
 1
1 -
2
-
3
-
4
-
5
-
6
-
7
-
8
-
9
-
10
-
11
-
12
-
13
-
14
-
15
-
16
-
17
-
18
-
19
-
20
-
21
-
22
-
23
-
24
-
25
-
26
-
27
-
28
-
29
-
30
-
31
-
32
-
33
-
34
-
35
-
36
-
37
-
38
-
39
-
40
-
41
-
42
-
43
-
44
-
45
-
46
-
47
-
 48
48 -
 49
49 -
 50
50 -
 51
51 -
 52
52 -
 53
53 -
 54
54 -
 55
55 -
 56
56 -
 57
57 -
 58
58 -
59
-
60
-
61
-
62
-
63
-
64
-
65
-
66
-
67
-
68
-
69
-
70
-
71
-
72
-
73
-
74
-
75
-
76
-
77
-
78
-
79
-
80
-
81
-
82
-
83
-
84
-
85
-
86
-
87
-
88
-
89
-
90
-
91
-
92
-
93
-
94
-
95
-
96
-
97
-
98
-
99
-
100
-
101
-
102
-
103
-
104
-
105
-
106
-
107
-
108
-
109
-
110
-
111
-
112
-
113
-
114
-
115
-
116
-
117
-
118
-
119
-
120
-
121
-
122
-
123
-
124
-
125
-
126
-
127
-
128
-
129
-
130
-
131
-
132
-
133
-
134
-
135
-
136
-
137
-
138
-
139
-
140
-
141
-
142
-
143
-
144
-
145
-
146
-
147
-
148
-
149
-
150
-
151
-
152
-
153
-
154
-
155
-
156
-
157
-
158
-
159
-
160
-
161
-
162
-
163
-
164
-
165
-
166
-
167
-
168
-
169
-
170
-
171
-
172
-
173
-
174
-
175
-
176
 |
 |
