Epson Stylus Pro 7800 Professional Edition Printer Guide - Page 96
Managing Print Jobs, you can monitor the progress of your print job using
 |
View all Epson Stylus Pro 7800 Professional Edition manuals
Add to My Manuals
Save this manual to your list of manuals |
Page 96 highlights
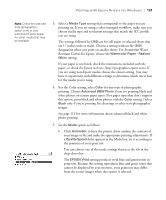
96 | Printing with Epson Drivers for Macintosh • Max Optical Density adjusts the overall density or focus of the print. Create a soft focus print by setting the density lower. • Highlight Point Shift helps to reduce gloss differential by adding density to the highlights of your image. • The tone color circle adjusts the hue of your black and white print. Click on any portion of the color wheel or enter corresponding values to customize the tone (hue) to add to your print. The closer you select to the edge of the wheel, the more color you will add. • Preview approximates the image tone based on your settings. Note that this preview always shows the same image and is not color managed. It provides a level of feedback as you make changes. Managing Print Jobs After you click Print, you can monitor the progress of your print job using the Print Center. Follow these steps: 1. Click the icon for your printer or Print Center icon on the Dock. If necessary, double-click your printer (and print queue) name. You see a screen like this: 3-96
-
 1
1 -
2
-
3
-
4
-
5
-
6
-
7
-
8
-
9
-
10
-
11
-
12
-
13
-
14
-
15
-
16
-
17
-
18
-
19
-
20
-
21
-
22
-
23
-
24
-
25
-
26
-
27
-
28
-
29
-
30
-
31
-
32
-
33
-
34
-
35
-
36
-
37
-
38
-
39
-
40
-
41
-
42
-
43
-
44
-
45
-
46
-
47
-
48
-
49
-
50
-
51
-
52
-
53
-
54
-
55
-
56
-
57
-
58
-
59
-
60
-
61
-
62
-
63
-
64
-
65
-
66
-
67
-
68
-
69
-
70
-
71
-
72
-
73
-
74
-
75
-
76
-
77
-
78
-
79
-
80
-
81
-
82
-
83
-
84
-
85
-
86
-
87
-
88
-
89
-
90
-
 91
91 -
 92
92 -
 93
93 -
 94
94 -
 95
95 -
 96
96 -
 97
97 -
 98
98 -
 99
99 -
 100
100 -
 101
101 -
102
-
103
-
104
-
105
-
106
-
107
-
108
-
109
-
110
-
111
-
112
-
113
-
114
-
115
-
116
-
117
-
118
-
119
-
120
-
121
-
122
-
123
-
124
-
125
-
126
-
127
-
128
-
129
-
130
-
131
-
132
-
133
-
134
-
135
-
136
-
137
-
138
-
139
-
140
-
141
-
142
-
143
-
144
-
145
-
146
-
147
-
148
-
149
-
150
-
151
-
152
-
153
-
154
-
155
-
156
-
157
-
158
-
159
-
160
-
161
-
162
-
163
-
164
-
165
-
166
-
167
-
168
-
169
-
170
-
171
-
172
-
173
-
174
-
175
-
176
 |
 |
