Epson Stylus Pro 7800 Professional Edition Printer Guide - Page 26
after moving., only a short distance. Lock the casters and extend the stabilizer knobs
 |
View all Epson Stylus Pro 7800 Professional Edition manuals
Add to My Manuals
Save this manual to your list of manuals |
Page 26 highlights
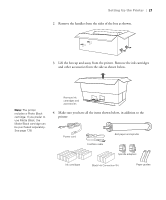
26 | Setting Up the Printer 3. Rotate the front bar once as shown, so the fabric folds around the bar. 4. Snap the connectors onto the front hooks as shown. 5. If you find that your roll paper is curled too tightly to eject properly, attach the two paper guides to the bottom of the printer. See page 161 for more information. 6. Raise the stabilizer knobs and unlock the casters. Then move the printer to the place of use. (The casters are meant for moving the printer for only a short distance.) Lock the casters and extend the stabilizer knobs after moving. 7. Make sure you save the box and packaging in case you need to ship the printer. When you are finished assembling the printer, go to "Connecting the Power Cord" on page 37. 1-26
-
 1
1 -
2
-
3
-
4
-
5
-
6
-
7
-
8
-
9
-
10
-
11
-
12
-
13
-
14
-
15
-
16
-
17
-
18
-
19
-
20
-
 21
21 -
 22
22 -
 23
23 -
 24
24 -
 25
25 -
 26
26 -
 27
27 -
 28
28 -
 29
29 -
 30
30 -
 31
31 -
32
-
33
-
34
-
35
-
36
-
37
-
38
-
39
-
40
-
41
-
42
-
43
-
44
-
45
-
46
-
47
-
48
-
49
-
50
-
51
-
52
-
53
-
54
-
55
-
56
-
57
-
58
-
59
-
60
-
61
-
62
-
63
-
64
-
65
-
66
-
67
-
68
-
69
-
70
-
71
-
72
-
73
-
74
-
75
-
76
-
77
-
78
-
79
-
80
-
81
-
82
-
83
-
84
-
85
-
86
-
87
-
88
-
89
-
90
-
91
-
92
-
93
-
94
-
95
-
96
-
97
-
98
-
99
-
100
-
101
-
102
-
103
-
104
-
105
-
106
-
107
-
108
-
109
-
110
-
111
-
112
-
113
-
114
-
115
-
116
-
117
-
118
-
119
-
120
-
121
-
122
-
123
-
124
-
125
-
126
-
127
-
128
-
129
-
130
-
131
-
132
-
133
-
134
-
135
-
136
-
137
-
138
-
139
-
140
-
141
-
142
-
143
-
144
-
145
-
146
-
147
-
148
-
149
-
150
-
151
-
152
-
153
-
154
-
155
-
156
-
157
-
158
-
159
-
160
-
161
-
162
-
163
-
164
-
165
-
166
-
167
-
168
-
169
-
170
-
171
-
172
-
173
-
174
-
175
-
176
 |
 |

1-26
26
|
Setting Up the Printer
3.
Rotate the front bar once as shown, so the fabric folds around the bar.
4.
Snap the connectors onto the front hooks as shown.
5.
If you find that your roll paper is curled too tightly to eject properly,
attach the two paper guides to the bottom of the printer. See page 161
for more information.
6.
Raise the stabilizer knobs and unlock the casters. Then move the printer
to the place of use. (The casters are meant for moving the printer for
only a short distance.) Lock the casters and extend the stabilizer knobs
after moving.
7.
Make sure you save the box and packaging in case you need to ship the
printer.
When you are finished assembling the printer, go to “Connecting the Power
Cord” on page
37.