Garmin GPSMAP 527 Owner's Manual - Page 67
Advanced Sonar Settings, Auto 4x Zoom
 |
View all Garmin GPSMAP 527 manuals
Add to My Manuals
Save this manual to your list of manuals |
Page 67 highlights
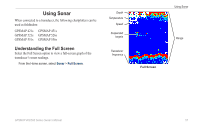
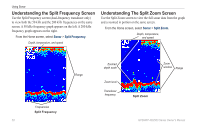
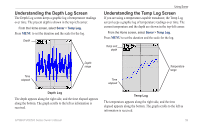
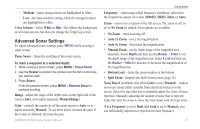
◦◦ Medium-many strong returns are highlighted in white. ◦◦ Low-the least-sensitive setting. Only the strongest returns are highlighted in white. Color Scheme-select White or Blue. This affects the background on all sonar screens, but does not change the Temp Log screen. Advanced Sonar Settings To adjust advanced sonar settings, press MENU while viewing a sonar screen. Pause Sonar-Stops the scrolling of the sonar screen. To mark a waypoint at a selected depth: 1. While viewing a sonar screen, press MENU > Pause Sonar. 2. Use the Rocker to position the pointer over the fish or structure you want to mark. 3. Press Select. From the paused screen, press MENU > Resume Sonar to continue scrolling. Range-adjust the range of the depth scale on the right side of the screen (Auto, or to adjust manually, Manual Range). Gain-controls the sensitivity of the sonar receiver (Auto, or to adjust manually, Manual). To see more detail, increase the gain. If the screen is cluttered, decrease the gain. GPSMAP 400/500 Series Owner's Manual Using Sonar Frequency-when using a dual frequency transducer, select how the frequencies appear on-screen (200kHz, 50kHz, Dual, or Auto). Zoom-zoom in to a section of the full screen. The zoom is off, or set to No Zoom by default. Four options are available: • No Zoom-turns zooming off. • Auto 2x Zoom-twice the magnification. • Auto 4x Zoom-four times the magnification. • Manual Zoom-set the depth range of the magnified area manually. Select Depth and then use the Rocker > Select to set the depth range of the magnified area. Select Level and then use the Rocker > Select to increase or decrease the magnification of the magnified area. • Bottom Lock-locks the zoom window to the bottom. • Split Zoom-displays the Split Zoom screen (page 58). Noise Reject (available only when Gain is set to Manual)-reduces on-screen visual clutter (usually from electrical sources) on the screen. Select the top slider bar to manually adjust the value of noise rejection. Manually adjusting the amount of noise that is rejected helps fine-tune the sonar to show the most detail with the least noise. When Frequency is set to Dual (and Gain is set to Manual), you can individually adjust noise rejection for each frequency. 61
-
 1
1 -
2
-
3
-
4
-
5
-
6
-
7
-
8
-
9
-
10
-
11
-
12
-
13
-
14
-
15
-
16
-
17
-
18
-
19
-
20
-
21
-
22
-
23
-
24
-
25
-
26
-
27
-
28
-
29
-
30
-
31
-
32
-
33
-
34
-
35
-
36
-
37
-
38
-
39
-
40
-
41
-
42
-
43
-
44
-
45
-
46
-
47
-
48
-
49
-
50
-
51
-
52
-
53
-
54
-
55
-
56
-
57
-
58
-
59
-
60
-
61
-
 62
62 -
 63
63 -
 64
64 -
 65
65 -
 66
66 -
 67
67 -
 68
68 -
 69
69 -
 70
70 -
 71
71 -
 72
72 -
73
-
74
-
75
-
76
-
77
-
78
-
79
-
80
-
81
-
82
-
83
-
84
 |
 |
