HP LaserJet Enterprise 700 HP LaserJet Enterprise 700 M712 - User Guide - Page 138
Solve problems checklist, Ready, Trays, Administration, Reports, Configuration/Status s
 |
View all HP LaserJet Enterprise 700 manuals
Add to My Manuals
Save this manual to your list of manuals |
Page 138 highlights
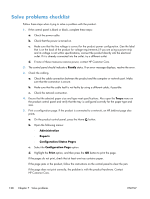
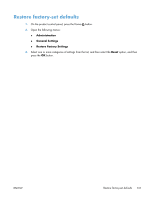
Solve problems checklist Follow these steps when trying to solve a problem with the product. 1. If the control panel is blank or black, complete these steps: a. Check the power cable. b. Check that the power is turned on. c. Make sure that the line voltage is correct for the product power configuration. (See the label that is on the back of the product for voltage requirements.) If you are using a power strip and its voltage is not within specifications, connect the product directly into the electrical outlet. If it is already connected into the outlet, try a different outlet. d. If none of these measures restores power, contact HP Customer Care. 2. The control panel should indicate a Ready status. If an error message displays, resolve the error. 3. Check the cabling. a. Check the cable connection between the product and the computer or network port. Make sure that the connection is secure. b. Make sure that the cable itself is not faulty by using a different cable, if possible. c. Check the network connection. 4. Ensure that the selected paper size and type meet specifications. Also open the Trays menu on the product control panel and verify that the tray is configured correctly for the paper type and size. 5. Print a configuration page. If the product is connected to a network, an HP Jetdirect page also prints. a. On the product control panel, press the Home button. b. Open the following menus: ◦ Administration ◦ Reports ◦ Configuration/Status Pages c. Select the Configuration Page option. d. Highlight the Print option, and then press the OK button to print the page. If the pages do not print, check that at least one tray contains paper. If the page jams in the product, follow the instructions on the control panel to clear the jam. If the page does not print correctly, the problem is with the product hardware. Contact HP Customer Care. 128 Chapter 7 Solve problems ENWW
-
 1
1 -
2
-
3
-
4
-
5
-
6
-
7
-
8
-
9
-
10
-
11
-
12
-
13
-
14
-
15
-
16
-
17
-
18
-
19
-
20
-
21
-
22
-
23
-
24
-
25
-
26
-
27
-
28
-
29
-
30
-
31
-
32
-
33
-
34
-
35
-
36
-
37
-
38
-
39
-
40
-
41
-
42
-
43
-
44
-
45
-
46
-
47
-
48
-
49
-
50
-
51
-
52
-
53
-
54
-
55
-
56
-
57
-
58
-
59
-
60
-
61
-
62
-
63
-
64
-
65
-
66
-
67
-
68
-
69
-
70
-
71
-
72
-
73
-
74
-
75
-
76
-
77
-
78
-
79
-
80
-
81
-
82
-
83
-
84
-
85
-
86
-
87
-
88
-
89
-
90
-
91
-
92
-
93
-
94
-
95
-
96
-
97
-
98
-
99
-
100
-
101
-
102
-
103
-
104
-
105
-
106
-
107
-
108
-
109
-
110
-
111
-
112
-
113
-
114
-
115
-
116
-
117
-
118
-
119
-
120
-
121
-
122
-
123
-
124
-
125
-
126
-
127
-
128
-
129
-
130
-
131
-
132
-
 133
133 -
 134
134 -
 135
135 -
 136
136 -
 137
137 -
 138
138 -
 139
139 -
 140
140 -
 141
141 -
 142
142 -
 143
143 -
144
-
145
-
146
-
147
-
148
-
149
-
150
-
151
-
152
-
153
-
154
-
155
-
156
-
157
-
158
-
159
-
160
-
161
-
162
-
163
-
164
-
165
-
166
-
167
-
168
-
169
-
170
-
171
-
172
-
173
-
174
-
175
-
176
-
177
-
178
-
179
-
180
-
181
-
182
-
183
-
184
-
185
-
186
 |
 |