HP LaserJet Pro M1132s User Guide - Page 239
Optimize and improve image quality, Change print density
 |
View all HP LaserJet Pro M1132s manuals
Add to My Manuals
Save this manual to your list of manuals |
Page 239 highlights
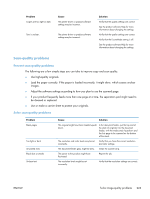
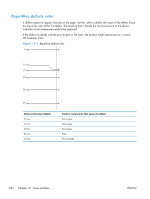
Optimize and improve image quality Change print density 1. Use the printer driver to change the default settings. Follow the appropriate procedure, depending on the operating system you are using. Windows XP, Windows Server 2003, and Windows Server 2008 (using the default Start menu view) a. Click Start, and then click Printers and Faxes. b. Right-click the driver icon, and then select Properties. c. Click the Device Settings tab. Windows XP, Windows Server 2003, and Windows Server 2008 (using the Classic Start menu view) a. Click Start, click Settings, and then click Printers. b. Right-click the driver icon, and then select Properties. c. Click the Device Settings tab. Windows Vista a. Click Start, click Control Panel, and then in the category for Hardware and Sound click Printer. b. Right-click the driver icon, and then select Properties. c. Click the Device Settings tab. Mac OS X 10.4 a. From the Apple menu , click the System Preferences menu and then click the Print & Fax icon. b. Click the Printer Setup button. Mac OS X 10.5 and 10.6 a. From the Apple menu , click the System Preferences menu and then click the Print & Fax icon. b. Select the product in the left side of the window. c. Click the Options & Supplies button. d. Click the Driver tab. 2. Adjust the Print Density slider to change the setting. ENWW Solve image-quality problems 225
-
 1
1 -
2
-
3
-
4
-
5
-
6
-
7
-
8
-
9
-
10
-
11
-
12
-
13
-
14
-
15
-
16
-
17
-
18
-
19
-
20
-
21
-
22
-
23
-
24
-
25
-
26
-
27
-
28
-
29
-
30
-
31
-
32
-
33
-
34
-
35
-
36
-
37
-
38
-
39
-
40
-
41
-
42
-
43
-
44
-
45
-
46
-
47
-
48
-
49
-
50
-
51
-
52
-
53
-
54
-
55
-
56
-
57
-
58
-
59
-
60
-
61
-
62
-
63
-
64
-
65
-
66
-
67
-
68
-
69
-
70
-
71
-
72
-
73
-
74
-
75
-
76
-
77
-
78
-
79
-
80
-
81
-
82
-
83
-
84
-
85
-
86
-
87
-
88
-
89
-
90
-
91
-
92
-
93
-
94
-
95
-
96
-
97
-
98
-
99
-
100
-
101
-
102
-
103
-
104
-
105
-
106
-
107
-
108
-
109
-
110
-
111
-
112
-
113
-
114
-
115
-
116
-
117
-
118
-
119
-
120
-
121
-
122
-
123
-
124
-
125
-
126
-
127
-
128
-
129
-
130
-
131
-
132
-
133
-
134
-
135
-
136
-
137
-
138
-
139
-
140
-
141
-
142
-
143
-
144
-
145
-
146
-
147
-
148
-
149
-
150
-
151
-
152
-
153
-
154
-
155
-
156
-
157
-
158
-
159
-
160
-
161
-
162
-
163
-
164
-
165
-
166
-
167
-
168
-
169
-
170
-
171
-
172
-
173
-
174
-
175
-
176
-
177
-
178
-
179
-
180
-
181
-
182
-
183
-
184
-
185
-
186
-
187
-
188
-
189
-
190
-
191
-
192
-
193
-
194
-
195
-
196
-
197
-
198
-
199
-
200
-
201
-
202
-
203
-
204
-
205
-
206
-
207
-
208
-
209
-
210
-
211
-
212
-
213
-
214
-
215
-
216
-
217
-
218
-
219
-
220
-
221
-
222
-
223
-
224
-
225
-
226
-
227
-
228
-
229
-
230
-
231
-
232
-
233
-
 234
234 -
 235
235 -
 236
236 -
 237
237 -
 238
238 -
 239
239 -
 240
240 -
 241
241 -
 242
242 -
 243
243 -
 244
244 -
245
-
246
-
247
-
248
-
249
-
250
-
251
-
252
-
253
-
254
-
255
-
256
-
257
-
258
-
259
-
260
-
261
-
262
-
263
-
264
-
265
-
266
-
267
-
268
-
269
-
270
-
271
-
272
-
273
-
274
-
275
-
276
-
277
-
278
-
279
-
280
-
281
-
282
-
283
-
284
 |
 |