HP LaserJet Pro M1132s User Guide - Page 92
Use HP Direct Print (wireless models only), Add printer, Setup, HP ePrint Settings, Allowed Senders
 |
View all HP LaserJet Pro M1132s manuals
Add to My Manuals
Save this manual to your list of manuals |
Page 92 highlights
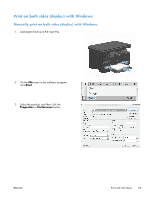
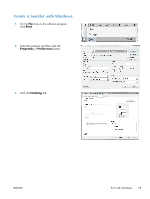
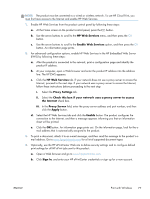
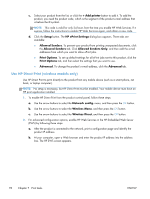
c. Select your product from the list, or click the + Add printer button to add it. To add the product, you need the product code, which is the segment of the product e-mail address that is before the @ symbol. NOTE: This code is valid for only 24 hours from the time you enable HP Web Services. If it expires, follow the instructions to enable HP Web Services again, and obtain a new code. d. Click the Setup button. The HP ePrint Settings dialog box appears. Three tabs are available: ● Allowed Senders. To prevent your product from printing unexpected documents, click the Allowed Senders tab. Click Allowed Senders Only, and then add the e-mail addresses from which you want to allow ePrint jobs. ● Print Options. To set up default settings for all ePrint jobs sent to this product, click the Print Options tab, and then select the settings that you want to use. ● Advanced. To change the product's e-mail address, click the Advanced tab. Use HP Direct Print (wireless models only) Use HP Direct Print to print directly to the product from any mobile device (such as a smart phone, net book, or laptop computer). NOTE: No setup is necessary, but HP Direct Print must be enabled. Your mobile device must have an HP print application installed. 1. To enable HP Direct Print from the product control panel, follow these steps: a. Use the arrow buttons to select the Network config. menu, and then press the OK button. b. Use the arrow buttons to select the Wireless Menu, and then press the OK button. c. Use the arrow buttons to select the Wireless Direct, and then press the OK button. 2. For advanced configuration options, enable HP Web Services in the HP Embedded Web Server (EWS) by following these steps: a. After the product is connected to the network, print a configuration page and identify the product IP address. b. At your computer, open a Web browser and enter the product IP address into the address line. The HP EWS screen appears. 78 Chapter 7 Print tasks ENWW
-
 1
1 -
2
-
3
-
4
-
5
-
6
-
7
-
8
-
9
-
10
-
11
-
12
-
13
-
14
-
15
-
16
-
17
-
18
-
19
-
20
-
21
-
22
-
23
-
24
-
25
-
26
-
27
-
28
-
29
-
30
-
31
-
32
-
33
-
34
-
35
-
36
-
37
-
38
-
39
-
40
-
41
-
42
-
43
-
44
-
45
-
46
-
47
-
48
-
49
-
50
-
51
-
52
-
53
-
54
-
55
-
56
-
57
-
58
-
59
-
60
-
61
-
62
-
63
-
64
-
65
-
66
-
67
-
68
-
69
-
70
-
71
-
72
-
73
-
74
-
75
-
76
-
77
-
78
-
79
-
80
-
81
-
82
-
83
-
84
-
85
-
86
-
 87
87 -
 88
88 -
 89
89 -
 90
90 -
 91
91 -
 92
92 -
 93
93 -
 94
94 -
 95
95 -
 96
96 -
 97
97 -
98
-
99
-
100
-
101
-
102
-
103
-
104
-
105
-
106
-
107
-
108
-
109
-
110
-
111
-
112
-
113
-
114
-
115
-
116
-
117
-
118
-
119
-
120
-
121
-
122
-
123
-
124
-
125
-
126
-
127
-
128
-
129
-
130
-
131
-
132
-
133
-
134
-
135
-
136
-
137
-
138
-
139
-
140
-
141
-
142
-
143
-
144
-
145
-
146
-
147
-
148
-
149
-
150
-
151
-
152
-
153
-
154
-
155
-
156
-
157
-
158
-
159
-
160
-
161
-
162
-
163
-
164
-
165
-
166
-
167
-
168
-
169
-
170
-
171
-
172
-
173
-
174
-
175
-
176
-
177
-
178
-
179
-
180
-
181
-
182
-
183
-
184
-
185
-
186
-
187
-
188
-
189
-
190
-
191
-
192
-
193
-
194
-
195
-
196
-
197
-
198
-
199
-
200
-
201
-
202
-
203
-
204
-
205
-
206
-
207
-
208
-
209
-
210
-
211
-
212
-
213
-
214
-
215
-
216
-
217
-
218
-
219
-
220
-
221
-
222
-
223
-
224
-
225
-
226
-
227
-
228
-
229
-
230
-
231
-
232
-
233
-
234
-
235
-
236
-
237
-
238
-
239
-
240
-
241
-
242
-
243
-
244
-
245
-
246
-
247
-
248
-
249
-
250
-
251
-
252
-
253
-
254
-
255
-
256
-
257
-
258
-
259
-
260
-
261
-
262
-
263
-
264
-
265
-
266
-
267
-
268
-
269
-
270
-
271
-
272
-
273
-
274
-
275
-
276
-
277
-
278
-
279
-
280
-
281
-
282
-
283
-
284
 |
 |