HP LaserJet Pro M1132s User Guide - Page 91
For advanced configuration options, enable HP Web Services in the HP Embedded Web Server
 |
View all HP LaserJet Pro M1132s manuals
Add to My Manuals
Save this manual to your list of manuals |
Page 91 highlights
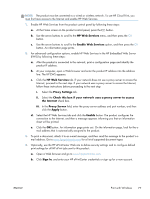
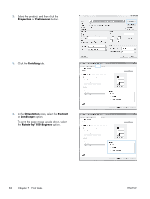
NOTE: The product must be connected to a wired or wireless network. To use HP Cloud Print, you must first have access to the Internet and enable HP Web Services. 1. Enable HP Web Services from the product control panel by following these steps: a. At the Home screen on the product control panel, press the button. b. Use the arrow buttons to scroll to the HP Web Services menu, and then press the OK button. c. Use the arrow buttons to scroll to the Enable Web Services option, and then press the OK button. An information page prints. 2. For advanced configuration options, enable HP Web Services in the HP Embedded Web Server (EWS) by following these steps: a. After the product is connected to the network, print a configuration page and identify the product IP address. b. At your computer, open a Web browser and enter the product IP address into the address line. The HP EWS appears. c. Click the HP Web Services tab. If your network does not use a proxy server to access the Internet, proceed to the next step. If your network uses a proxy server to access the Internet, follow these instructions before proceeding to the next step: i. Select the Proxy Settings tab. ii. Select the Check this box if your network uses a proxy server to access the Internet check box. iii. In the Proxy Server field, enter the proxy server address and port number, and then click the Apply button. d. Select the HP Web Services tab and click the Enable button. The product configures the connection to the Internet, and then a message appears informing you that an information sheet will be printed. e. Click the OK button. An information page prints out. On the information page, look for the email address that is automatically assigned to the product. 3. To print a document, attach it to an e-mail message, and then send the message to the product's email address. Go to www.hpeprintcenter.com for a list of supported document types 4. Optionally, use the HP ePrintCenter Web site to define security settings and to configure default print settings for all HP ePrint jobs sent to this product: a. Open a Web browser and go to www.hpeprintcenter.com. b. Click Sign In, and enter your HP ePrintCenter credentials or sign up for a new account. ENWW Print with Windows 77
-
 1
1 -
2
-
3
-
4
-
5
-
6
-
7
-
8
-
9
-
10
-
11
-
12
-
13
-
14
-
15
-
16
-
17
-
18
-
19
-
20
-
21
-
22
-
23
-
24
-
25
-
26
-
27
-
28
-
29
-
30
-
31
-
32
-
33
-
34
-
35
-
36
-
37
-
38
-
39
-
40
-
41
-
42
-
43
-
44
-
45
-
46
-
47
-
48
-
49
-
50
-
51
-
52
-
53
-
54
-
55
-
56
-
57
-
58
-
59
-
60
-
61
-
62
-
63
-
64
-
65
-
66
-
67
-
68
-
69
-
70
-
71
-
72
-
73
-
74
-
75
-
76
-
77
-
78
-
79
-
80
-
81
-
82
-
83
-
84
-
85
-
 86
86 -
 87
87 -
 88
88 -
 89
89 -
 90
90 -
 91
91 -
 92
92 -
 93
93 -
 94
94 -
 95
95 -
 96
96 -
97
-
98
-
99
-
100
-
101
-
102
-
103
-
104
-
105
-
106
-
107
-
108
-
109
-
110
-
111
-
112
-
113
-
114
-
115
-
116
-
117
-
118
-
119
-
120
-
121
-
122
-
123
-
124
-
125
-
126
-
127
-
128
-
129
-
130
-
131
-
132
-
133
-
134
-
135
-
136
-
137
-
138
-
139
-
140
-
141
-
142
-
143
-
144
-
145
-
146
-
147
-
148
-
149
-
150
-
151
-
152
-
153
-
154
-
155
-
156
-
157
-
158
-
159
-
160
-
161
-
162
-
163
-
164
-
165
-
166
-
167
-
168
-
169
-
170
-
171
-
172
-
173
-
174
-
175
-
176
-
177
-
178
-
179
-
180
-
181
-
182
-
183
-
184
-
185
-
186
-
187
-
188
-
189
-
190
-
191
-
192
-
193
-
194
-
195
-
196
-
197
-
198
-
199
-
200
-
201
-
202
-
203
-
204
-
205
-
206
-
207
-
208
-
209
-
210
-
211
-
212
-
213
-
214
-
215
-
216
-
217
-
218
-
219
-
220
-
221
-
222
-
223
-
224
-
225
-
226
-
227
-
228
-
229
-
230
-
231
-
232
-
233
-
234
-
235
-
236
-
237
-
238
-
239
-
240
-
241
-
242
-
243
-
244
-
245
-
246
-
247
-
248
-
249
-
250
-
251
-
252
-
253
-
254
-
255
-
256
-
257
-
258
-
259
-
260
-
261
-
262
-
263
-
264
-
265
-
266
-
267
-
268
-
269
-
270
-
271
-
272
-
273
-
274
-
275
-
276
-
277
-
278
-
279
-
280
-
281
-
282
-
283
-
284
 |
 |