HP Pavilion a1000 Getting Started Guide - Page 21
Configuring the Sound Effect Manager (6-connector)
 |
View all HP Pavilion a1000 manuals
Add to My Manuals
Save this manual to your list of manuals |
Page 21 highlights
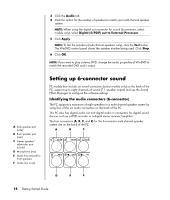
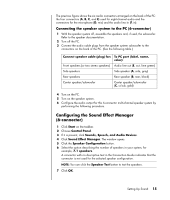
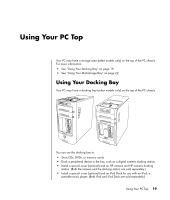
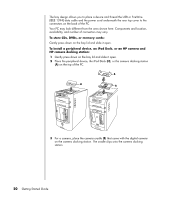
The previous figure shows the six audio connectors arranged on the back of the PC: the four connectors (A, B, C, and E) used for eight-channel audio and the connectors for the microphone (D, mic) and the audio line in (F, in). Connecting the speaker system to the PC (6-connector) 1 With the speaker system off, assemble the speakers and, if used, the subwoofer. Refer to the speaker documentation. 2 Turn off the PC. 3 Connect the audio cable plugs from the speaker system subwoofer to the connectors on the back of the PC. (See the following table.) Connect speaker cable (plug) for: To PC port (label, name, color): Front speakers (or two stereo speakers) Audio line out (E, out, lime green) Side speakers Side speaker (A, side, gray) Rear speakers Rear speaker (B, rear, black) Center speaker/subwoofer Center speaker/subwoofer (C, c/sub, gold) 4 Turn on the PC. 5 Turn on the speaker system. 6 Configure the audio output for this 6-connector multi-channel speaker system by performing the following procedure. Configuring the Sound Effect Manager (6-connector) 1 Click Start on the taskbar. 2 Choose Control Panel. 3 If it is present, click Sounds, Speech, and Audio Devices. 4 Click Sound Effect Manager. The window opens. 5 Click the Speaker Configuration button. 6 Select the option describing the number of speakers in your system, for example, 7.1 speakers. A connector with no descriptive text in the Connection Guide indicates that the connector is not used for the selected speaker configuration. NOTE: You can click the Speaker Test button to test the speakers. 7 Click OK. Setting Up Sound 15
-
 1
1 -
2
-
3
-
4
-
5
-
6
-
7
-
8
-
9
-
10
-
11
-
12
-
13
-
14
-
15
-
 16
16 -
 17
17 -
 18
18 -
 19
19 -
 20
20 -
 21
21 -
 22
22 -
 23
23 -
 24
24 -
 25
25 -
 26
26 -
27
-
28
-
29
-
30
-
31
-
32
-
33
-
34
-
35
-
36
-
37
-
38
-
39
-
40
-
41
-
42
-
43
-
44
-
45
-
46
-
47
-
48
-
49
-
50
-
51
-
52
-
53
-
54
-
55
-
56
-
57
-
58
-
59
-
60
-
61
-
62
-
63
-
64
-
65
-
66
-
67
-
68
-
69
-
70
-
71
-
72
-
73
-
74
-
75
-
76
-
77
-
78
-
79
-
80
-
81
-
82
-
83
-
84
-
85
-
86
-
87
-
88
-
89
-
90
-
91
-
92
-
93
-
94
-
95
-
96
-
97
-
98
-
99
-
100
 |
 |
