HP Pavilion a1000 Getting Started Guide - Page 74
Archiving Files on a DVD or CD, Creating an Image File, Start, All Programs, Sonic RecordNow - hard drive removal
 |
View all HP Pavilion a1000 manuals
Add to My Manuals
Save this manual to your list of manuals |
Page 74 highlights
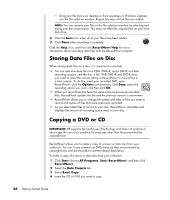
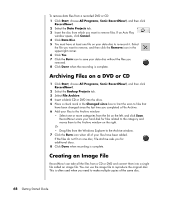
To remove data files from a recorded DVD or CD: 1 Click Start, choose All Programs, Sonic RecordNow!, and then click RecordNow!. 2 Select the Data Projects tab. 3 Insert the disc from which you want to remove files. If an Auto Play window opens, click Cancel. 4 Click Data Disc. 5 You must have at least one file on your data disc to re-record it. Select the file you want to remove, and then click the Remove icon in the upper-right corner. 6 Click Yes. 7 Click the Burn icon to save your data disc without the files you removed. 8 Click Done when the recording is complete. Archiving Files on a DVD or CD 1 Click Start, choose All Programs, Sonic RecordNow!, and then click RecordNow!. 2 Select the Backup Projects tab. 3 Select File Archive. 4 Insert a blank CD or DVD into the drive. 5 Place a check mark in the Changed since box to limit the scan to files that have been changed since the last time you completed a File Archive. 6 Add your files to the Archive window: • Select one or more categories from the list on the left, and click Scan. RecordNow! scans your hard disk for files related to the category and moves them to the Archive window on the right. Or • Drag files from the Windows Explorer to the Archive window. 7 Click the Burn icon when all of your files have been added. If the files do not fit on one disc, File Archive asks you for additional discs. 8 Click Done when recording is complete. Creating an Image File RecordNow! can take all the files from a CD or DVD and convert them into a single file called an image file. You can use the image file to reproduce the original disc. This is often used when you need to make multiple copies of the same disc. 68 Getting Started Guide
-
 1
1 -
2
-
3
-
4
-
5
-
6
-
7
-
8
-
9
-
10
-
11
-
12
-
13
-
14
-
15
-
16
-
17
-
18
-
19
-
20
-
21
-
22
-
23
-
24
-
25
-
26
-
27
-
28
-
29
-
30
-
31
-
32
-
33
-
34
-
35
-
36
-
37
-
38
-
39
-
40
-
41
-
42
-
43
-
44
-
45
-
46
-
47
-
48
-
49
-
50
-
51
-
52
-
53
-
54
-
55
-
56
-
57
-
58
-
59
-
60
-
61
-
62
-
63
-
64
-
65
-
66
-
67
-
68
-
 69
69 -
 70
70 -
 71
71 -
 72
72 -
 73
73 -
 74
74 -
 75
75 -
 76
76 -
 77
77 -
 78
78 -
 79
79 -
80
-
81
-
82
-
83
-
84
-
85
-
86
-
87
-
88
-
89
-
90
-
91
-
92
-
93
-
94
-
95
-
96
-
97
-
98
-
99
-
100
 |
 |
