HP Pavilion a1000 Getting Started Guide - Page 77
LightScribe 12cm Disc, Edit Background
 |
View all HP Pavilion a1000 manuals
Add to My Manuals
Save this manual to your list of manuals |
Page 77 highlights
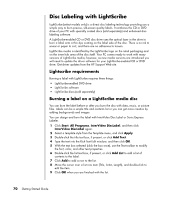
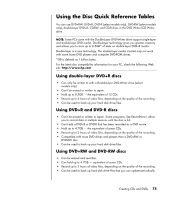
10 Click Edit Background, and then click Change Background to add a background image to the label. 11 Follow the onscreen instructions to browse to and select an image file. InterVideo Disc Label supports .jpg, .bmp, and .png image files. NOTE: LightScribe creates a grayscale (monochrome) image similar to a black and white photograph. 12 Click Add Image and follow the onscreen instructions to browse to and select an image file. InterVideo Disc Label supports .jpg, .bmp, and .png image files. 13 Click and drag the image to the area you want it to appear on the label. You can resize the image by clicking and dragging the sides or corners of the image. NOTE: To remove an image from the label, click the image, and then press Delete on your keyboard. 14 When you are satisfied with the appearance of your label design, click LightScribe Print. Click Print, insert the LightScribe media (label side down) in the disc tray, and then click OK. To burn a label with Sonic Express Labeler: 1 Click Start, All Programs, Sonic RecordNow!, and then click Express Labeler. NOTE: You can open the Express Labeler from within RecordNow! by clicking Label Disc. 2 Select the Project area and make sure that Disc Label is selected. 3 Click Text, and then enter text for the Title and Subtitle. 4 For each line of content description, click New and enter text for the information you want to include, and then click OK. 5 Select a label template by clicking Layout and choosing a layout. 6 Select a background, if desired, by clicking Background. Select one of the provided backgrounds, or click More to find one of your own images to use as a background. NOTE: LightScribe creates a grayscale (monochrome) image similar to a black and white photograph. 7 When you are satisfied with the appearance of your label, insert the LightScribe media disc (label side down) into the disc drive tray, and then click Print. 8 From the Disc Label menu, select LightScribe 12cm Disc. 9 Select a Contrast Level, and then click OK to begin burning the label. Creating CDs and DVDs 71
-
 1
1 -
2
-
3
-
4
-
5
-
6
-
7
-
8
-
9
-
10
-
11
-
12
-
13
-
14
-
15
-
16
-
17
-
18
-
19
-
20
-
21
-
22
-
23
-
24
-
25
-
26
-
27
-
28
-
29
-
30
-
31
-
32
-
33
-
34
-
35
-
36
-
37
-
38
-
39
-
40
-
41
-
42
-
43
-
44
-
45
-
46
-
47
-
48
-
49
-
50
-
51
-
52
-
53
-
54
-
55
-
56
-
57
-
58
-
59
-
60
-
61
-
62
-
63
-
64
-
65
-
66
-
67
-
68
-
69
-
70
-
71
-
 72
72 -
 73
73 -
 74
74 -
 75
75 -
 76
76 -
 77
77 -
 78
78 -
 79
79 -
 80
80 -
 81
81 -
 82
82 -
83
-
84
-
85
-
86
-
87
-
88
-
89
-
90
-
91
-
92
-
93
-
94
-
95
-
96
-
97
-
98
-
99
-
100
 |
 |
