HP Visualize J5000 hp Visualize J5000, J7000 workstations service handbook (a4 - Page 130
Removable Storage Device
 |
View all HP Visualize J5000 manuals
Add to My Manuals
Save this manual to your list of manuals |
Page 130 highlights
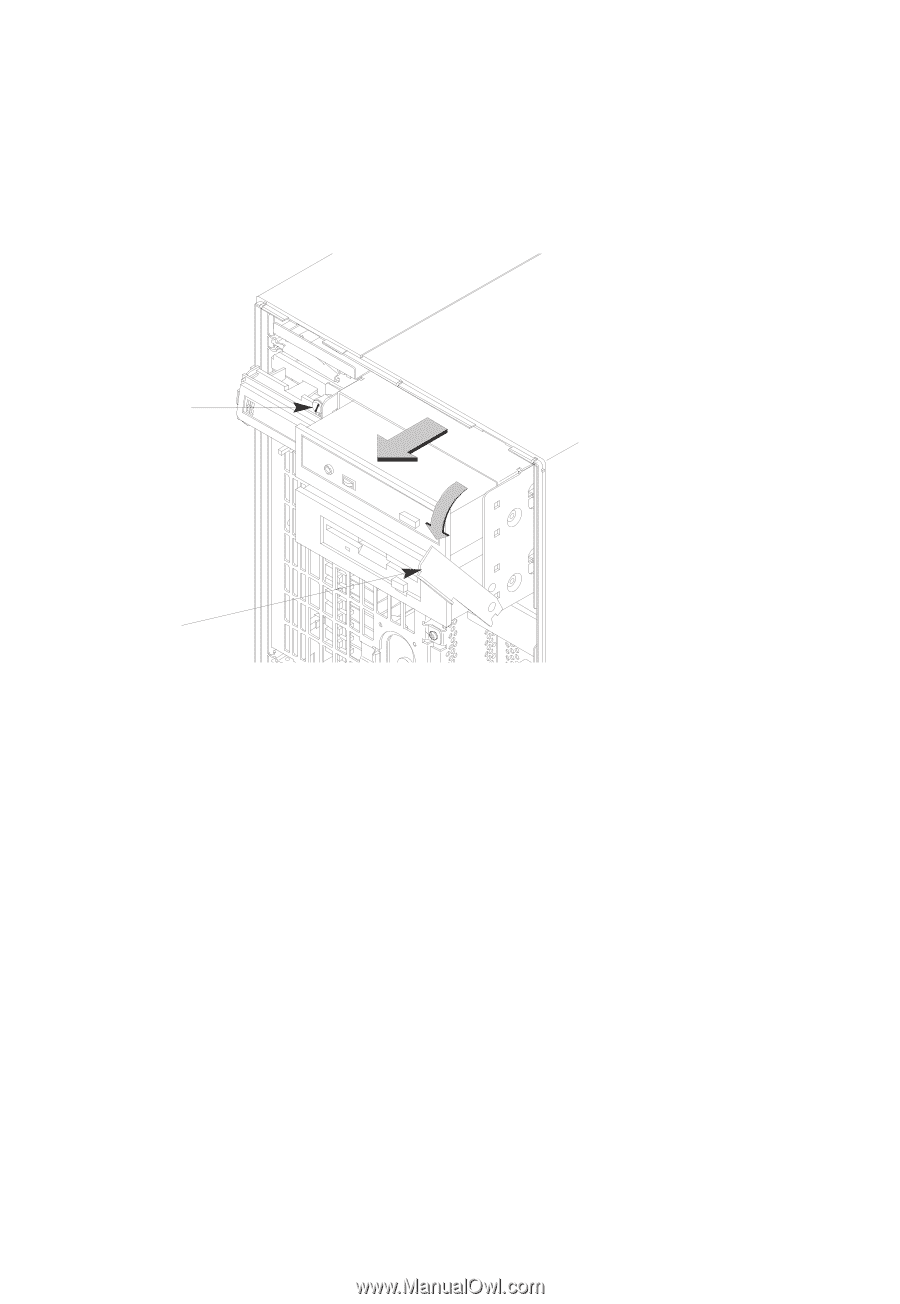
Removable Storage Device Before removing a storage device, open the system unit. Perform the following steps to remove any of the removable storage devices: 1. Unscrew the two captive screws on the left side of the Storage Assembly and pull down the drawer latch on the right side of the Storage Assembly, as shown in Figure 5-43. 1st Captive Screw (2nd Captive screw is below 1st, but not visible in this view) Drawer Ejector Handle Figure 5-43. Removing Storage Drawer from System Unit The Storage Assembly slides partway out of the drawer. 2. Pull the Storage Assembly out as far as it will go. (A safety catch on the left side prevents the drawer from coming all the way out.) NOTICE: When sliding the Storage Assembly out of the system unit, move the drawer ejector handle to prevent the Storage Assembly from hitting it. 3. Push in on the safety catch and continue pulling the drawer out. Be sure to support the assembly from the bottom. 5-48 Field Replaceable Units
-
 1
1 -
2
-
3
-
4
-
5
-
6
-
7
-
8
-
9
-
10
-
11
-
12
-
13
-
14
-
15
-
16
-
17
-
18
-
19
-
20
-
21
-
22
-
23
-
24
-
25
-
26
-
27
-
28
-
29
-
30
-
31
-
32
-
33
-
34
-
35
-
36
-
37
-
38
-
39
-
40
-
41
-
42
-
43
-
44
-
45
-
46
-
47
-
48
-
49
-
50
-
51
-
52
-
53
-
54
-
55
-
56
-
57
-
58
-
59
-
60
-
61
-
62
-
63
-
64
-
65
-
66
-
67
-
68
-
69
-
70
-
71
-
72
-
73
-
74
-
75
-
76
-
77
-
78
-
79
-
80
-
81
-
82
-
83
-
84
-
85
-
86
-
87
-
88
-
89
-
90
-
91
-
92
-
93
-
94
-
95
-
96
-
97
-
98
-
99
-
100
-
101
-
102
-
103
-
104
-
105
-
106
-
107
-
108
-
109
-
110
-
111
-
112
-
113
-
114
-
115
-
116
-
117
-
118
-
119
-
120
-
121
-
122
-
123
-
124
-
 125
125 -
 126
126 -
 127
127 -
 128
128 -
 129
129 -
 130
130 -
 131
131 -
 132
132 -
 133
133 -
 134
134 -
 135
135 -
136
-
137
-
138
-
139
-
140
-
141
-
142
-
143
-
144
-
145
-
146
-
147
-
148
-
149
-
150
-
151
-
152
-
153
-
154
-
155
-
156
-
157
-
158
-
159
-
160
-
161
-
162
-
163
-
164
-
165
-
166
-
167
-
168
-
169
-
170
-
171
-
172
 |
 |