IBM 8676 Hardware Maintenance Manual - Page 36
Light, Diagnostics, Level, diagnostic, panel
 |
UPC - 087944770107
View all IBM 8676 manuals
Add to My Manuals
Save this manual to your list of manuals |
Page 36 highlights
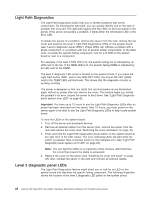
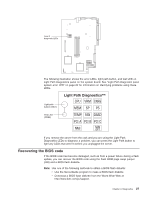
Light Path Diagnostics The Light Path Diagnostics LEDs help you to identify problems with server components. By following the light path, you can quickly identify and fix the type of problem that occurred. The light path begins with the LEDs on the front panel of the server. If the server encounters a problem, it lights either the Information LED or the Error LED. To isolate the source of a problem, remove the server from the rack, remove the top cover and examine the level 2 Light Path Diagnostics LEDs on the system board (see "Level 2 diagnostic panel LEDs"). These LEDs can indicate a problem with a single component, or a problem with one of several similar components. In the latter case, to isolate the specific failing component, look for a lit LED on the system board or next to a component. For example, if the level 2 FAN LED is lit, the specific failing fan is indicated by an LED next to the fan. If the MEM LED is lit, the specific failing DIMM is indicated by an LED next to the DIMM. The level 2 diagnostic LED panel is located on the system board. If you press the Light Path button (SW1, next to the NON OPT LED), the Circuit OK LED (CR82, next to the TEMP LED) will illuminate. This shows that the diagnostic circuitry is working correctly. The server is designed so that any LEDs that are illuminated can be illuminated again without ac power after you remove the cover. This feature helps you isolate the problem if an error causes the server to shut down. See "Light Path Diagnostic panel system error LED" on page 82. Important: You have up to 12 hours to use the Light Path Diagnostic LEDs after ac power has been removed from the server. After 12 hours, you must power-on the server again to be able to use the Light Path Diagnostic LEDs to help locate system errors. To view the LEDs on the system board: 1. Turn off the server and peripheral devices. 2. Remove all external cables from the server; then, remove the server from the rack and remove the cover (see "Removing the cover and bezel" on page 44). 3. Press and hold the Light Path Diagnostics (blue) button on the system board at the right front of the LED cluster. The error-indicating LEDs will light while the switch is pressed. Take corrective action for the indicated error (see "Light Path Diagnostic panel system error LED" on page 82). Note: You can light the LEDs for a maximum of two minutes. After that time, the circuit that powers the LEDs is exhausted. 4. Replace the cover on the server (see "Installing the cover and bezel" on page 59); then, reinstall the server in the rack and connect all external cables. Level 2 diagnostic panel LEDs The Light Path Diagnostics feature might direct you to look for an LED on the system board that identifies the specific failing component. The following illustration shows the location of the level 2 diagnostic LED panel on the system board. 26 xSeries 335 Type 8676, Type 8830: Hardware Maintenance Manual and Troubleshooting Guide
-
 1
1 -
2
-
3
-
4
-
5
-
6
-
7
-
8
-
9
-
10
-
11
-
12
-
13
-
14
-
15
-
16
-
17
-
18
-
19
-
20
-
21
-
22
-
23
-
24
-
25
-
26
-
27
-
28
-
29
-
30
-
 31
31 -
 32
32 -
 33
33 -
 34
34 -
 35
35 -
 36
36 -
 37
37 -
 38
38 -
 39
39 -
 40
40 -
 41
41 -
42
-
43
-
44
-
45
-
46
-
47
-
48
-
49
-
50
-
51
-
52
-
53
-
54
-
55
-
56
-
57
-
58
-
59
-
60
-
61
-
62
-
63
-
64
-
65
-
66
-
67
-
68
-
69
-
70
-
71
-
72
-
73
-
74
-
75
-
76
-
77
-
78
-
79
-
80
-
81
-
82
-
83
-
84
-
85
-
86
-
87
-
88
-
89
-
90
-
91
-
92
-
93
-
94
-
95
-
96
-
97
-
98
-
99
-
100
-
101
-
102
-
103
-
104
-
105
-
106
-
107
-
108
-
109
-
110
-
111
-
112
-
113
-
114
-
115
-
116
-
117
-
118
-
119
-
120
-
121
-
122
-
123
-
124
-
125
-
126
-
127
-
128
-
129
-
130
-
131
-
132
-
133
-
134
-
135
-
136
-
137
-
138
-
139
-
140
-
141
-
142
-
143
-
144
-
145
-
146
-
147
-
148
-
149
-
150
-
151
-
152
-
153
-
154
-
155
-
156
-
157
-
158
-
159
-
160
-
161
-
162
-
163
-
164
-
165
-
166
-
167
-
168
-
169
-
170
-
171
-
172
 |
 |
