IBM 8676 Hardware Maintenance Manual - Page 38
Power, checkout
 |
UPC - 087944770107
View all IBM 8676 manuals
Add to My Manuals
Save this manual to your list of manuals |
Page 38 highlights
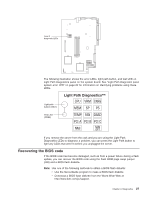
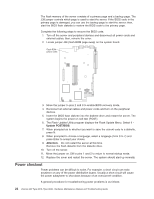
The flash memory of the server consists of a primary page and a backup page. The J38 jumper controls which page is used to start the server. If the BIOS code in the primary page is damaged, you can use the backup page to start the server; then, start the BIOS flash diskette to restore the BIOS code to the primary page. Complete the following steps to recover the BIOS code: 1. Turn off the server and peripheral devices and disconnect all power cords and external cables; then, remove the cover. 2. Locate jumper J38 (flash-ROM page swap) on the system board. Flash ROM jumper (J38) 3. Move the jumper to pins 2 and 3 to enable BIOS recovery mode. 4. Reconnect all external cables and power cords and turn on the peripheral devices. 5. Insert the BIOS flash diskette into the diskette drive and restart the server. The system begins the power-on self-test (POST). 6. The Flash Update Utility program displays the Flash Update Menu. Select 1 - Update POST/BIOS. 7. When prompted as to whether you want to save the current code to a diskette, press N. 8. When prompted to choose a language, select a language (from 0 to 7) and press Enter to accept your choice. 9. Attention: Do not restart the server at this time. Remove the flash diskette from the diskette drive. 10. Turn off the server. 11. Move the jumper on J38 to pins 1 and 2 to return to normal startup mode. 12. Replace the cover and restart the server. The system should start up normally. Power checkout Power problems can be difficult to solve. For example, a short circuit can exist anywhere on any of the power distribution buses. Usually a short circuit will cause the power subsystem to shut down because of an overcurrent condition. A general procedure for troubleshooting power problems is as follows: 28 xSeries 335 Type 8676, Type 8830: Hardware Maintenance Manual and Troubleshooting Guide
-
 1
1 -
2
-
3
-
4
-
5
-
6
-
7
-
8
-
9
-
10
-
11
-
12
-
13
-
14
-
15
-
16
-
17
-
18
-
19
-
20
-
21
-
22
-
23
-
24
-
25
-
26
-
27
-
28
-
29
-
30
-
31
-
32
-
 33
33 -
 34
34 -
 35
35 -
 36
36 -
 37
37 -
 38
38 -
 39
39 -
 40
40 -
 41
41 -
 42
42 -
 43
43 -
44
-
45
-
46
-
47
-
48
-
49
-
50
-
51
-
52
-
53
-
54
-
55
-
56
-
57
-
58
-
59
-
60
-
61
-
62
-
63
-
64
-
65
-
66
-
67
-
68
-
69
-
70
-
71
-
72
-
73
-
74
-
75
-
76
-
77
-
78
-
79
-
80
-
81
-
82
-
83
-
84
-
85
-
86
-
87
-
88
-
89
-
90
-
91
-
92
-
93
-
94
-
95
-
96
-
97
-
98
-
99
-
100
-
101
-
102
-
103
-
104
-
105
-
106
-
107
-
108
-
109
-
110
-
111
-
112
-
113
-
114
-
115
-
116
-
117
-
118
-
119
-
120
-
121
-
122
-
123
-
124
-
125
-
126
-
127
-
128
-
129
-
130
-
131
-
132
-
133
-
134
-
135
-
136
-
137
-
138
-
139
-
140
-
141
-
142
-
143
-
144
-
145
-
146
-
147
-
148
-
149
-
150
-
151
-
152
-
153
-
154
-
155
-
156
-
157
-
158
-
159
-
160
-
161
-
162
-
163
-
164
-
165
-
166
-
167
-
168
-
169
-
170
-
171
-
172
 |
 |
