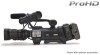
JVC GY-HM700UXT 132 page operation manual for the GY-HM700 solid state camcord - Page 35
SDHC Cards, SDHC Cards to Use, Inserting an SDHC Card, Card Slot Status Indicator
 |
View all JVC GY-HM700UXT manuals
Add to My Manuals
Save this manual to your list of manuals |
Page 35 highlights
SDHC Cards This camera recorder saves the recorded images and audio sound on the SDHC card (sold separately) in the card slot. Memo: ● If the SDHC card contains files recorded by devices other than this camera recorder or files that are saved from a PC, the recordable time may be shorter or data may not be properly recorded. Ⅵ SDHC Cards to Use Use a Class 6 SDHC card (4 GB - 32 GB). Note: ● Using cards other than those from Panasonic, TOSHIBA or SanDisk may result in recording failure or data loss. SDHC Card Cover Knob Slot B Status Indicator Slot A Status Indicator [SLOT SELECT] Button SDHC Card Cover Inserting an SDHC Card This camera recorder comes with two card slots for video/ audio recording and playback (Slot A and B). 1 Slide the SDHC card cover knob of the desired slot in the direction of the arrow and open the cover. 2 Insert an SDHC card with the notched corner first. 3 Close the SDHC card cover. 1 Notched Corner SDHC Card 3 2 Ⅵ Card Slot Status Indicator The following table shows the respective states of slot A and B. Lamp Lights up in red Lights up in green Light goes out Slot Status Inserted SDHC card is being accessed. (writing/reading data) Do not turn off the power of the camera recorder or remove the SDHC card. On standby. Inserted SDHC card can be used for recording or playback. ● SDHC card is not inserted. ● An unusable card is inserted. ● An SDHC card is inserted but a different slot is selected. Removing the SDHC Card 1 Check that the SDHC card to be removed is not being accessed (lights up in red). 2 Slide the SDHC card cover knob in the direction of the arrow and open the cover. 3 Push the SDHC card and remove it from the slot. 4 Close the SDHC card cover. 2 3 4 Memo: ● When both slots are inserted with usable SDHC cards, the previously selected slot is used. Note: ● Data may be lost if you turn off the power of the camera recorder or remove the SDHC card when it is being accessed. All data recorded on the card, including the file that is being accessed, may be corrupted. Be sure to check whether the status indicator is lighted in green or not before you turn off the power or remove the SDHC card. ● If you mistakenly remove the card when it is being accessed, reinsert the card only after the status indicator goes off. ● The SDHC card may not be recognized if you insert and remove the card within a short time. When this happens, remove the card and wait for a few seconds before you reinsert. 31
-
 1
1 -
2
-
3
-
4
-
5
-
6
-
7
-
8
-
9
-
10
-
11
-
12
-
13
-
14
-
15
-
16
-
17
-
18
-
19
-
20
-
21
-
22
-
23
-
24
-
25
-
26
-
27
-
28
-
29
-
 30
30 -
 31
31 -
 32
32 -
 33
33 -
 34
34 -
 35
35 -
 36
36 -
 37
37 -
 38
38 -
 39
39 -
 40
40 -
41
-
42
-
43
-
44
-
45
-
46
-
47
-
48
-
49
-
50
-
51
-
52
-
53
-
54
-
55
-
56
-
57
-
58
-
59
-
60
-
61
-
62
-
63
-
64
-
65
-
66
-
67
-
68
-
69
-
70
-
71
-
72
-
73
-
74
-
75
-
76
-
77
-
78
-
79
-
80
-
81
-
82
-
83
-
84
-
85
-
86
-
87
-
88
-
89
-
90
-
91
-
92
-
93
-
94
-
95
-
96
-
97
-
98
-
99
-
100
-
101
-
102
-
103
-
104
-
105
-
106
-
107
-
108
-
109
-
110
-
111
-
112
-
113
-
114
-
115
-
116
-
117
-
118
-
119
-
120
-
121
-
122
-
123
-
124
-
125
-
126
-
127
-
128
-
129
-
130
-
131
-
132
 |
 |
