JVC GY-HM700UXT 132 page operation manual for the GY-HM700 solid state camcord - Page 48
Adjusting Audio Input Settings and Recording Level, Setting Audio Input
 |
View all JVC GY-HM700UXT manuals
Add to My Manuals
Save this manual to your list of manuals |
Page 48 highlights
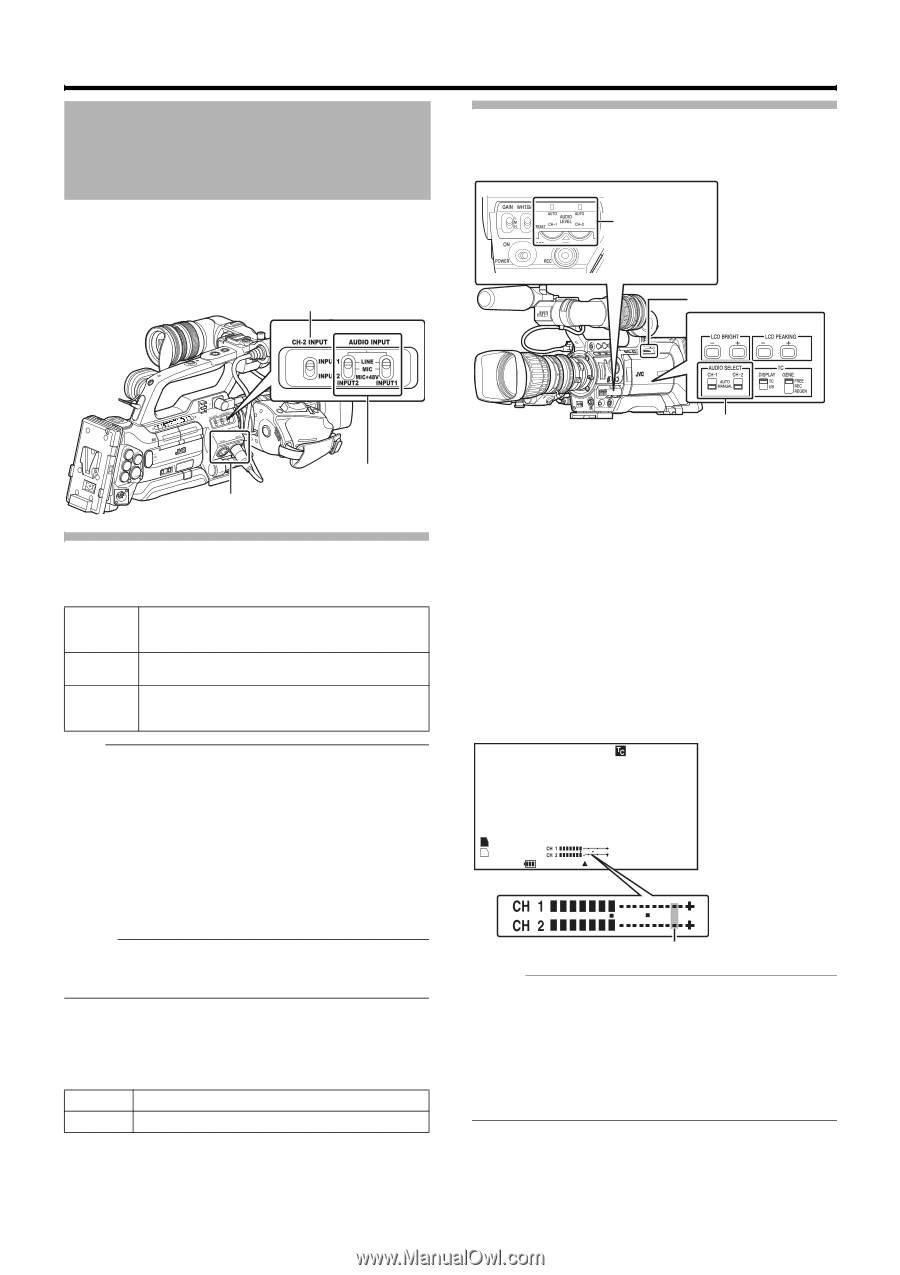
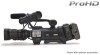
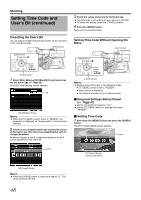
Shooting Adjusting Audio Input Settings and Recording Level You can record audio from the two channels (CH-1/CH-2) in synchronization with video images on this camera recorder. The camera recorder is equipped with [INPUT1] and [INPUT2] terminals for audio input. You can select a recording channel and the adjustment mode (manual/ automatic). [CH-2 INPUT] Selection Switch Adjusting Audio Recording Level You can select to adjust the audio recording levels for the two channels (CH-1/CH-2) manually or automatically. [AUDIO LEVEL CH-1/CH-2] Adjustment Knob [FULL AUTO] Switch When the LCD monitor is open [AUDIO INPUT 1/2] Mode Switch [INPUT1/INPUT2] Terminal Setting Audio Input Select the audio to input through [INPUT1] and [INPUT2] terminals with the [AUDIO INPUT 1/2] mode switch. [LINE] Use this setting when connecting to an audio device or other equipment. The reference input level is +4 dBu. [MIC] Use this setting when connecting to a dynamic microphone. [MIC+48V] Use this setting when connecting to a microphone (phantom microphone) that requires a +48 V power supply. Note: ● When connecting a device that does not require a +48 V power supply, make sure that it is not set to the AMIC+48VB position. ● When the [AUDIO INPUT 1/2] mode switch is set to AMICB, make sure that a microphone is connected to the [INPUT1/INPUT2] terminal. If you increase the recording level when a microphone is not connected, noise from the input terminal may be recorded. ● When a microphone is not connected to the [INPUT1/ INPUT2] terminal, set the [AUDIO INPUT 1/2] mode switch to ALINEB or adjust the volume with the [CH1/CH2 AUDIO LEVEL] recording level adjustment knob. Memo: ● Set the reference input level of AMICB and AMIC+48VB using [Input1 Mic Ref.]/[Input2 Mic Ref.] in the [Main Menu]B[Record Set]B[Audio Set] menu. (A Page 72) Ⅵ Setting of [CH-2 INPUT] Selection Switch Use the [CH-2 INPUT] selection switch to select the audio to be recorded to CH-2. [INPUT1] Records audio from [INPUT1] terminal to CH-2. [INPUT2] Records audio from [INPUT2] terminal to CH-2. [AUDIO SELECT CH-1/ CH-2] Selection Switch Ⅵ Manual Adjustment Mode (Manual Adjustment) Set the [AUDIO SELECT CH-1/CH-2] switch on the camera recorder to AMANUALB to enter the manual adjustment mode, and use the [AUDIO LEVEL CH-1/CH-2] adjustment knob to set the recording level. You can adjust the level manually during the recording, recording pause, and stop modes. 1 Set the [AUDIO SELECT CH-1/CH-2] switch to AMANUALB for the channel to manually adjust the recording level. 2 Turn the corresponding [AUDIO LEVEL CH-1/CH-2] adjustment knob to adjust the level. Adjust such that the audio level meter does not light up at -2 dB even for loud sounds. 1280x720 30/24 fps 24p HQ 00:00:00:00 A 100min B 100min STBY 282min F5.6 STATUS 1 Screen MAX 123% MIN 45% SKIN AREA S.DTL B -3 ND1/16 A AE+1 9dB 1/10000 -2 dB Audio Level Meter Memo: ● Set [Audio Limiter] in the [Main Menu]B[Record Set]B[Audio Set] menu to AOnB to activate the audio limiter in the Manual Adjustment Mode. This controls the recording level when excessive audio signals are input. (A Page 72) ● For the reference level to be recorded on SDHC cards, set [Audio Ref. Level] in the [Main Menu]B[Record Set]B[Audio Set] menu to A-20dBB or A-12dBB. (common for CH-1, CH-2) (A Page 72) 44
-
 1
1 -
2
-
3
-
4
-
5
-
6
-
7
-
8
-
9
-
10
-
11
-
12
-
13
-
14
-
15
-
16
-
17
-
18
-
19
-
20
-
21
-
22
-
23
-
24
-
25
-
26
-
27
-
28
-
29
-
30
-
31
-
32
-
33
-
34
-
35
-
36
-
37
-
38
-
39
-
40
-
41
-
42
-
 43
43 -
 44
44 -
 45
45 -
 46
46 -
 47
47 -
 48
48 -
 49
49 -
 50
50 -
 51
51 -
 52
52 -
 53
53 -
54
-
55
-
56
-
57
-
58
-
59
-
60
-
61
-
62
-
63
-
64
-
65
-
66
-
67
-
68
-
69
-
70
-
71
-
72
-
73
-
74
-
75
-
76
-
77
-
78
-
79
-
80
-
81
-
82
-
83
-
84
-
85
-
86
-
87
-
88
-
89
-
90
-
91
-
92
-
93
-
94
-
95
-
96
-
97
-
98
-
99
-
100
-
101
-
102
-
103
-
104
-
105
-
106
-
107
-
108
-
109
-
110
-
111
-
112
-
113
-
114
-
115
-
116
-
117
-
118
-
119
-
120
-
121
-
122
-
123
-
124
-
125
-
126
-
127
-
128
-
129
-
130
-
131
-
132
 |
 |