JVC GY-HM700UXT 132 page operation manual for the GY-HM700 solid state camcord - Page 49
Audio Monitor During Recording, Set [Main Menu]
 |
View all JVC GY-HM700UXT manuals
Add to My Manuals
Save this manual to your list of manuals |
Page 49 highlights
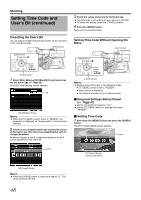
Note: ● When the [FULL AUTO] switch on the camera recorder is set to AONB, the recording level cannot be adjusted with the [AUDIO LEVEL CH-1/CH-2] adjustment knob. Ⅵ Automatic Adjustment Mode Set the [AUDIO SELECT CH-1/CH-2] switch on the camera recorder to AAUTOB or the [FULL AUTO] switch to AONB to enter Automatic Adjustment Mode. The audio recording level is set automatically according to the input level. When the [FULL AUTO] switch is set to AONB, mode switching with the [AUDIO SELECT CH-1/CH-2] switch is disabled. Memo: ● When [Audio] in the [Camera Function]B[FULL AUTO] menu is set to ASW SetB, you can switch the recording level mode with the [AUDIO SELECT CH-1/CH-2] switch on the camera recorder even if the [FULL AUTO] switch is set to AONB. (A Page 75) Ⅵ Using Stereo Type Earphone Jack When a stereo type earphone jack is connected, perform the following setting to output stereo sound. 1 Set the [MONITOR SELECT] switch to ABOTHB. 2 Set [Main Menu]B[A/V Out]B[Audio Monitor] to AStereoB. (A Page 87) Only audio from [CH-1] is output through the monitor speaker. Memo: ● You can set the volume of the alarm tone with [Alarm Level] in the [Main Menu]B[Others] menu. (AOffB/ALowB/ AMiddleB/AHighB) (A Page 87) Audio Monitor During Recording You can check the input audio with the monitor speaker or earphones. 1 Select the channel to monitor with the [MONITOR SELECT] switch. [CH-1] [BOTH] [CH-2] Outputs audio from [INPUT1] terminal. Mixes and outputs audio from both [INPUT1/INPUT2] terminals. Outputs audio from [INPUT2] terminal. 2 Adjust the volume of the monitor audio with the [MONITOR] adjustment knob. Monitor Speaker [PHONES] Terminal [MONITOR] Adjustment Knob [MONITOR SELECT] Switch Memo: ● Alarm tone is output when there is an abnormality in the camera recorder. Alarm tone is also output when the SDHC card is full or when the battery is low. (A Page 123) ● Alarm tone is not output during recording. Note: ● Increasing the volume of the monitor too much may result in howling of the camera microphone. 45
-
 1
1 -
2
-
3
-
4
-
5
-
6
-
7
-
8
-
9
-
10
-
11
-
12
-
13
-
14
-
15
-
16
-
17
-
18
-
19
-
20
-
21
-
22
-
23
-
24
-
25
-
26
-
27
-
28
-
29
-
30
-
31
-
32
-
33
-
34
-
35
-
36
-
37
-
38
-
39
-
40
-
41
-
42
-
43
-
 44
44 -
 45
45 -
 46
46 -
 47
47 -
 48
48 -
 49
49 -
 50
50 -
 51
51 -
 52
52 -
 53
53 -
 54
54 -
55
-
56
-
57
-
58
-
59
-
60
-
61
-
62
-
63
-
64
-
65
-
66
-
67
-
68
-
69
-
70
-
71
-
72
-
73
-
74
-
75
-
76
-
77
-
78
-
79
-
80
-
81
-
82
-
83
-
84
-
85
-
86
-
87
-
88
-
89
-
90
-
91
-
92
-
93
-
94
-
95
-
96
-
97
-
98
-
99
-
100
-
101
-
102
-
103
-
104
-
105
-
106
-
107
-
108
-
109
-
110
-
111
-
112
-
113
-
114
-
115
-
116
-
117
-
118
-
119
-
120
-
121
-
122
-
123
-
124
-
125
-
126
-
127
-
128
-
129
-
130
-
131
-
132
 |
 |
