Konica Minolta Kodak i780 Image Processing Guide - Page 42
Creating multiple images for each side of a document, Sides: Both: Black and White 1-bit
 |
View all Konica Minolta Kodak i780 manuals
Add to My Manuals
Save this manual to your list of manuals |
Page 42 highlights
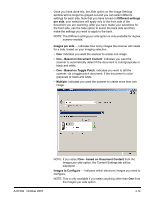
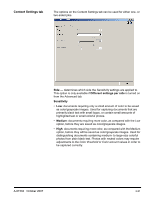
Creating multiple images for each side of a document In this example, let's assume you want to configure a scan session that has documents with information on both sides and you want the scanner to produce both a color and a black and white image for each side of each document. 1. Select a Setting Shortcut from the main Kodak Scanner window that closely describes your desired output. 2. Select Settings to display the Image Settings window. 3. Select the Advanced Image Setup icon on the Image Settings window to display the Advanced tab. 4. Select Input document is: Two Sided. 5. Select Images per side: Multiple. NOTE: The Images to Configure area will now be displayed on the Advanced tab and will contain a color image item and a black and white image item. The Content Settings tab will also be displayed. 6. If you want a grayscale image instead of a color image, when enough color is detected in the document: • make sure Color (24-bit) is selected • select Change to display a list of options • select Grayscale 7. By default the scanner will produce the color/grayscale image first and deliver it to the scanning application, then it will produce and deliver the black and white image. If you want the black and white image to be produced and delivered first: • make sure Black and White (1-bit) is selected • select Move up to place the black and white image first in the list 8. Select Done to return to the Image Settings window. NOTE: You will notice that the Side option now has two entries: Both: Color (24-bit) and Both: Black and White (1-bit). 9. Select Sides: Both: Color (24-bit). Make any other adjustments to the color image settings on the rest of the tabs on the Image Settings window. 10. Select Sides: Both: Black and White (1-bit). Make any other adjustments to the black and white image settings on the rest of the tabs on the Image Settings window. 11. When finished, select Home to return to the main Kodak Scanner window and then select Save to save your selections to the shortcut. 3-24 A-61504 October 2007
-
 1
1 -
2
-
3
-
4
-
5
-
6
-
7
-
8
-
9
-
10
-
11
-
12
-
13
-
14
-
15
-
16
-
17
-
18
-
19
-
20
-
21
-
22
-
23
-
24
-
25
-
26
-
27
-
28
-
29
-
30
-
31
-
32
-
33
-
34
-
35
-
36
-
 37
37 -
 38
38 -
 39
39 -
 40
40 -
 41
41 -
 42
42 -
 43
43 -
 44
44 -
 45
45 -
 46
46 -
 47
47 -
48
-
49
-
50
-
51
-
52
-
53
-
54
-
55
-
56
-
57
-
58
-
59
-
60
-
61
-
62
-
63
-
64
-
65
-
66
-
67
-
68
-
69
-
70
-
71
-
72
-
73
-
74
-
75
-
76
-
77
-
78
-
79
-
80
-
81
-
82
-
83
-
84
-
85
 |
 |
