Konica Minolta bizhub C3350 bizhub C3850/C3350 Applied Functions User Guide - Page 96
Select [Enable] to enable F-Code TX. Also enter [SUB Address] and [Pass, 2-Sided Binding Direc
 |
View all Konica Minolta bizhub C3350 manuals
Add to My Manuals
Save this manual to your list of manuals |
Page 96 highlights
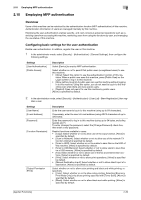
2.9 Registering a destination 2 Settings [Monotone] [Separate Scan] [Density] [Background Removal] [Sharpness] [Scan Size] [E-mail Notification] [Original Direction] [2-Sided Binding Direction] [Special Original] [Timer TX] [Password TX] [F-Code] Description Select whether or not to scan in gray scale or in black and white when an original is scanned in black and white. [Grayscale] is specified by default. When there are too many original sheets that cannot be loaded into the ADF at the same time, if you want to load them in several batches and handle them as one job, select [On]. [Off] is specified by default. Adjust the density (Dark or Light) to scan the original. [0] is specified by default. Adjust the density of the background area when printing originals with colored background (newspaper, recycled paper, etc.) or originals that are so thin that text or images on the back would be scanned. [0] is specified by default. Sharpen the edges of images to improve legibility. Smoothen the rough contours of images or sharpen blurred images. [0] is specified by default. Specify the size of the original. Select [On] to use the E-mail notification function. Also, enter the destination E-mail address. [Off] is specified by default. When scanning a double-sided original, you can specify the original loading direction so that the vertical direction is set correctly after scanning. [Left] is specified by default. Select the biding position of original when scanning both sides of the original. [Auto] is specified by default. Select [Long Original] to scan a long original. [Normal] is specified by default. To set a time to start fax transmission, select [On]. Also, specify when to start fax transmission. [Off] is specified by default. To send fax with a password to a destination for which fax destinations are restricted by passwords (Closed Network RX enabled), select [On]. Also, enter the password. [Off] is specified by default. Select [Enable] to enable F-Code TX. Also enter [SUB Address] and [Password]. [Disable] is specified by default. [Applied Functions] 2-29
-
 1
1 -
2
-
3
-
4
-
5
-
6
-
7
-
8
-
9
-
10
-
11
-
12
-
13
-
14
-
15
-
16
-
17
-
18
-
19
-
20
-
21
-
22
-
23
-
24
-
25
-
26
-
27
-
28
-
29
-
30
-
31
-
32
-
33
-
34
-
35
-
36
-
37
-
38
-
39
-
40
-
41
-
42
-
43
-
44
-
45
-
46
-
47
-
48
-
49
-
50
-
51
-
52
-
53
-
54
-
55
-
56
-
57
-
58
-
59
-
60
-
61
-
62
-
63
-
64
-
65
-
66
-
67
-
68
-
69
-
70
-
71
-
72
-
73
-
74
-
75
-
76
-
77
-
78
-
79
-
80
-
81
-
82
-
83
-
84
-
85
-
86
-
87
-
88
-
89
-
90
-
 91
91 -
 92
92 -
 93
93 -
 94
94 -
 95
95 -
 96
96 -
 97
97 -
 98
98 -
 99
99 -
 100
100 -
 101
101 -
102
-
103
-
104
-
105
-
106
-
107
-
108
-
109
-
110
-
111
-
112
-
113
-
114
-
115
-
116
-
117
-
118
-
119
-
120
-
121
-
122
-
123
-
124
-
125
-
126
-
127
-
128
-
129
-
130
-
131
-
132
-
133
-
134
-
135
-
136
-
137
-
138
-
139
-
140
-
141
-
142
-
143
-
144
-
145
-
146
-
147
-
148
 |
 |
