Kyocera TASKalfa 181 181/221 Operation Guide Rev-2 - Page 106
Printing Private Print/Stored Job, Deleting Private Print/Stored Job
 |
View all Kyocera TASKalfa 181 manuals
Add to My Manuals
Save this manual to your list of manuals |
Page 106 highlights
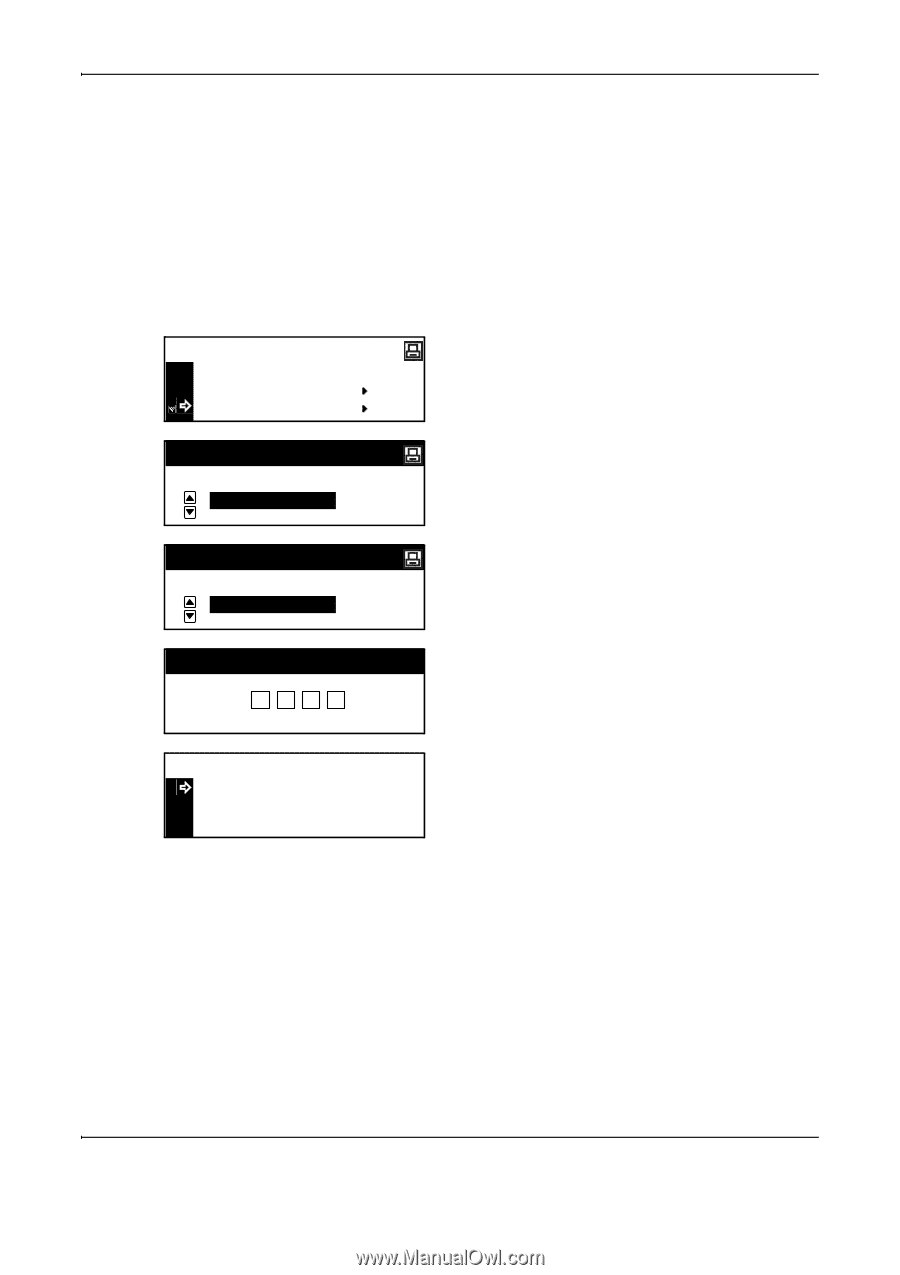
Printing Functions Printing Private Print/Stored Job In private printing, you can execute printing by using the operation panel to input the four-digit access code that has been set with the printer driver when printing from your computer. The data is cleared after printing is complete. In the stored job mode, print data can be stored in the hard disk without access codes after printing is complete. For the method of setting the respective functions with the printer driver, refer to the KX Printer Driver Operation Guide. 1 Display the e-MPS screen. (See How to Display the e-MPS Screen on page 5-4.) e-MPS Back Quick Copy Private/Stored 2 Press U or V to select Private/Stored, and then press the Enter key. Select User Name tom Select JOB List List Enter User ID Select User Name Copies : 001 Delete 3 Press U or V to select the user name, and then press the Enter key. The user name is the name that has been set with the printer driver. 4 Press U or V to select the desired job name, and then press the Enter key. The job name is the name that has been set with the printer driver. 5 Enter the four-digit access code using the numeric key, and then press the Enter key. The access code has been set with the printer driver. 6 Enter the number of copies using the numeric key, and then press the Enter key. Printing starts. Deleting Private Print/Stored Job Each stored job can be deleted manually as shown below. Jobs stored with the private print function are deleted automatically when printing is complete or the power of this machine is turned off. Jobs stored with the stored job function, however, are not deleted. 1 Select the job to delete referring to steps 1 to 4 of Printing Private Print/Stored Job. 5-6 OPERATION GUIDE
-
 1
1 -
2
-
3
-
4
-
5
-
6
-
7
-
8
-
9
-
10
-
11
-
12
-
13
-
14
-
15
-
16
-
17
-
18
-
19
-
20
-
21
-
22
-
23
-
24
-
25
-
26
-
27
-
28
-
29
-
30
-
31
-
32
-
33
-
34
-
35
-
36
-
37
-
38
-
39
-
40
-
41
-
42
-
43
-
44
-
45
-
46
-
47
-
48
-
49
-
50
-
51
-
52
-
53
-
54
-
55
-
56
-
57
-
58
-
59
-
60
-
61
-
62
-
63
-
64
-
65
-
66
-
67
-
68
-
69
-
70
-
71
-
72
-
73
-
74
-
75
-
76
-
77
-
78
-
79
-
80
-
81
-
82
-
83
-
84
-
85
-
86
-
87
-
88
-
89
-
90
-
91
-
92
-
93
-
94
-
95
-
96
-
97
-
98
-
99
-
100
-
 101
101 -
 102
102 -
 103
103 -
 104
104 -
 105
105 -
 106
106 -
 107
107 -
 108
108 -
 109
109 -
 110
110 -
 111
111 -
112
-
113
-
114
-
115
-
116
-
117
-
118
-
119
-
120
-
121
-
122
-
123
-
124
-
125
-
126
-
127
-
128
-
129
-
130
-
131
-
132
-
133
-
134
-
135
-
136
-
137
-
138
-
139
-
140
-
141
-
142
-
143
-
144
-
145
-
146
-
147
-
148
-
149
-
150
-
151
-
152
-
153
-
154
-
155
-
156
-
157
-
158
-
159
-
160
-
161
-
162
-
163
-
164
-
165
-
166
-
167
-
168
-
169
-
170
-
171
-
172
-
173
-
174
-
175
-
176
-
177
-
178
-
179
-
180
-
181
-
182
-
183
-
184
-
185
-
186
-
187
-
188
-
189
-
190
-
191
-
192
-
193
-
194
-
195
-
196
-
197
-
198
-
199
-
200
-
201
-
202
-
203
-
204
-
205
-
206
-
207
-
208
-
209
-
210
-
211
-
212
-
213
-
214
-
215
-
216
-
217
-
218
-
219
-
220
-
221
-
222
-
223
-
224
-
225
-
226
-
227
-
228
-
229
-
230
-
231
-
232
-
233
-
234
-
235
-
236
-
237
-
238
-
239
-
240
-
241
-
242
-
243
-
244
-
245
-
246
-
247
-
248
-
249
-
250
-
251
-
252
-
253
-
254
-
255
-
256
-
257
-
258
-
259
-
260
-
261
-
262
-
263
-
264
-
265
-
266
-
267
-
268
-
269
-
270
-
271
-
272
-
273
-
274
-
275
-
276
 |
 |