Kyocera TASKalfa 181 181/221 Operation Guide Rev-2 - Page 113
Enter, IP Address, This machine supports DHCP Dynamic Host Configuration Protocol. When using DHCP
 |
View all Kyocera TASKalfa 181 manuals
Add to My Manuals
Save this manual to your list of manuals |
Page 113 highlights
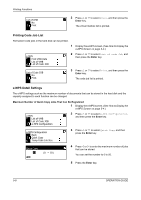
Printing Functions Interface Back Network USB Network Setting Back NetWare TCP/IP TCP/IP Back On Off 2 Press U or V to select Network, and then press the Enter key. 3 Press U or V to select TCP/IP, and then press the Enter key. 4 Press U or V to select On, and then press the Enter key. 5 DHCP This machine supports DHCP (Dynamic Host Configuration Protocol). When using DHCP, turn DHCP On. 1 Display the TCP/IP screen referring to steps 1 to 5 of TCP/IP setting. TCP/IP On Off Change # 2 Press U or V to select Change #, and then press the Enter key. TCP/IP Setting Back DHCP IP Address 3 Press U or V to select DHCP, and then press the Enter key. DHCP Back On Off 4 Press U or V to select On, and then press the Enter key. IP Address Register the IP address of this machine. NOTE: The IP address that should be registered here differs depending upon your network environment. Check with your network administrator before performing this setting. If you use the following procedure to manually register the IP address, be sure to turn the DHCP setting Off and the TCP/IP setting On. 1 Display the TCP/IP screen referring to steps 1 to 3 of TCP/IP setting. OPERATION GUIDE 5-13
-
 1
1 -
2
-
3
-
4
-
5
-
6
-
7
-
8
-
9
-
10
-
11
-
12
-
13
-
14
-
15
-
16
-
17
-
18
-
19
-
20
-
21
-
22
-
23
-
24
-
25
-
26
-
27
-
28
-
29
-
30
-
31
-
32
-
33
-
34
-
35
-
36
-
37
-
38
-
39
-
40
-
41
-
42
-
43
-
44
-
45
-
46
-
47
-
48
-
49
-
50
-
51
-
52
-
53
-
54
-
55
-
56
-
57
-
58
-
59
-
60
-
61
-
62
-
63
-
64
-
65
-
66
-
67
-
68
-
69
-
70
-
71
-
72
-
73
-
74
-
75
-
76
-
77
-
78
-
79
-
80
-
81
-
82
-
83
-
84
-
85
-
86
-
87
-
88
-
89
-
90
-
91
-
92
-
93
-
94
-
95
-
96
-
97
-
98
-
99
-
100
-
101
-
102
-
103
-
104
-
105
-
106
-
107
-
 108
108 -
 109
109 -
 110
110 -
 111
111 -
 112
112 -
 113
113 -
 114
114 -
 115
115 -
 116
116 -
 117
117 -
 118
118 -
119
-
120
-
121
-
122
-
123
-
124
-
125
-
126
-
127
-
128
-
129
-
130
-
131
-
132
-
133
-
134
-
135
-
136
-
137
-
138
-
139
-
140
-
141
-
142
-
143
-
144
-
145
-
146
-
147
-
148
-
149
-
150
-
151
-
152
-
153
-
154
-
155
-
156
-
157
-
158
-
159
-
160
-
161
-
162
-
163
-
164
-
165
-
166
-
167
-
168
-
169
-
170
-
171
-
172
-
173
-
174
-
175
-
176
-
177
-
178
-
179
-
180
-
181
-
182
-
183
-
184
-
185
-
186
-
187
-
188
-
189
-
190
-
191
-
192
-
193
-
194
-
195
-
196
-
197
-
198
-
199
-
200
-
201
-
202
-
203
-
204
-
205
-
206
-
207
-
208
-
209
-
210
-
211
-
212
-
213
-
214
-
215
-
216
-
217
-
218
-
219
-
220
-
221
-
222
-
223
-
224
-
225
-
226
-
227
-
228
-
229
-
230
-
231
-
232
-
233
-
234
-
235
-
236
-
237
-
238
-
239
-
240
-
241
-
242
-
243
-
244
-
245
-
246
-
247
-
248
-
249
-
250
-
251
-
252
-
253
-
254
-
255
-
256
-
257
-
258
-
259
-
260
-
261
-
262
-
263
-
264
-
265
-
266
-
267
-
268
-
269
-
270
-
271
-
272
-
273
-
274
-
275
-
276
 |
 |
