LG 40LV570H INSTALLATION - Page 48
IP Environment Setup Cont.
 |
View all LG 40LV570H manuals
Add to My Manuals
Save this manual to your list of manuals |
Page 48 highlights
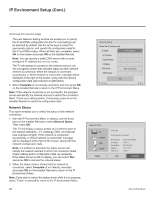
IP Environment Setup (Cont.) (Continued from previous page) The next Network Setting window will enable you to specify the IP and DNS configuration for this TV. Auto settings will be selected by default. Use the arrow keys to select the appropriate options, and specify the configuration data for the IP and DNS modes. When all fields are completed, select OK on the screen and press OK on the Installer Remote. Note: You can specify a static DNS server with an autoconfigured IP address but not vice versa. The TV will attempt to connect to the network and you will see a progress screen that indicates status as each network element is confirmed. When the network is connected successfully, a "Wired network is connected" message will be displayed at the right of the screen, along with the network configuration data (see example at right below). 5. Select Complete (if not already selected), and then press OK on the Installer Remote to return to the IP Environment Menu. Note: If the network connection is not successful, the progress screen will identify the network element in which the connection failed. Check your cabling and/or, if necessary, press on the Installer Remote to verify the configuration data. Network Status This option enables you to check the status of the network connection. 1. With the IP Environment Menu on display, use the arrow keys on the Installer Remote to select Network Status. Then, press OK. The TV will display a status screen as it confirms each of the network elements-TV, Gateway, DNS, and Internet (see example at right). If the network is connected successfully, a "Wired network is connected" message will be displayed at the right of the screen, along with the network configuration data. Note: If a problem is detected, the status screen will identify the network element in which the connection failed. Check cabling and/or configuration data, as necessary. If the status screen is still on display, you can select Test and press OK to recheck the network status. 2. When the status screen shows that the network is connected, select Complete (if not already selected) and press OK on the Installer Remote to return to the IP Environment Menu. Note: If you wish to cancel the status check while it is in progress, select "Close" or press to return to the IP Environment Menu. 48 Network Setting Select the IP setting mode. IP Mode IP Auto Setting • IP Address 0 . 0 . 0 . 0 • Subnet Mask 255 . 255 . 0 . 0 • Gateway 0 . 0 . 0 . 0 DNS Mode DNS Auto Setting • DNS Server 0 . 0 . 0 . 0 OK Previous Next Network Status TV Gateway DNS Internet Setting Auto mode Wired network is connected. MAC Address IP Address Subnet Mask Gateway DNS Server : 3C:CD:93:E5:78:8F : 10.2.3.4 : 255.255.255.0 : 10.10.10.10 : 10.5.6.7 Test Complete 206-4317 Draft A.2
-
 1
1 -
2
-
3
-
4
-
5
-
6
-
7
-
8
-
9
-
10
-
11
-
12
-
13
-
14
-
15
-
16
-
17
-
18
-
19
-
20
-
21
-
22
-
23
-
24
-
25
-
26
-
27
-
28
-
29
-
30
-
31
-
32
-
33
-
34
-
35
-
36
-
37
-
38
-
39
-
40
-
41
-
42
-
 43
43 -
 44
44 -
 45
45 -
 46
46 -
 47
47 -
 48
48 -
 49
49 -
 50
50 -
 51
51 -
 52
52 -
 53
53 -
54
-
55
-
56
-
57
-
58
-
59
-
60
-
61
-
62
-
63
-
64
-
65
-
66
-
67
-
68
-
69
-
70
-
71
-
72
-
73
 |
 |
