Lexmark MS310 User's Guide - Page 15
Using the Embedded Web Server
 |
View all Lexmark MS310 manuals
Add to My Manuals
Save this manual to your list of manuals |
Page 15 highlights
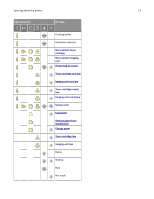
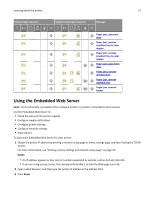
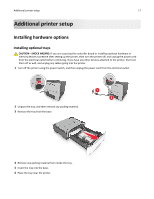
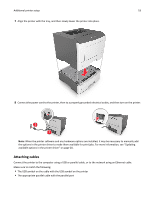
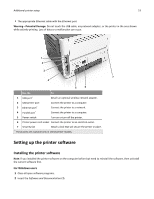
Learning about the printer 15 Primary light sequence Supplemental light sequence Message Paper jam, open rear door Paper jam, remove standard tray to clear duplex Paper jam, remove standard tray to clear duplex Paper jam, open front door Paper jam, remove standard tray Paper jam, remove optional tray Paper jam, manual feeder Using the Embedded Web Server Note: This functionality is available only in network printers or printers connected to print servers. Use the Embedded Web Server to: • Check the status of the printer supplies. • Configure supply notifications. • Configure printer settings. • Configure network settings. • View reports. To access the Embedded Web Server for your printer: 1 Obtain the printer IP address by printing a network setup page or menu settings page, and then finding the TCP/IP section. For more information, see "Printing a menu settings and network setup page" on page 26. Notes: • An IP address appears as four sets of numbers separated by periods, such as 123.123.123.123. • If you are using a proxy server, then temporarily disable it to load the Web page correctly. 2 Open a Web browser, and then type the printer IP address in the address field. 3 Press Enter.
-
 1
1 -
2
-
3
-
4
-
5
-
6
-
7
-
8
-
9
-
 10
10 -
 11
11 -
 12
12 -
 13
13 -
 14
14 -
 15
15 -
 16
16 -
 17
17 -
 18
18 -
 19
19 -
 20
20 -
21
-
22
-
23
-
24
-
25
-
26
-
27
-
28
-
29
-
30
-
31
-
32
-
33
-
34
-
35
-
36
-
37
-
38
-
39
-
40
-
41
-
42
-
43
-
44
-
45
-
46
-
47
-
48
-
49
-
50
-
51
-
52
-
53
-
54
-
55
-
56
-
57
-
58
-
59
-
60
-
61
-
62
-
63
-
64
-
65
-
66
-
67
-
68
-
69
-
70
-
71
-
72
-
73
-
74
-
75
-
76
-
77
-
78
-
79
-
80
-
81
-
82
-
83
-
84
-
85
-
86
-
87
-
88
-
89
-
90
-
91
-
92
-
93
-
94
-
95
-
96
-
97
-
98
-
99
-
100
-
101
-
102
-
103
-
104
-
105
-
106
-
107
-
108
-
109
-
110
-
111
-
112
-
113
-
114
-
115
-
116
-
117
-
118
-
119
-
120
-
121
-
122
-
123
-
124
-
125
-
126
-
127
-
128
-
129
-
130
-
131
-
132
-
133
-
134
-
135
-
136
-
137
-
138
-
139
-
140
-
141
-
142
-
143
-
144
-
145
-
146
-
147
-
148
-
149
-
150
-
151
-
152
-
153
-
154
-
155
-
156
-
157
-
158
-
159
-
160
-
161
-
162
-
163
-
164
-
165
-
166
-
167
-
168
-
169
-
170
-
171
-
172
-
173
-
174
-
175
-
176
-
177
-
178
-
179
-
180
-
181
-
182
-
183
-
184
-
185
-
186
-
187
-
188
-
189
-
190
-
191
-
192
-
193
-
194
-
195
-
196
-
197
-
198
-
199
-
200
-
201
-
202
-
203
-
204
-
205
 |
 |
