Lexmark MS818 Embedded Web Server Administrator s Guide - Page 10
Creating a scan profile
 |
View all Lexmark MS818 manuals
Add to My Manuals
Save this manual to your list of manuals |
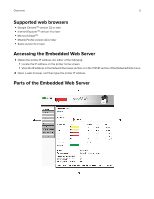
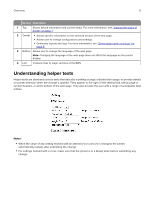
Page 10 highlights
Scanning 10 Scanning You can scan documents, photo, or other item directly from your printer to a network folder, an FTP server, or e-mail to a pre-defined recipient or group of recipients. You can also set default values through the Embedded Web Server for frequently used features and settings such as a scan profile, shortcuts, or SMTP server. Note: Scanning is supported only in a multifunction product. Creating a scan profile Notes: • Create a scan profile to save scanned documents to the computer. Once the profile is created, it cannot be changed. A new profile must be created to change or adjust the settings. • This feature is available only in some printer models. 1 From the Embedded Web Server, click Scan Profile > Create Scan Profile. 2 If you want to use a preconfigured template, then click the Quick Setup field and then make a selection. If not, then configure the following settings: • Format Type-Specify the file format for the scanned image. • JPEG Quality-Set the quality of a JPEG‑format image. • Compression-Set the format used to compress the scanned output file. • Content-Specify the original document type. • Darkness-Adjust the darkness of the scanned image. • Source-Specify how the original document was produced. • Color-Specify the color of the original document. • Resolution-Specify the resolution of the scan in dots per inch (dpi). Increasing the image resolution increases the file size and the time needed to scan your original document. Image resolution can be decreased to reduce the file size. • Original Size-Specify the size of the original document. • Orientation-Specify the orientation of the scanned document. • Duplex-Specify the orientation of the original documents loaded in the ADF for two-sided scanning. 3 If necessary, click PDF Settings, Advanced Imaging, and Color Balance, and then configure the settings. 4 Click Next. 5 Specify the scan location and file name. 6 Assign the user and scan names. 7 To use the profile for future use, enable Multiple use profile. Note: This feature also allows groups of scanned pages to be indexed by numbers. 8 Click Submit. 9 Take note of the shortcut number assigned to the profile.
-
 1
1 -
2
-
3
-
4
-
 5
5 -
 6
6 -
 7
7 -
 8
8 -
 9
9 -
 10
10 -
 11
11 -
 12
12 -
 13
13 -
 14
14 -
 15
15 -
16
-
17
-
18
-
19
-
20
-
21
-
22
-
23
-
24
-
25
-
26
-
27
-
28
-
29
-
30
-
31
-
32
-
33
-
34
-
35
-
36
-
37
-
38
-
39
-
40
-
41
-
42
-
43
-
44
-
45
-
46
-
47
-
48
-
49
-
50
-
51
-
52
-
53
-
54
-
55
-
56
-
57
-
58
-
59
-
60
-
61
-
62
-
63
-
64
-
65
-
66
-
67
-
68
-
69
-
70
-
71
-
72
-
73
-
74
-
75
-
76
-
77
-
78
-
79
-
80
-
81
-
82
-
83
-
84
-
85
-
86
-
87
-
88
-
89
-
90
-
91
-
92
-
93
-
94
-
95
-
96
-
97
-
98
 |
 |
