Lexmark MS818 Embedded Web Server Administrator s Guide - Page 52
Enabling and disabling USB host ports
 |
View all Lexmark MS818 manuals
Add to My Manuals
Save this manual to your list of manuals |
Page 52 highlights
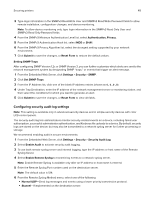
Securing printers 52 Many organizations establish login restrictions for information assets such as workstations and servers. Make sure that device login restrictions also comply with organizational security policies. 1 From the Embedded Web Server, click Settings > Security > Miscellaneous Security Settings > Login Restrictions. 2 Enter the appropriate login restrictions: • Login failures-Specify the number of times a user can attempt login before being locked out. • Failure time frame-Specify how long before lockout takes place. • Lockout time-Specify how long the lockout lasts. • Panel Login Timeout-Specify how long a user may be logged in before being automatically logged out. • Remote Login Timeout-Specify how long a user may be logged in remotely before being automatically logged out. 3 Click Submit. Enabling and disabling USB host ports Note: This setting is available only in some printer models. USB host ports on devices do the following: • Detect and display the files that are stored in the inserted USB mass storage devices, such as a flash drive. • Print a supported file from the flash drive or initiate a firmware update. • Scan data directly into the flash drive. • Access can be restricted or permitted depending on the schedule. In secure environments, devices can be configured to limit these operations, or not to allow them at all. Device administrators can disable the front USB port during setup using access control restrictions. Devices have a rear USB host port designed for card readers and HID devices, such as a keyboard. To restrict access to the front USB port, apply a security template to the appropriate access control. For more information, see "Using a security template to control function access" on page 32. To set the schedule that restricts access at a specified time, do the following: 1 From the Embedded Web Server, click Settings > Security > Schedule USB Devices. 2 From the Disable Devices menu, select Printing from any USB device or Printing from flash drives only. Note: All scheduled Disable actions are affected by this setting. 3 Click Submit. 4 Enable or disable the use of USB devices on certain days or during certain hours. To create a schedule: a Select a device action, and then set the time and day for the device to perform the action. b Add the entry. Notes: • Use of USB devices is enabled by default. • For each Disable schedule entry, create an Enable schedule entry to reactivate use of the USB devices.
-
 1
1 -
2
-
3
-
4
-
5
-
6
-
7
-
8
-
9
-
10
-
11
-
12
-
13
-
14
-
15
-
16
-
17
-
18
-
19
-
20
-
21
-
22
-
23
-
24
-
25
-
26
-
27
-
28
-
29
-
30
-
31
-
32
-
33
-
34
-
35
-
36
-
37
-
38
-
39
-
40
-
41
-
42
-
43
-
44
-
45
-
46
-
 47
47 -
 48
48 -
 49
49 -
 50
50 -
 51
51 -
 52
52 -
 53
53 -
 54
54 -
 55
55 -
 56
56 -
 57
57 -
58
-
59
-
60
-
61
-
62
-
63
-
64
-
65
-
66
-
67
-
68
-
69
-
70
-
71
-
72
-
73
-
74
-
75
-
76
-
77
-
78
-
79
-
80
-
81
-
82
-
83
-
84
-
85
-
86
-
87
-
88
-
89
-
90
-
91
-
92
-
93
-
94
-
95
-
96
-
97
-
98
 |
 |
