Lexmark Prestige Pro800 SmartSolutions User's Guide
Lexmark Prestige Pro800 Manual
 |
View all Lexmark Prestige Pro800 manuals
Add to My Manuals
Save this manual to your list of manuals |
Lexmark Prestige Pro800 manual content summary:
- Lexmark Prestige Pro800 | SmartSolutions User's Guide - Page 1
SmartSolutions User's Guide September 2009 www.lexmark.com - Lexmark Prestige Pro800 | SmartSolutions User's Guide - Page 2
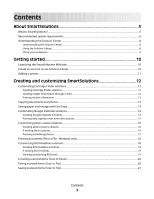
account to use Solution Center...10 Adding a printer...11 Creating and customizing SmartSolutions 12 Customizing Cartridge 18 Creating RSS Headlines solutions ...18 E-mailing RSS feed links...19 Viewing and printing RSS feeds ...19 E-mailing scanned items (Scan to Email)...20 Faxing scanned items - Lexmark Prestige Pro800 | SmartSolutions User's Guide - Page 3
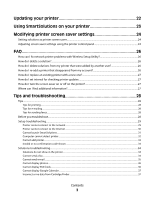
find additional information?...27 Tips and troubleshooting 28 Tips...28 Tips for printing...28 Tips for e-mailing ...28 Tips for sending faxes...28 Before you troubleshoot...28 Setup troubleshooting...29 Printer cannot connect to the network ...29 Printer cannot connect to the Internet...30 Cannot - Lexmark Prestige Pro800 | SmartSolutions User's Guide - Page 4
Printer solutions not updated...37 Index 49 Contents 4 - Lexmark Prestige Pro800 | SmartSolutions User's Guide - Page 5
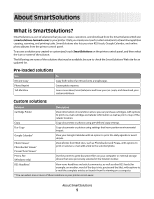
can create, customize, and download from the SmartSolutions Web site (smartsolutions.lexmark.com) to your printer. It lets you create one-touch custom solutions to streamline repetitive copying, scanning, and printing tasks. SmartSolutions also lets you view RSS feeds, Google Calendar, and online - Lexmark Prestige Pro800 | SmartSolutions User's Guide - Page 6
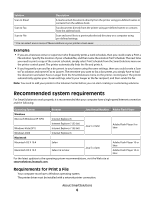
later For the latest updates to the operating system recommendations, visit the Web site at smartsolutions.lexmark.com. Requirements for Print a File Your computer must have a Windows operating system. The printer driver must be installed with a network printer connection. About SmartSolutions 6 - Lexmark Prestige Pro800 | SmartSolutions User's Guide - Page 7
as the computer. Requirement for launching a browser from the printer The printer driver must be installed with a network printer connection. Software downloads Visit these Web sites to download compatible versions of the supported software applications or browsers: • Internet Explorer: http://www - Lexmark Prestige Pro800 | SmartSolutions User's Guide - Page 8
view more solutions, click the up and down arrows. Notes: • If you have multiple printers on your SmartSolutions account, the solution will be added to the selected printer. • You can add up to 75 solutions to a printer. For more information on how to create and customize solutions, see the solution - Lexmark Prestige Pro800 | SmartSolutions User's Guide - Page 9
Your workspace contains the different solutions that you have customized for each printer. From your workspace, you can do the following: • View, on page 12. • Change the order in which the solutions appear on the printer control panel. Click and drag the solution icon to where you want to move - Lexmark Prestige Pro800 | SmartSolutions User's Guide - Page 10
software is installed. 1 Open the printer program folder: For Windows users a Click or Start. b Click All Programs or Programs, and then select the printer program folder from the list. For Macintosh users From the Finder desktop, double-click the printer program folder. 2 Click Visit Lexmark - Lexmark Prestige Pro800 | SmartSolutions User's Guide - Page 11
log in to the SmartSolutions Web site, then you will be prompted to create an account. 3 Click the Solution Center tab. 4 At the bottom of the screen, click Add Printer. 5 Follow the instructions to add your printer. Notes: • You only need to add your printer once. The next time you log in and use - Lexmark Prestige Pro800 | SmartSolutions User's Guide - Page 12
can view and search for information on retailers that carry your ink cartridges. 1 From the Solution Library, double-click the Cartridge the update is taking place. The printer control panel will indicate that the solutions have been sent to the printer. Sending retailer information through e-mail - Lexmark Prestige Pro800 | SmartSolutions User's Guide - Page 13
Printing retailer information Note: Make sure to enter your ZIP code and country when customizing the Cartridge Finder solution. 1 Load paper. 2 From the home screen of the printer control panel, touch SmartSolutions. 3 Touch Cartridge Finder. The printer will display a list of retailers selling - Lexmark Prestige Pro800 | SmartSolutions User's Guide - Page 14
the number of copies you want to print or select Prompt at touch screen if you want to be prompted from the printer control panel. 6 Click More Options is taking place. The printer control panel will indicate that the solutions have been sent to the printer. Customizing Google Calendar solutions - Lexmark Prestige Pro800 | SmartSolutions User's Guide - Page 15
. Note: Do not close the browser window while the update is taking place. The printer control panel will indicate that the solutions have been sent to the printer. Printing daily agendas with event descriptions 1 From the Solution Library, double-click on the Google Calendar icon. 2 Click More - Lexmark Prestige Pro800 | SmartSolutions User's Guide - Page 16
control panel will indicate that the solutions have been sent to the printer. E-mailing links to photos Notes: • To send photos from your Picasa or Photobucket Viewer, use the photo viewer solution specific to Picasa or Photobucket. • Only photos in JPEG format are supported. 1 From the Solution - Lexmark Prestige Pro800 | SmartSolutions User's Guide - Page 17
Touch . Printing and editing photos Note: Only photos in JPEG format are supported. 1 Load photo paper. 2 From the home screen of the printer control by light reflection. Auto Fix Enhance a photo automatically. Color Effects Select to print a photo in black and white, sepia, antique brown, - Lexmark Prestige Pro800 | SmartSolutions User's Guide - Page 18
of the printer software installed. 1 From the Solution Library, double-click the Print a File icon. 2 Type the name of your Print a File solution settings to your printer. Note: Do not close the browser window while the update is taking place. The printer control panel will indicate that the - Lexmark Prestige Pro800 | SmartSolutions User's Guide - Page 19
The printer control panel will indicate that the solutions have been sent to the printer. 7 From the home screen of the printer control panel . Viewing and printing RSS feeds 1 From the home screen of the printer control panel, touch SmartSolutions > RSS Headlines. The printer displays a list of - Lexmark Prestige Pro800 | SmartSolutions User's Guide - Page 20
color, and original size. 9 Click OK. 10 Click Save and Sync to send the solution settings to your printer. Note: Do not close the browser window while the update is taking place. The printer control panel will the printer Fax Getting Started Guide or the Faxing chapter of the printer User's Guide. 1 - Lexmark Prestige Pro800 | SmartSolutions User's Guide - Page 21
computer that has the Windows or Mac OS X version of the printer software installed. 1 From the Solution Library, double-click the Scan to File as quality, original size and color. Note: If Append Date is not selected, then the scan file on your computer will be overwritten each time the solution - Lexmark Prestige Pro800 | SmartSolutions User's Guide - Page 22
panel, check to see if the solutions have been sent to the printer. 3 If the solutions do not appear on the printer, manually update the printer from the printer control panel: a From the home screen of your printer control panel, touch SmartSolutions. b Touch More Options. c Touch Update Now. Note - Lexmark Prestige Pro800 | SmartSolutions User's Guide - Page 23
on, and at the Home screen. • You have saved the solutions you have created on the Solution Center, and sent them to your printer. 1 If using a copy or print solution, load paper. 2 If using a copy or scan solution, load an original document faceup into the ADF or facedown on the scanner glass - Lexmark Prestige Pro800 | SmartSolutions User's Guide - Page 24
the browser window while the update is taking place. The printer control panel will indicate that the solutions have been sent to the printer. Adjusting screen saver settings using the printer control panel The printer screen saver only supports solutions that display Web-based information on the - Lexmark Prestige Pro800 | SmartSolutions User's Guide - Page 25
Timeout. 3 Select your preferred time interval before the screen saver is initiated. Selecting Off will disable screen savers on your printer. 4 Touch Accept. Make the screen saver run longer than the printer's default Power Saver timeout: The screen saver runs for a number of minutes before the - Lexmark Prestige Pro800 | SmartSolutions User's Guide - Page 26
or Start. 2 Click All Programs or Programs, and then select the printer program folder from the list. 3 Click Printer Home. 4 Select your printer from the list. 5 From the Settings tab, click Wireless setup utility. 6 Follow the instructions on the computer screen. How do I delete a solution? 1 From - Lexmark Prestige Pro800 | SmartSolutions User's Guide - Page 27
The solutions you created on the existing printer will be copied to the newly-added printer. • Your current printer will be deleted from the Solution Center. How do I set interval for checking printer updates 1 On the Printers area, right-click the printer of your choice. 2 Click Advanced. 3 Select - Lexmark Prestige Pro800 | SmartSolutions User's Guide - Page 28
, adjust the paper guide on the ADF to the width of the original document. • When using the scanner glass, close the scanner lid to avoid dark edges on the scanned image. Before you troubleshoot Use this checklist to solve most SmartSolutions problems. Make sure: • Your printer and computer are each - Lexmark Prestige Pro800 | SmartSolutions User's Guide - Page 29
< < Setup troubleshooting Printer cannot connect to the network CHECK THE ETHERNET CONNECTION < < • Make sure that one end of the Ethernet cable is securely connected to the printer Ethernet port, and the other end to a network hub or wall connection. • Check the connectors on each end of the - Lexmark Prestige Pro800 | SmartSolutions User's Guide - Page 30
lit or is orange, try reconnecting to a wireless network. For more information, see the Network Getting Started Guide for instructions in setting up a wireless connection for the printer. Printer cannot connect to the Internet CHECK THE ETHERNET CONNECTION • Make sure that one end of the Ethernet - Lexmark Prestige Pro800 | SmartSolutions User's Guide - Page 31
PRINTER INSTALLED IN YOUR COMPUTER MAKE SURE ADOBE FLASH PLAYER 10 IS INSTALLED FOR YOUR BROWSER The SmartSolutions Web site needs an Adobe Flash Player plug-in to launch. CHECK THE ETHERNET CONNECTION • Make sure that one end of the Ethernet cable is securely connected to the printer printer - Lexmark Prestige Pro800 | SmartSolutions User's Guide - Page 32
network. For more information, see the Network Getting Started Guide for instructions in setting up a wireless connection for the printer. Computer cannot detect printer Connection problems prevent communication between the printer and computer. Make sure all connections are working properly - Lexmark Prestige Pro800 | SmartSolutions User's Guide - Page 33
page 44. CHECK THE USB CONNECTION Note: If the printer is only connected to the computer through a USB cable, you will need to connect it to a wired or wireless network Network Getting Started Guide for instructions in setting up a wireless connection for the printer. Tips and troubleshooting 33 - Lexmark Prestige Pro800 | SmartSolutions User's Guide - Page 34
the wall outlet, and then turn on the printer. 4 Click Cancel on the Add Printer Wizard. 5 Add your printer again. Solutions troubleshooting Solutions do not show in the printer MANUALLY UPDATE THE SOLUTIONS ON YOUR PRINTER Update the solutions on your printer from the Solution Center or from your - Lexmark Prestige Pro800 | SmartSolutions User's Guide - Page 35
fax machine does not support color fax, then this option automatically converts the outgoing color fax to black and printer is connected to an Ethernet or wireless network. Your network must be connected to the Internet for the printer to communicate with the SMTP server. Tips and troubleshooting - Lexmark Prestige Pro800 | SmartSolutions User's Guide - Page 36
THE SUPPORTED FILE SIZE Images that are too large are not displayed. ENTER AUTHENTICATION INFORMATION WHEN PROMPTED Enter your photo viewer username and password. Cannot display RSS feeds CHECK THE INTERNET CONNECTION Viewing RSS feeds requires a working Internet connection. CHECK THE PRINTER PROXY - Lexmark Prestige Pro800 | SmartSolutions User's Guide - Page 37
information. THE CARTRIDGE FINDER SOLUTION IS AVAILABLE ONLY IN SELECTED COUNTRIES Printer solutions not updated MANUALLY UPDATE THE SOLUTIONS ON YOUR PRINTER Update the solutions on your printer from the Solution Center or from your printer: • From the Solution Center, click Save and Sync to send - Lexmark Prestige Pro800 | SmartSolutions User's Guide - Page 38
may be connected in three ways: • USB • Ethernet • Wireless connection USB < Note: If the printer is only connected to the computer through a USB cable, you will need to connect it to a wired or wireless network with Internet connection. Run the Wireless Setup Utility For Windows users 1 Click - Lexmark Prestige Pro800 | SmartSolutions User's Guide - Page 39
connection 1 Uninstall the printer software. 2 Reinsert the software installation CD. 3 Follow the instructions on the installation dialog for setting up your printer on an Ethernet or wireless network. For more information, see the Network Getting Started Guide for instructions in setting up an - Lexmark Prestige Pro800 | SmartSolutions User's Guide - Page 40
mask are correct for your network. For more information, see the Network Getting Started Guide for instructions in setting up a wireless connection for the printer. How do I know which printer to select? Each printer detected on the network has its own unique IP address and MAC address. Select the - Lexmark Prestige Pro800 | SmartSolutions User's Guide - Page 41
of the printer is a series of letters and numbers. Other devices sometimes use a type of MAC address called Universally Administered Address (UAA). MAC: XX XX XX XX XX XX UAA: XX XX XX XX XX XX • From the printer control panel, navigate to Print Setup Page: > Network Setup > Print Setup Page - Lexmark Prestige Pro800 | SmartSolutions User's Guide - Page 42
powered on and at the home screen. When the printer is ready, click Back on the Add Printer Wizard, and then add the printer again. • Make sure all connections are working properly. Connection problems prevent communication between the printer and computer. How do I find SmartSolutions Setup? 1 From - Lexmark Prestige Pro800 | SmartSolutions User's Guide - Page 43
Reinsert the installation software CD or run the Wireless Setup Utility and configure the printer network settings printer you want to add. For more information, see "How do I know which printer to select?" on page 40. • When adding a printer manually: - It is recommended that you place the printer - Lexmark Prestige Pro800 | SmartSolutions User's Guide - Page 44
the abc.xyz.com:80 format, where abc.xyz.com is the HTTP proxy name, and 80 is the port number used. Contact your system support person for details on your network proxy server configuration. Using the Solution Center Printer Setup 44 - Lexmark Prestige Pro800 | SmartSolutions User's Guide - Page 45
browser uses manual proxy configuration, then you may copy the proxy settings from the Internet browser and enter it on the printer. 1 Open that will bypass the proxy server when accessing the Internet, then touch Bypass Proxy For, and then enter the addresses. Notes: • The printer supports static - Lexmark Prestige Pro800 | SmartSolutions User's Guide - Page 46
For more information, see the Network GettingStarted Guide for instructions in setting up a wireless connection for the printer. Should I disable the printer search? By default, the Add Printer Wizard searches for printers within your network through the printer search. However, you need to disable - Lexmark Prestige Pro800 | SmartSolutions User's Guide - Page 47
.lexmark.com. Software downloads Visit these Web sites to download compatible versions of the supported software applications and fax contact list, see the E-mailing chapter or the Faxing chapter of the printer User's Guide. • From the Contacts tab, select a name from the list to add that - Lexmark Prestige Pro800 | SmartSolutions User's Guide - Page 48
Notes: • You can enter up to 30 contacts for Scan to Email and Scan to Fax solutions. • You can enter only 1 contact for photo viewer and RSS Headlines solutions. Using the Solution Center Printer Setup 48 - Lexmark Prestige Pro800 | SmartSolutions User's Guide - Page 49
troubleshooting printing agendas with event descriptions 15 I ID Card Copy 5 informational solutions 5 interactive solutions 5 Internet connection checking 45 invalid or no confirmation code 34 K keypad does not show 42 L launching SmartSolutions using a Web browser 10 using the printer software - Lexmark Prestige Pro800 | SmartSolutions User's Guide - Page 50
connection Ethernet 38 USB 38 wireless 38 printer network settings solutions troubleshooting 26 printer not found 42 printer not showing number entry screen 42 printer solutions 5 adding a printer 11 using 23 printer solutions not updated 37 Printers 8 printing agenda or events from a calendar 15 - Lexmark Prestige Pro800 | SmartSolutions User's Guide - Page 51
Cartridge Finder 37 supported browsers 6, 47 supported operating systems 6, 47 T Tell Me More 5 tips for adding a printer successfully 43 e-mailing 28 printing 28 sending faxes 28 troubleshooting SmartSolutions 28 SmartSolutions problems 28 troubleshooting checklist 28 troubleshooting, e-mail cannot
-
 1
1 -
 2
2 -
 3
3 -
 4
4 -
 5
5 -
 6
6 -
 7
7 -
8
-
9
-
10
-
11
-
12
-
13
-
14
-
15
-
16
-
17
-
18
-
19
-
20
-
21
-
22
-
23
-
24
-
25
-
26
-
27
-
28
-
29
-
30
-
31
-
32
-
33
-
34
-
35
-
36
-
37
-
38
-
39
-
40
-
41
-
42
-
43
-
44
-
45
-
46
-
47
-
48
-
49
-
50
-
51
 |
 |

SmartSolutions User's Guide
September 2009
www.lexmark.com