Lexmark X925 Lexmark Document Distributor - Page 40
Profile buttons, eSF applications, Task 2 and e, Task 2+, SFP e, Import, Remove, Notes, Descriptor
 |
View all Lexmark X925 manuals
Add to My Manuals
Save this manual to your list of manuals |
Page 40 highlights
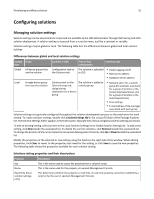
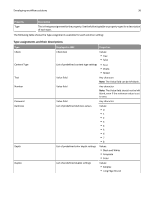
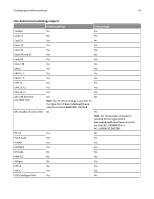
Developing workflow solutions 40 Profile buttons You can package profile buttons to appear on the home screen as part of the device policy for e‑Task and e‑Task 2 devices. When e‑Task or e‑Task 2 is selected in the Device Group list, the Profile Button(s) section appears. Additionally, when e‑Task 2 is selected, a selection appears for e‑Task 2 or e‑Task 2+ profile buttons, representing older and newer e‑Task 2 printers, respectively. You can determine which setting to use by matching the preview of the default image with the look of the existing buttons on the printer display. You can load separate images for Up Image, shown when the button is in its default state, and Down Image, shown while the user is pressing the button. If no Down Image is specified, the Up Image is used for both conditions. Note: File names of images used for the home screen cannot contain double‑byte characters. Images selected are resized to the following dimensions for each device class. For best results, resize or crop source images to the correct size before use. • e‑Task-120 x 80 pixels • e‑Task 2 and e‑Task 2+, SFP e‑Task 2+-120 x 75 pixels • e‑Task 3-172 x 254 pixels • X642-120 x 55 pixels eSF applications To associate an eSF application with the e‑Task 2 sub‑policy for a hybrid solution, click Import beside the eSF Applications list, and then locate an eSF application. Select the newly imported application in the list, and then make sure e‑Task2 is selected in the Device Group list. To remove a previously imported eSF application, select it from the list, and then click Remove. Note: File names of eSF applications used in a solution cannot contain double‑byte characters. To manage the settings associated with the eSF application and allow later configuration of the application in LMC, import and configure the descriptor file for the eSF application. Notes: • LDD cannot accept colons in XML tag names, which appear in some descriptor files for eSF applications. If you upload a solution with a descriptor file containing colons in tag names, then the Solutions tab and the eSF Configuration task for device groups will no longer function, and intervention from Lexmark Professional Services will be required to restore access. Before importing the descriptor file, open it in a text editor and remove any colons from tag names. For example, if the tag appears in the file, change it to . Make sure to change matching closing tags as well. • LDD can only manage eSF application settings for e‑Task 2+ printers. You must configure eSF application settings for e‑Task 2 and X642 printers using the Embedded Web Server on each printer after the application is deployed. 1 Select the eSF application from the eSF Application list. 2 Click Descriptor. 3 Locate the XML descriptor file for the eSF application. The file name should be the same as the file name of the eSF application, with an "xml" extension and "_desc" appended before the extension. 4 Click Open. 5 Select the eSF application from the eSF Application list.
-
 1
1 -
2
-
3
-
4
-
5
-
6
-
7
-
8
-
9
-
10
-
11
-
12
-
13
-
14
-
15
-
16
-
17
-
18
-
19
-
20
-
21
-
22
-
23
-
24
-
25
-
26
-
27
-
28
-
29
-
30
-
31
-
32
-
33
-
34
-
 35
35 -
 36
36 -
 37
37 -
 38
38 -
 39
39 -
 40
40 -
 41
41 -
 42
42 -
 43
43 -
 44
44 -
 45
45 -
46
-
47
-
48
-
49
-
50
-
51
-
52
-
53
-
54
-
55
-
56
-
57
-
58
-
59
-
60
-
61
-
62
-
63
-
64
-
65
-
66
-
67
-
68
-
69
-
70
-
71
-
72
-
73
-
74
-
75
-
76
-
77
-
78
-
79
-
80
-
81
-
82
 |
 |