Lexmark X925 Lexmark Document Distributor - Page 41
Managing the Solution Status Enable Status
 |
View all Lexmark X925 manuals
Add to My Manuals
Save this manual to your list of manuals |
Page 41 highlights
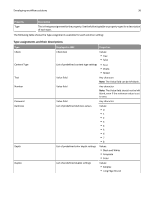
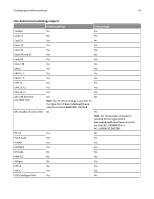
Developing workflow solutions 41 6 Click the eSF Descriptor Editor tab at the bottom of the Device Policy Editor. 7 Modify the settings as necessary, and then click Save. Managing the Solution Status Page The Solution Status Page can optionally be used to provide simple and easy-to-use access to status information for the server system where the solution is running and the printers in the device groups to which the solution is deployed. The Solution Status Page is ideal for users with a basic setup who are not experienced with LMC. Additionally, new printers and licenses can be added, and a single Fix button can fix many common problems. The Solution Status Page is particularly suited to less experienced users. Note: The Solution Status Page can be enabled only for solutions designed for device groups. To manage the Status Page associated with the solution, double‑click statusPage.properties in the src\conf\ folder of the project in the Package Explorer pane. The Status Page Editor appears in the Editor pane. Click Enable Status Page to enable the Status Page for the solution and show the additional Status Page settings. Two tabs are available at the bottom of the Status Page Editor to modify Status Page settings: • Status Page Editor-This provides access to the following basic settings of the Status Page: - Device Group Name-This is the Device Group for which the Status Page is used. - Background Image-This is the background image of the Status Page. - Logo Image-This is the logo image that appears beside the title of the Status Page. - Jobs Logo Image-This is the logo image that appears in the jobs section of the Status Page. • Status Page Properties-This provides access to all Status Page settings in the text‑based configuration file. In addition to the previously mentioned settings, most titles and message strings used on the Status Page can be customized. When a solution has been deployed with a Solution Status Page, the page can be accessed from your Web browser using the URL http://loadbalancer:9780/lmc/statuspage/?solutionName=, where loadbalancer is the computer where your load balancer and database are installed.
-
 1
1 -
2
-
3
-
4
-
5
-
6
-
7
-
8
-
9
-
10
-
11
-
12
-
13
-
14
-
15
-
16
-
17
-
18
-
19
-
20
-
21
-
22
-
23
-
24
-
25
-
26
-
27
-
28
-
29
-
30
-
31
-
32
-
33
-
34
-
35
-
 36
36 -
 37
37 -
 38
38 -
 39
39 -
 40
40 -
 41
41 -
 42
42 -
 43
43 -
 44
44 -
 45
45 -
 46
46 -
47
-
48
-
49
-
50
-
51
-
52
-
53
-
54
-
55
-
56
-
57
-
58
-
59
-
60
-
61
-
62
-
63
-
64
-
65
-
66
-
67
-
68
-
69
-
70
-
71
-
72
-
73
-
74
-
75
-
76
-
77
-
78
-
79
-
80
-
81
-
82
 |
 |
